240sx Convertible Interior Components And Restoration Techniques
The Nissan 240SX convertible, produced for a limited run from 1992 to 1994, holds a special place in automotive history. Its open-top design, coupled with the 240SX's inherent sporty characteristics, makes it a desirable project car. However, like any vehicle of this age, the interior can suffer from wear and tear, sun damage, and general neglect. Restoring a 240SX convertible interior requires a methodical approach, a detailed understanding of its components, and the right tools and techniques. This guide provides a comprehensive overview of the key interior components and restoration methods.
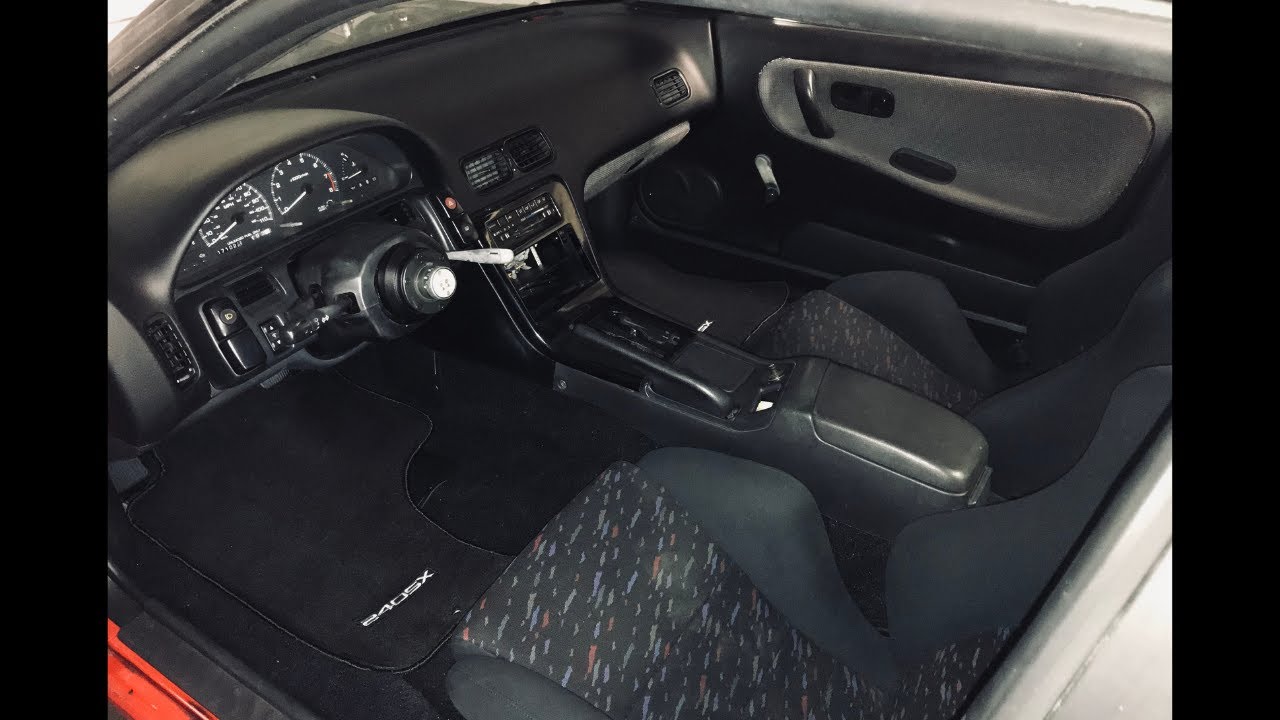
Understanding the 240SX Convertible Interior Landscape
The 240SX convertible interior shares many components with its coupe counterpart, but the open-top nature introduces unique elements and different points of failure. Before embarking on any restoration project, a thorough inspection is crucial. Consider the following key areas:
Dashboard and Instrument Panel
The dashboard is often the most visible and arguably the most problematic area. Direct sunlight exposure can cause cracking, fading, and warping of the plastic. Common issues include:
- Cracks: These are often located around the air vents, speaker grilles, and mounting points.
- Fading: The original color can fade significantly, especially in areas exposed to direct sunlight.
- Sticky surface: The plastic can become sticky over time due to the breakdown of the original coating.
- Broken mounting points: Over time, the plastic around mounting points can become brittle and break.
The instrument panel, housing the gauges and warning lights, is also susceptible to damage. Check for:
- Gauge functionality: Ensure all gauges are working accurately. Consider replacing any faulty sending units.
- Bulb condition: Replace any burned-out bulbs to ensure proper illumination.
- Wiring integrity: Inspect the wiring harness for damage or corrosion.
Restoration Techniques: For minor cracks, plastic repair kits can be used. These kits typically involve applying a filler to the crack and sanding it smooth. For more severe damage, consider sourcing a replacement dashboard. If refinishing the original dashboard, thoroughly clean it with a plastic cleaner, apply a plastic adhesion promoter, and then use a specialized automotive interior paint. Be sure to use UV-resistant paints to prevent future fading. Refurbishing the instrument panel often involves cleaning, replacing bulbs, and repairing any damaged wiring.
Seats
The seats are another area prone to wear and tear. The convertible top being down exposes the seats to the elements. Examine:
- Upholstery condition: Look for tears, rips, stains, and fading.
- Foam condition: Check for sagging or deterioration of the seat foam.
- Frame integrity: Ensure the seat frame is not bent, broken, or rusted.
- Seat adjustment mechanism: Verify that the seat adjustment mechanism is functioning properly.
Restoration Techniques: For minor tears and stains, professional upholstery repair is recommended. For more significant damage, consider reupholstering the seats. Replacement seat covers are available, but professional installation is often required for a proper fit. If the seat foam is deteriorated, it can be replaced with new foam cut to the original specifications. Repair any damaged seat frame components by welding or replacing them entirely.
Door Panels
Door panels are subject to wear and tear from entering and exiting the vehicle. Key areas of concern include:
- Upholstery condition: Similar to the seats, look for tears, rips, stains, and fading.
- Armrest condition: The armrest is a high-wear area and can become cracked or damaged.
- Speaker grille condition: The speaker grilles can become damaged or detached.
- Mounting clip condition: The plastic mounting clips that hold the door panel to the door frame can break over time.
Restoration Techniques: Repairing door panels often involves reupholstering, repairing or replacing the armrest, and replacing any broken speaker grilles. Broken mounting clips should be replaced with new ones to ensure a secure fit. Consider replacing the vapor barrier behind the door panel as well if it is damaged.
Carpeting
The carpeting is another area that accumulates dirt, stains, and wear and tear. Convertible models are especially prone to water damage.
- Stains and dirt: Thoroughly clean the carpeting to remove any stains and dirt.
- Fading: The carpeting can fade over time, especially in areas exposed to sunlight.
- Wear and tear: Check for worn areas, especially in high-traffic areas such as the driver's side footwell.
- Water damage: Inspect for signs of water damage, such as mildew or rust.
Restoration Techniques: Thoroughly clean the carpeting using a carpet cleaner and extractor. For heavily stained or worn carpeting, consider replacing it with a new carpet kit. Remove the seats and center console to facilitate carpet removal and installation. Be sure to install new sound deadening material under the carpet to reduce road noise.
Convertible Top Components
The convertible top is unique to this model and requires special attention. While technically external, its condition dramatically impacts the interior ambiance and protection.
- Fabric condition: Check for tears, rips, fading, and mildew.
- Rear window condition: The plastic rear window can become cloudy, cracked, or yellowed.
- Frame condition: Inspect the frame for rust, damage, or misalignment.
- Hydraulic system: Ensure the hydraulic system is functioning properly and check for leaks.
- Weather stripping: Inspect the weather stripping for cracks or deterioration.
Restoration Techniques: Repairing the convertible top can range from patching small tears to replacing the entire top. The plastic rear window can often be polished to improve clarity, but severely damaged windows may need to be replaced. Ensure the convertible top frame is free of rust and properly aligned. Replace any damaged weather stripping to prevent leaks.
Other Interior Components
Beyond the major components, several other areas require attention:
- Center Console: Inspect for cracks, broken hinges, and faded finishes.
- Steering Wheel: Consider reupholstering or replacing a worn or damaged steering wheel.
- Shift Knob: Replace a worn or faded shift knob.
- Interior Trim Pieces: Clean and polish all interior trim pieces. Replace any broken or missing pieces.
Essential Tools and Materials
Successfully restoring a 240SX convertible interior requires the right tools and materials. Consider the following:
- Basic Hand Tools: Screwdrivers, sockets, wrenches, pliers, etc.
- Trim Removal Tools: Plastic trim removal tools to avoid damaging delicate trim pieces.
- Upholstery Tools: Hog ring pliers, upholstery needles, etc.
- Cleaning Supplies: Interior cleaner, carpet cleaner, vinyl cleaner, leather cleaner, etc.
- Repair Materials: Plastic repair kits, upholstery repair kits, adhesive, etc.
- Replacement Parts: Seat covers, carpet kits, trim pieces, etc.
- Safety Gear: Gloves, eye protection, dust mask.
Restoration Process: A Step-by-Step Approach
- Planning and Assessment: Thoroughly inspect the interior, identify areas of damage, and create a restoration plan. Prioritize tasks and budget accordingly.
- Disassembly: Carefully remove all interior components, labeling and organizing them for easy reassembly. Take pictures during disassembly to aid in reassembly.
- Cleaning and Preparation: Thoroughly clean all components. Repair any minor damage, such as cracks or tears.
- Refinishing and Repair: Refinish or reupholster any worn or damaged components. Replace any broken or missing parts.
- Reassembly: Carefully reassemble all interior components, following the disassembly notes and diagrams.
- Final Inspection: Inspect the completed interior to ensure everything is properly installed and functioning.
Conclusion
Restoring a 240SX convertible interior is a rewarding but challenging project. By understanding the key components, utilizing the proper tools and techniques, and paying attention to detail, you can bring your classic Nissan back to its former glory. Remember to prioritize safety and take your time. The result will be a beautifully restored interior that enhances the driving experience and adds value to your vehicle. The satisfaction of completing such a project is unparalleled, especially knowing you've contributed to preserving a piece of automotive history. Good luck!