240sx Coolant Temp Sensor Location
The Nissan 240sx, a beloved sports coupe for its drift-friendly rear-wheel drive and potential for modification, requires meticulous maintenance to keep it running smoothly. Among the essential maintenance tasks is ensuring the coolant system is functioning correctly. A critical component of this system is the coolant temperature sensor (CTS). This article provides a comprehensive guide to the 240sx coolant temp sensor location, helping you identify, diagnose, and potentially replace the sensor.
Understanding the Coolant Temperature Sensor
Before diving into the specific location, let's understand the function of the coolant temperature sensor. The CTS monitors the temperature of the engine coolant and relays this information to the engine control unit (ECU). The ECU uses this data to:
- Adjust the air-fuel mixture: A colder engine requires a richer mixture for optimal starting and running.
- Control ignition timing: Engine temperature affects optimal ignition timing.
- Operate the cooling fan: The ECU triggers the cooling fan when the coolant reaches a certain temperature.
- Activate the temperature gauge on the dashboard: This provides the driver with a visual indication of engine temperature.
A faulty CTS can lead to a variety of performance issues, including poor fuel economy, rough idling, difficulty starting, and overheating. Therefore, knowing its location is crucial for troubleshooting and repair.
240sx Coolant Temp Sensor Location
The 240sx coolant temp sensor location can vary slightly depending on the engine type (KA24E or KA24DE). However, the general area remains consistent. Here's a detailed breakdown:
KA24E (Single Overhead Cam) Engine
For 240sx models equipped with the KA24E engine (typically 1989-1990 models), the coolant temperature sensor is typically located on the engine block, near the thermostat housing. Specifically:
- Look towards the front of the engine, near where the upper radiator hose connects to the engine.
- The sensor is usually a small, cylindrical component with a two-wire connector.
- It's threaded directly into the engine block.
Pay close attention to the orientation of the thermostat housing. The CTS will be nearby, often slightly below or to the side of it. Remember to disconnect the battery before working on any electrical components.
KA24DE (Dual Overhead Cam) Engine
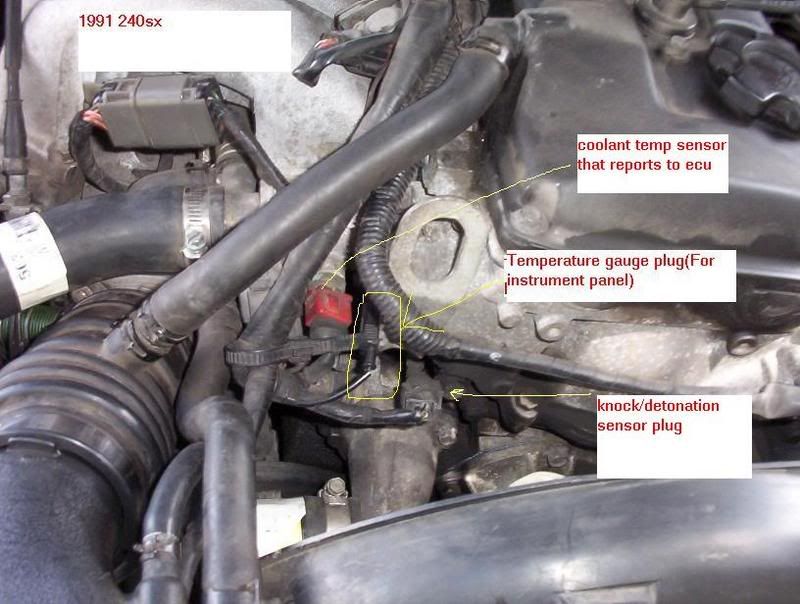
For 240sx models equipped with the KA24DE engine (typically 1991-1998 models), the 240sx coolant temp sensor location is generally similar to the KA24E, but with a slightly different physical presentation. Again, it's near the thermostat housing:
- Locate the thermostat housing at the front of the engine, where the upper radiator hose attaches.
- The CTS is usually positioned on or very close to the thermostat housing itself.
- It’s generally a two-wire sensor, threaded into the housing.
While the position is similar, the physical appearance might be slightly different due to variations in the thermostat housing design across different model years. A good starting point is always to locate the thermostat housing and carefully examine the surrounding area.
Identifying the Correct Sensor
It's crucial to ensure you've located the correct sensor. The 240sx, like many vehicles, may have multiple temperature sensors. To avoid confusion, look for the following characteristics:
- Two-Wire Connector: The coolant temperature sensor typically has a two-wire electrical connector.
- Location near Thermostat Housing: As previously mentioned, proximity to the thermostat housing is a key indicator.
- Threads into Engine Block or Thermostat Housing: The sensor is threaded directly into the engine block or the thermostat housing itself.
- Color: The sensor body is often made of brass or another metallic material.
If you're still unsure, consult your 240sx repair manual. These manuals contain detailed diagrams and illustrations that can help you pinpoint the exact 240sx coolant temp sensor location.
Diagnosing a Faulty Coolant Temperature Sensor
If you suspect your CTS is failing, there are several symptoms to watch out for:
- Poor Fuel Economy: The ECU may be providing an incorrect air-fuel mixture, leading to increased fuel consumption.
- Rough Idling: An incorrect air-fuel mixture can also cause rough idling, especially when the engine is cold.
- Difficulty Starting: The engine may struggle to start, particularly in cold weather.
- Overheating: A faulty CTS can prevent the cooling fan from activating, leading to overheating.
- Check Engine Light: A faulty CTS will often trigger the check engine light.
- Inaccurate Temperature Gauge Reading: The temperature gauge on the dashboard may display incorrect readings.
To confirm a faulty CTS, you can perform the following tests:
- OBD-II Scanner: Use an OBD-II scanner to check for diagnostic trouble codes (DTCs) related to the coolant temperature sensor. Codes like P0115, P0116, P0117, and P0118 are common indicators of a CTS issue.
- Multimeter Test: Use a multimeter to measure the sensor's resistance at different temperatures. Compare your readings to the specifications in your repair manual. An abnormal resistance reading indicates a faulty sensor.
- Voltage Test: Check the voltage at the sensor connector with the ignition on. A healthy sensor should receive a voltage signal from the ECU.
Replacing the Coolant Temperature Sensor
Replacing the CTS is a relatively straightforward process, but it's important to take the necessary precautions.
- Gather Your Tools and Materials: You'll need a new CTS, a wrench or socket set, a multimeter (optional), Teflon tape or sealant, and a coolant drain pan.
- Disconnect the Battery: Disconnect the negative battery terminal to prevent electrical shock.
- Drain Some Coolant: Drain a small amount of coolant from the radiator to prevent spillage when you remove the sensor.
- Locate and Disconnect the Old Sensor: Find the 240sx coolant temp sensor location as described earlier. Disconnect the electrical connector from the sensor.
- Remove the Old Sensor: Use a wrench or socket to carefully unscrew the old sensor from the engine block or thermostat housing. Be prepared for a small amount of coolant to leak out.
- Prepare the New Sensor: Apply Teflon tape or sealant to the threads of the new sensor to prevent leaks.
- Install the New Sensor: Carefully screw the new sensor into the engine block or thermostat housing. Tighten it to the specified torque (consult your repair manual).
- Reconnect the Electrical Connector: Reconnect the electrical connector to the new sensor.
- Refill the Coolant: Refill the cooling system with the drained coolant and top it off as needed.
- Reconnect the Battery: Reconnect the negative battery terminal.
- Start the Engine and Check for Leaks: Start the engine and allow it to warm up. Check for any coolant leaks around the new sensor.
- Monitor the Temperature Gauge: Monitor the temperature gauge to ensure it's functioning correctly.
- Check for Check Engine Light: If the check engine light was on before, it should turn off after replacing the sensor. If it doesn't, you may need to clear the codes using an OBD-II scanner.
Conclusion
The 240sx coolant temp sensor location is a key piece of information for anyone maintaining or repairing their Nissan sports coupe. By understanding the sensor's function, identifying its location, diagnosing potential issues, and knowing the replacement procedure, you can ensure your engine operates at its optimal temperature, preventing costly damage and maximizing performance. Always consult your 240sx repair manual for specific instructions and torque specifications relevant to your model year and engine type. Regular maintenance and attention to detail are crucial for keeping your 240sx running strong for years to come. Remember to always prioritize safety when working on your vehicle.