240sx Fire Extinguisher Mount: Track-day Essential Install
So, you're planning to hit the track in your 240SX. Excellent choice! One crucial safety item you absolutely must consider is a fire extinguisher. While hopefully you'll never need it, having one readily accessible can be the difference between a minor incident and a total loss. This article will walk you through installing a fire extinguisher mount in your 240SX, focusing on creating a robust and easily reachable setup.
Why Bother?
You might be thinking, "Isn't a fire extinguisher overkill?" The answer is a resounding no, especially on the track. High-performance driving puts immense stress on your car. Fuel leaks, overheated components, and electrical shorts are all potential fire hazards. Track day regulations often mandate a fire extinguisher, but even if they don't, it's just plain smart. A freely rolling extinguisher in the cabin becomes a projectile in even a minor collision, so mounting is not optional, it is required for safety.
Having a readily available fire extinguisher offers these benefits:
- Quick Response: Seconds matter in a fire. A securely mounted extinguisher allows you to react instantly.
- Personal Safety: You're protecting yourself, your car, and other drivers on the track.
- Track Compliance: Many racing organizations require a fire extinguisher mount that meets specific criteria.
Choosing the Right Extinguisher and Mount
Before you grab just any fire extinguisher and strap, let's discuss some important considerations.
Extinguisher Type
For automotive use, you'll typically want an ABC dry chemical extinguisher. These are effective on Class A (ordinary combustibles), Class B (flammable liquids), and Class C (electrical) fires. Avoid extinguishers containing halon, as they are environmentally damaging and often prohibited. A 2.5 lb or larger extinguisher is a good starting point, providing a reasonable amount of extinguishing agent without being excessively bulky. Some prefer AFFF (Aqueous Film Forming Foam) extinguishers for their superior performance on fuel fires, but these can be more expensive and require careful consideration regarding corrosiveness of the foam.
Mount Type
There are several mounting options available:
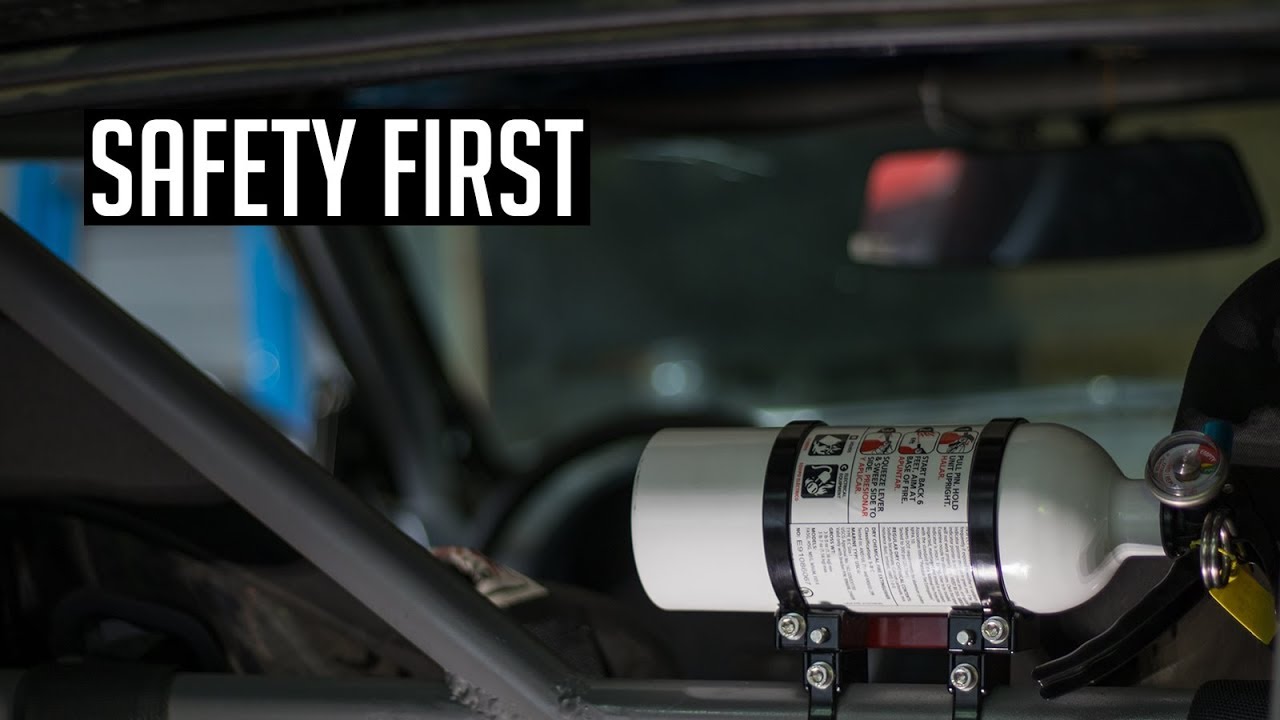
- Seat Rail Mounts: These attach to the seat rails, providing a low-profile and easily accessible location. These are typically the best option as they keep the extinguisher within easy reach.
- Roll Cage Mounts: If you have a roll cage, this is a very secure and convenient option.
- Floor Mounts: These require drilling into the floor pan and can be less ideal due to potential interference with wiring or fuel lines. Avoid this type unless absolutely necessary.
- Universal Straps: While seemingly convenient, these often lack the rigidity and security needed for track use. They can allow the extinguisher to move around during hard cornering or impacts. It is highly recommended to avoid universal straps.
For this guide, we'll focus on a seat rail mount, as it's the most common and practical choice for most 240SX owners.
Tools and Materials
Here’s what you’ll need for the installation:
- Fire extinguisher and seat rail mount kit (ensure compatibility with your extinguisher size).
- Socket set (metric).
- Wrench set (metric).
- Torque wrench.
- Screwdrivers (Phillips and flathead).
- Drill and drill bits (if required for minor modifications).
- Punch and hammer (for removing stubborn bolts).
- Measuring tape.
- Marker or pen.
- Gloves and safety glasses.
- Optional: Threadlocker (e.g., Loctite).
Installation Procedure
Safety First: Disconnect the negative terminal of your battery before starting any work on the car's electrical system.
Step 1: Prepare the Area
Move the driver's seat all the way back and up to create ample working space. Cover the surrounding area with a cloth or towels to protect the interior. Identify the seat rail mounting bolts. These are typically located at the front and rear of the seat rails.
Step 2: Remove the Seat (Partial Disassembly)
Loosen the seat rail mounting bolts using the appropriate socket or wrench. You don't need to completely remove the seat from the car, just loosen the bolts enough to lift the seat slightly and access the mounting points. Be careful not to damage the seat rails or the floor pan.
Important Note: Some 240SXs have airbags integrated into the seats. If so, disconnect the airbag connector before removing the seat. Failure to do so could result in accidental airbag deployment, causing serious injury. Refer to your car's service manual for the proper procedure for disconnecting airbags.
Step 3: Install the Seat Rail Mount
Position the seat rail mount bracket. Most kits come with multiple mounting holes, allowing you to adjust the extinguisher's position. Find the optimal placement where the extinguisher is easily accessible and doesn't interfere with legroom or seat movement. Use the original seat mounting bolts to secure the bracket to the seat rails. The mount should fit snugly and securely between the seat rail and the floor. If shims or spacers are included in the kit, use them to ensure a level and stable installation. Do not overtighten the bolts at this stage.
Step 4: Adjust and Tighten
Once you're satisfied with the position, tighten the seat rail mounting bolts to the manufacturer's specified torque. Use a torque wrench to ensure proper tightness. Apply a small amount of threadlocker (e.g., Loctite) to the bolt threads for added security.
Step 5: Install the Extinguisher
Most extinguisher mounts use straps, brackets, or clamps to secure the extinguisher. Follow the mount manufacturer's instructions for attaching the extinguisher. Ensure the extinguisher is held firmly in place and cannot move or rattle. Double-check that the release mechanism is easily accessible. Some mounts use a quick-release pin or lever. Practice releasing the extinguisher a few times to familiarize yourself with the mechanism. Make sure the extinguisher does not obstruct your legs or interfere with driving. There should be ample clearance to operate the pedals and steering wheel.
Step 6: Reconnect and Test
Reconnect the negative terminal of your battery (if disconnected). Reconnect the airbag connector (if applicable). Test the seat movement to ensure the extinguisher mount doesn't interfere. Make sure the seat slides forward and backward smoothly. Check that all bolts are still tight after adjusting the seat. Start the engine and check for any warning lights (especially if you disconnected an airbag).
Step 7: Final Checks and Adjustments
Sit in the driver's seat and reach for the extinguisher. Ensure you can easily grab and release it without any obstructions. Adjust the mount position or extinguisher angle if necessary. Conduct a final visual inspection to confirm that all connections are secure and there are no loose parts.
Tips and Considerations
- Extinguisher Placement: The ideal location for the extinguisher is within easy reach of the driver while buckled into their racing harness.
- Quick-Release Mechanism: Familiarize yourself with the quick-release mechanism. Practice releasing the extinguisher a few times so you can do it quickly and efficiently in an emergency.
- Regular Inspection: Regularly inspect the extinguisher to ensure it's properly charged and the pressure gauge is within the acceptable range. Check the mount for any signs of damage or wear.
- Track Tech Inspection: Before each track day, double-check that your extinguisher and mount meet the track's requirements. Some organizations have specific rules regarding extinguisher size, type, and mounting location.
- Service Intervals: Fire extinguishers need to be professionally inspected and serviced periodically. This ensures they are in good working order and will function properly when needed. Refer to the extinguisher's manual for recommended service intervals.
- Alternative Mounting Locations: If a seat rail mount doesn't work for your setup, consider a roll cage mount or a custom-fabricated bracket. Just make sure the extinguisher is securely mounted and easily accessible.
- Documentation: Keep the extinguisher's manual and any relevant certification papers in your car. This will be helpful during tech inspection and if you ever need to make a claim.
Conclusion
Installing a fire extinguisher mount in your 240SX is a relatively straightforward process that can significantly improve your safety on the track. By following these steps and paying attention to detail, you can create a secure and accessible setup that will give you peace of mind. Remember, safety should always be your top priority when modifying your car for high-performance driving. Be meticulous and take your time with the installation and never compromise on safety.
Now get out there and enjoy your track day, knowing you're prepared for the unexpected!