240sx Headlight Replacement: Bulb And Motor Fixes
The Nissan 240SX, a darling of the drift and tuner scenes, boasts a sleek profile and surprisingly robust mechanics. However, age inevitably takes its toll, and one area particularly prone to wear is the headlight system. From flickering bulbs to completely inoperative motors, diagnosing and resolving headlight issues can be frustrating. This guide delves into the nuances of 240SX headlight maintenance, covering both bulb replacement and motor repair, offering insights into the system's operation and practical troubleshooting techniques.
Understanding the 240SX Headlight System
Before diving into repairs, it's crucial to understand the system's components. The 240SX employs a pop-up headlight design, a popular aesthetic of the era. This system comprises:
- Headlight Bulbs: Typically, the 240SX uses replaceable halogen bulbs, H4 type are the most common for dual filament high and low beam functionality.
- Headlight Motors: These electric motors are responsible for raising and lowering the headlight assemblies. Each headlight has its own dedicated motor.
- Linkage: A series of mechanical linkages connect the headlight motor to the headlight assembly, translating the motor's rotational motion into the raising and lowering action.
- Headlight Switch: Controls the activation of the headlights, signaling the motors to operate.
- Relays: High-current relays protect the headlight switch and other electrical components from overload. One relay per motor is common.
- Wiring Harness: Provides the electrical pathways for power and signals throughout the system.
- Fuse Box: Contains fuses that protect the circuit from shorts and overloads.
The system operates relatively simply: when the headlight switch is activated, a signal is sent to the headlight motors via the relays. The motors rotate, driving the linkages that raise the headlight assemblies. When the switch is turned off, the motors reverse, lowering the headlights back into their recessed position.
Headlight Bulb Replacement
Replacing a burnt-out headlight bulb is the simplest repair. Here's a step-by-step guide:
- Safety First: Disconnect the negative terminal of the battery to prevent electrical shock.
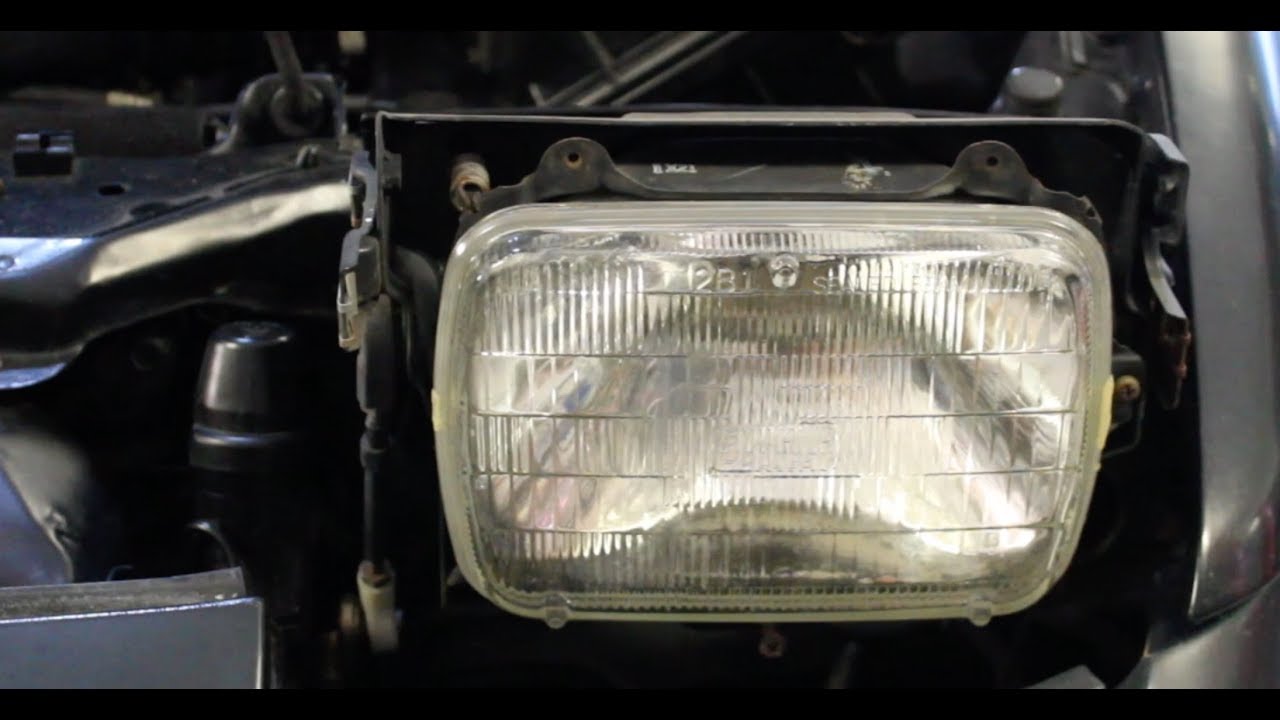
- Access the Bulb: Open the hood and locate the back of the headlight assembly. Depending on the year and model, you might need to remove a plastic cover to access the bulb.
- Disconnect the Connector: Carefully disconnect the electrical connector from the back of the bulb. It’s secured with a clip that needs to be depressed before pulling. Do not pull on the wires directly!
- Remove the Old Bulb: The bulb is typically held in place by a retaining clip or wire. Release the clip and gently remove the old bulb. Note the orientation of the bulb for proper installation of the new one.
- Install the New Bulb: Carefully insert the new bulb into the socket, ensuring it’s properly aligned. Secure it with the retaining clip. Avoid touching the glass portion of the bulb with your bare hands, as the oils from your skin can reduce its lifespan. If you do accidentally touch it, clean it with rubbing alcohol.
- Reconnect the Connector: Reattach the electrical connector to the back of the bulb. Ensure it clicks into place.
- Test the Headlight: Reconnect the negative terminal of the battery and test the headlight to ensure it's working correctly.
- Repeat for the Other Side: Repeat the process for the other headlight if necessary.
Troubleshooting Bulb Issues: If the new bulb doesn't work, check the following:
- Fuse: Inspect the headlight fuse in the fuse box. A blown fuse is a common cause of headlight failure. Consult your owner's manual for the location of the correct fuse.
- Connector: Ensure the electrical connector is securely attached to the bulb.
- Wiring: Inspect the wiring harness for any signs of damage, such as frayed wires or corrosion.
- Ground: Check the headlight ground connection to ensure it's clean and secure.
Headlight Motor Repair
Headlight motor failure is a more complex issue. The motors themselves are surprisingly robust, but the linkages and internal components can wear down over time. A common symptom is a headlight that either doesn't raise or lower at all, moves slowly, or makes grinding noises. Here's a breakdown of common issues and repair strategies:
Diagnosing Headlight Motor Problems
Before disassembling the motor, it's essential to diagnose the problem accurately. Consider these troubleshooting steps:
- Listen Carefully: Does the motor make any noise when the headlight switch is activated? If you hear a clicking sound, the motor is likely receiving power but is unable to turn. A grinding noise suggests stripped gears. Silence suggests no power or an electrical fault.
- Check the Linkage: Examine the linkage between the motor and the headlight assembly. Look for broken or disconnected parts. Sometimes, the linkage simply becomes disconnected, preventing the headlight from moving.
- Voltage Test: Use a multimeter to check for voltage at the motor connector when the headlight switch is activated. If there's no voltage, the problem lies upstream, possibly in the headlight switch, relay, or wiring harness.
- Manual Operation: Many 240SX headlights include a knob or screw to allow manual operation. If the headlight can be raised and lowered manually but not electrically, the issue is almost certainly within the motor assembly or the linkage.
- Swap Motors: If you suspect a faulty motor, swap the motors from the left and right headlights. If the problem switches sides, you've confirmed the motor is the culprit.
Headlight Motor Disassembly and Repair
If you've determined that the headlight motor itself is the problem, you can attempt to disassemble and repair it. Note: This requires some mechanical aptitude and patience.
- Removal: Disconnect the battery, then remove the headlight motor from the vehicle. This usually involves removing a few bolts and disconnecting the electrical connector.
- Disassembly: Carefully disassemble the motor housing. Take pictures as you go to remember the order of the components. Pay close attention to the position of the gears and linkages.
- Inspection: Inspect the internal components for wear and damage. Common problems include:
- Stripped Gears: The plastic gears inside the motor are prone to stripping, especially if the headlight is forced. Replacement gears are sometimes available online.
- Worn Bushings: The motor's armature rotates on bushings, which can wear down over time, causing the motor to bind.
- Corroded Contacts: The electrical contacts inside the motor can corrode, preventing proper operation.
- Damaged Armature: In rare cases, the armature itself can be damaged.
- Cleaning and Lubrication: Clean all the components with a solvent and lubricate them with a silicone-based grease. This can help improve the motor's performance and extend its lifespan.
- Component Replacement: Replace any worn or damaged components, such as gears, bushings, or contacts. You may need to source these parts from a specialized supplier or salvage yard.
- Reassembly: Carefully reassemble the motor housing, ensuring all the components are in their correct positions. Refer to the pictures you took during disassembly.
- Testing: Before reinstalling the motor in the vehicle, test it to ensure it's working correctly. Connect it to a 12V power source and observe its operation.
- Reinstallation: Reinstall the headlight motor in the vehicle and reconnect the electrical connector.
- Final Test: Test the headlight to ensure it's raising and lowering correctly.
Alternative Solutions
If you're not comfortable disassembling and repairing the headlight motor, you have a few alternative solutions:
- Replacement Motor: Purchase a new or rebuilt headlight motor. This is the easiest but potentially most expensive option.
- Salvage Yard: Find a used headlight motor from a salvage yard. This can be a more affordable option, but the motor's condition may be uncertain.
- Aftermarket Kits: Some aftermarket companies offer kits that replace the entire pop-up headlight system with fixed headlights. This can be a more drastic solution, but it eliminates the reliability issues associated with the pop-up design.
Preventative Maintenance
To prolong the life of your 240SX's headlight system, consider these preventative maintenance tips:
- Regular Lubrication: Periodically lubricate the headlight linkages with a silicone-based grease. This will help prevent them from binding and reduce wear on the motor.
- Avoid Forcing: Never force the headlights to raise or lower manually. This can damage the motor and linkage.
- Cleanliness: Keep the headlight assemblies clean and free of debris. Dirt and grime can interfere with the operation of the linkage.
- Inspect Wiring: Regularly inspect the wiring harness for any signs of damage or corrosion. Repair any damaged wiring promptly.
By understanding the 240SX's headlight system and following these repair and maintenance tips, you can keep your headlights shining bright and functioning reliably for years to come. Remember to always prioritize safety and consult a qualified mechanic if you're unsure about any aspect of the repair process. Good luck and happy motoring!