240sx Intake Manifold Gasket: A How-to For Replacement
The Nissan 240SX, particularly the models equipped with the KA24DE engine, are renowned for their reliability and relatively simple mechanics. However, like any engine, the intake manifold gasket is a critical component susceptible to wear and eventual failure. This article provides an in-depth look at the intake manifold gasket replacement procedure on a KA24DE engine, explaining not just the "how," but also the "why" behind each step. Understanding the underlying principles will empower you to tackle this repair with confidence and a deeper appreciation for automotive engineering.
Understanding the Intake Manifold and Gasket
The intake manifold's primary function is to distribute the air/fuel mixture evenly to each cylinder's intake port. Imagine it as a branching network, taking air from the throttle body and splitting it into individual streams for each cylinder. A properly functioning intake manifold is crucial for optimal engine performance, fuel efficiency, and emissions control. The gasket that seals the intake manifold to the cylinder head is what we're focused on here. This gasket prevents vacuum leaks, which can drastically affect engine performance. A vacuum leak essentially allows unmetered air to enter the engine, disrupting the carefully calculated air/fuel ratio. This can lead to a variety of problems, including:
- Rough idling
- Poor acceleration
- Increased fuel consumption
- Check engine light (often with codes related to lean conditions)
The intake manifold gasket is subjected to significant thermal cycling, constantly expanding and contracting as the engine heats up and cools down. Over time, this can cause the gasket material to degrade, leading to cracks, leaks, and ultimately, failure. Common symptoms of a failing intake manifold gasket include a hissing sound (indicating a vacuum leak), poor engine performance, and difficulty starting the engine.
Tools and Materials
Before embarking on this project, gather the necessary tools and materials. Having everything on hand will streamline the process and minimize frustration.
- New intake manifold gasket (ensure it's the correct part for your year and model)
- Socket set (metric, typically 10mm, 12mm, 14mm)
- Wrench set (metric, same sizes as above)
- Torque wrench
- Screwdrivers (Phillips and flathead)
- Pliers
- Razor scraper or gasket scraper
- Cleaning supplies (brake cleaner, shop towels)
- Coolant (if coolant lines are connected to the intake manifold, which they sometimes are)
- Throttle body cleaner
- Penetrating oil (for stubborn bolts)
- Masking tape and marker (for labeling hoses and wires)
- Digital camera or smartphone (for taking pictures as a reference)
Step-by-Step Replacement Procedure
Now, let's dive into the actual replacement process. Remember safety first! Disconnect the negative battery terminal before beginning any work on the electrical system.
Step 1: Preparation and Disconnection
Begin by disconnecting all components attached to the intake manifold. This is where careful labeling and documentation are crucial. Use masking tape and a marker to label each hose and wire connection. A digital camera or smartphone can also be invaluable for taking pictures before disconnecting anything. Pay close attention to the following:
- Throttle cable: Disconnect the throttle cable from the throttle body linkage.
- Vacuum hoses: There will be several vacuum hoses connected to various ports on the intake manifold. Carefully disconnect each one, noting its location.
- Fuel lines: If your KA24DE has fuel lines running near or to the intake manifold, depressurize the fuel system and disconnect them with appropriate fuel line disconnect tools. This is critical for safety.
- Electrical connectors: Disconnect any electrical connectors attached to sensors on the intake manifold, such as the throttle position sensor (TPS) or idle air control valve (IACV).
- Coolant lines: Some KA24DE intake manifolds have coolant lines running through them for warming the intake air. If this is the case, drain a portion of the coolant system before disconnecting these lines to prevent coolant spillage.
- Air intake: Remove the air intake assembly from the throttle body.
- EGR valve (if equipped): If your 240SX has an EGR (Exhaust Gas Recirculation) valve connected to the intake manifold, disconnect it.
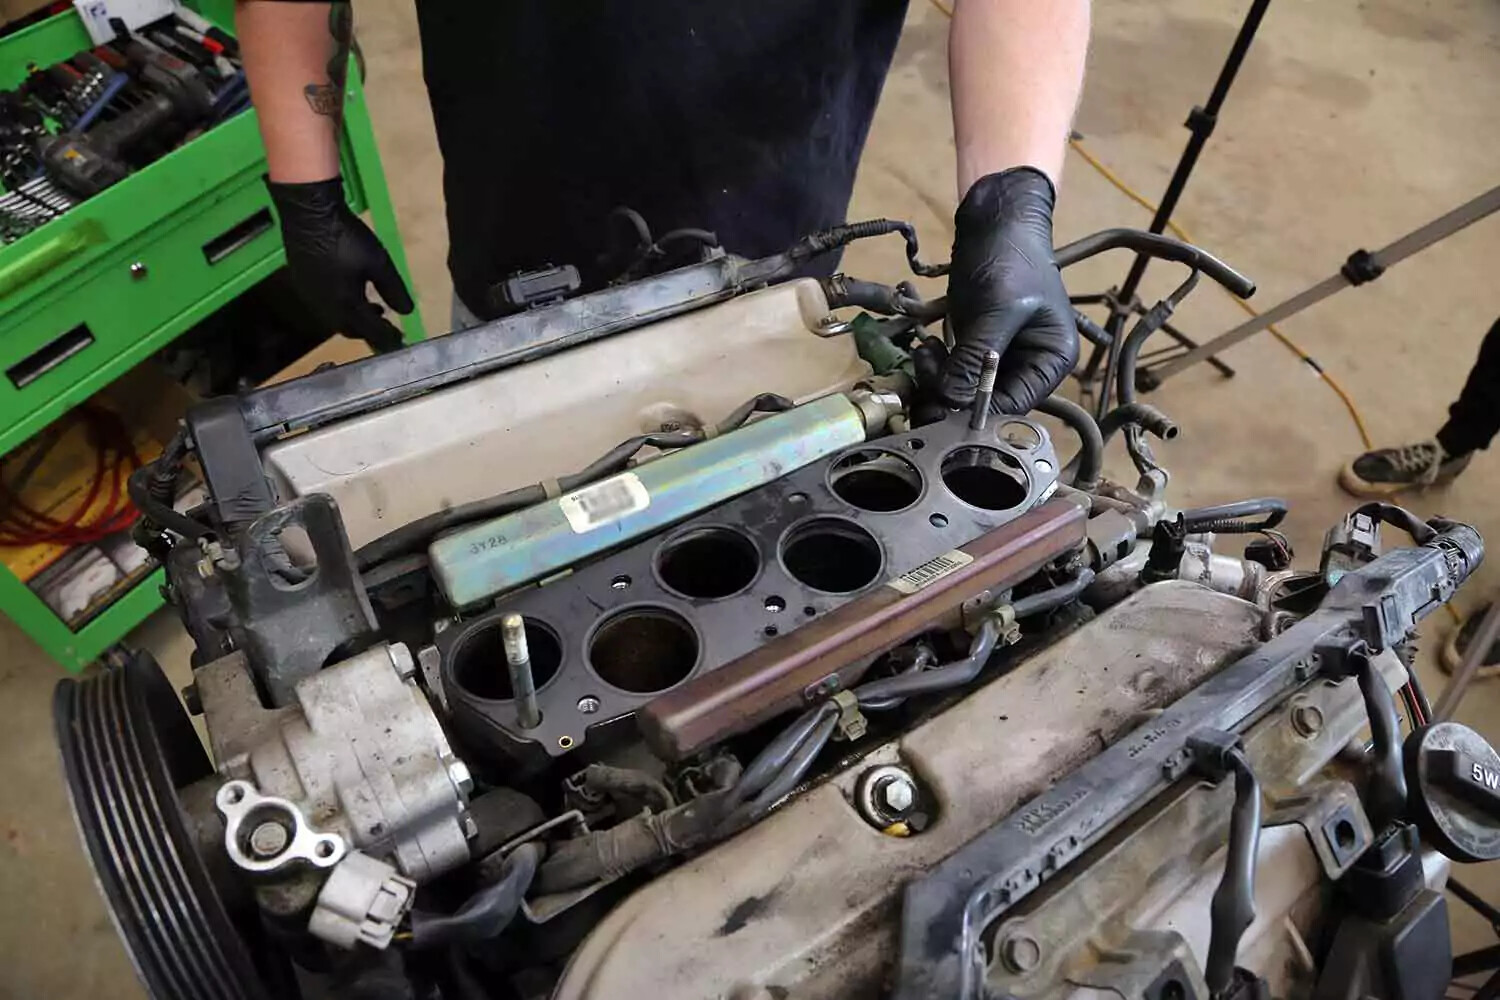
Step 2: Removing the Intake Manifold
With all connections detached, you can now proceed to remove the intake manifold. The manifold is typically secured to the cylinder head with several bolts or nuts. Use the appropriate socket or wrench to loosen and remove these fasteners. It's highly recommended to loosen the bolts in a specific sequence, typically from the outside inwards, in a crisscross pattern. This helps to distribute the stress evenly and prevent warping of the manifold. Store the removed bolts in a safe place, as you'll need them later.
Once all the fasteners are removed, the intake manifold should be free to lift off the cylinder head. You might need to gently pry it loose with a flathead screwdriver, but be careful not to damage the mating surfaces. With the intake manifold removed, you'll likely find remnants of the old gasket stuck to both the manifold and the cylinder head.
Step 3: Cleaning the Mating Surfaces
This is a critical step for ensuring a proper seal with the new gasket. Use a razor scraper or gasket scraper to carefully remove all traces of the old gasket material from both the intake manifold and the cylinder head. Be meticulous and avoid scratching the mating surfaces. Once you've removed the bulk of the gasket material, use brake cleaner and shop towels to thoroughly clean both surfaces. The surfaces must be clean, dry, and free of any debris for the new gasket to seal properly.
Step 4: Installing the New Gasket
Now it's time to install the new intake manifold gasket. Orient the gasket correctly, ensuring that it aligns properly with the bolt holes and intake ports on both the manifold and the cylinder head. Some gaskets are directional, so pay attention to any markings or instructions provided with the gasket. Place the gasket onto the cylinder head, making sure it's seated properly. Alternatively, some prefer to place the gasket on the intake manifold first, using a small amount of gasket adhesive to hold it in place during installation. This is a matter of personal preference, but ensure the gasket is seated correctly either way.
Step 5: Reinstalling the Intake Manifold
Carefully position the intake manifold onto the cylinder head, aligning it with the gasket and bolt holes. Install the bolts or nuts, tightening them by hand initially. Once all the fasteners are in place, use a torque wrench to tighten them to the manufacturer's specified torque value. Again, follow a specific tightening sequence, typically from the inside outwards, in a crisscross pattern. This ensures even pressure distribution and prevents warping. The correct torque specification is crucial to avoid over-tightening, which can damage the gasket or the manifold.
Step 6: Reconnecting Components
With the intake manifold securely in place, reconnect all the hoses, wires, and cables that you disconnected earlier. Refer to your labels and photographs to ensure that everything is connected correctly. Pay particular attention to the following:
- Throttle cable: Adjust the throttle cable tension as needed.
- Vacuum hoses: Double-check that all vacuum hoses are properly connected and secured.
- Fuel lines: Ensure fuel lines are properly connected and leak-free.
- Electrical connectors: Verify that all electrical connectors are securely attached.
- Coolant lines: If you disconnected coolant lines, top off the coolant system and check for leaks.
- Air intake: Reinstall the air intake assembly.
- EGR valve (if equipped): Reconnect the EGR valve.
Step 7: Final Checks and Testing
Before starting the engine, double-check all connections to ensure that everything is properly installed. Reconnect the negative battery terminal. Start the engine and let it idle. Listen for any unusual noises, such as hissing sounds indicating a vacuum leak. If you suspect a vacuum leak, use a can of carburetor cleaner or brake cleaner to spray around the intake manifold gasket area. If the engine idle changes when you spray a particular area, that indicates a vacuum leak in that location. If necessary, re-torque the intake manifold bolts and check all hose connections.
Monitor the engine temperature gauge to ensure that the engine is not overheating. Drive the car for a short distance and observe its performance. Pay attention to any symptoms of a vacuum leak, such as rough idling, poor acceleration, or increased fuel consumption. If you experience any problems, re-examine your work and consult a repair manual or experienced mechanic.
Conclusion
Replacing the intake manifold gasket on a 240SX with a KA24DE engine is a manageable task for the DIY mechanic. By understanding the function of the intake manifold and gasket, following a systematic approach, and paying close attention to detail, you can successfully complete this repair and restore your engine's performance. Remember to prioritize safety, use the correct tools and materials, and double-check your work to ensure a proper and long-lasting seal. This process not only saves you money on labor costs but also provides a valuable learning experience, deepening your understanding of automotive mechanics.