240sx Ls Swap Radiator Hoses: Custom Fitment Solutions
Swapping an LS engine into a Nissan 240SX (S13 or S14 chassis) is a popular and powerful upgrade. The increased horsepower and readily available parts make it a compelling option. However, integrating this different engine family into your 240SX presents several challenges, and one often overlooked area is the cooling system, specifically the radiator hoses. The original Nissan hoses won't fit the LS engine, and a universal approach can lead to headaches. This article will delve into custom fitment solutions for 240SX LS swap radiator hoses, providing you with the knowledge to properly cool your newfound power.
Understanding the Problem
The LS engine family, primarily manufactured by General Motors, has different inlet and outlet locations, diameters, and orientations for its cooling system compared to the original Nissan KA24DE or SR20DET engines found in the 240SX. Simply put, the hoses won't line up. Moreover, the LS engine might require a different radiator placement depending on your swap kit, further complicating things.
Trying to force a generic hose to fit can lead to:
- Kinked Hoses: Restricting coolant flow and potentially causing overheating.
- Rubbing: Contact with engine components, the chassis, or other hoses, leading to wear and eventual failure.
- Improper Seals: Leaks that can cause coolant loss and engine damage.
- Unsightly Appearance: A messy and unprofessional-looking engine bay.
Therefore, a custom solution is almost always necessary for reliable and efficient cooling.
Exploring Your Options
Several approaches exist for achieving optimal radiator hose fitment:
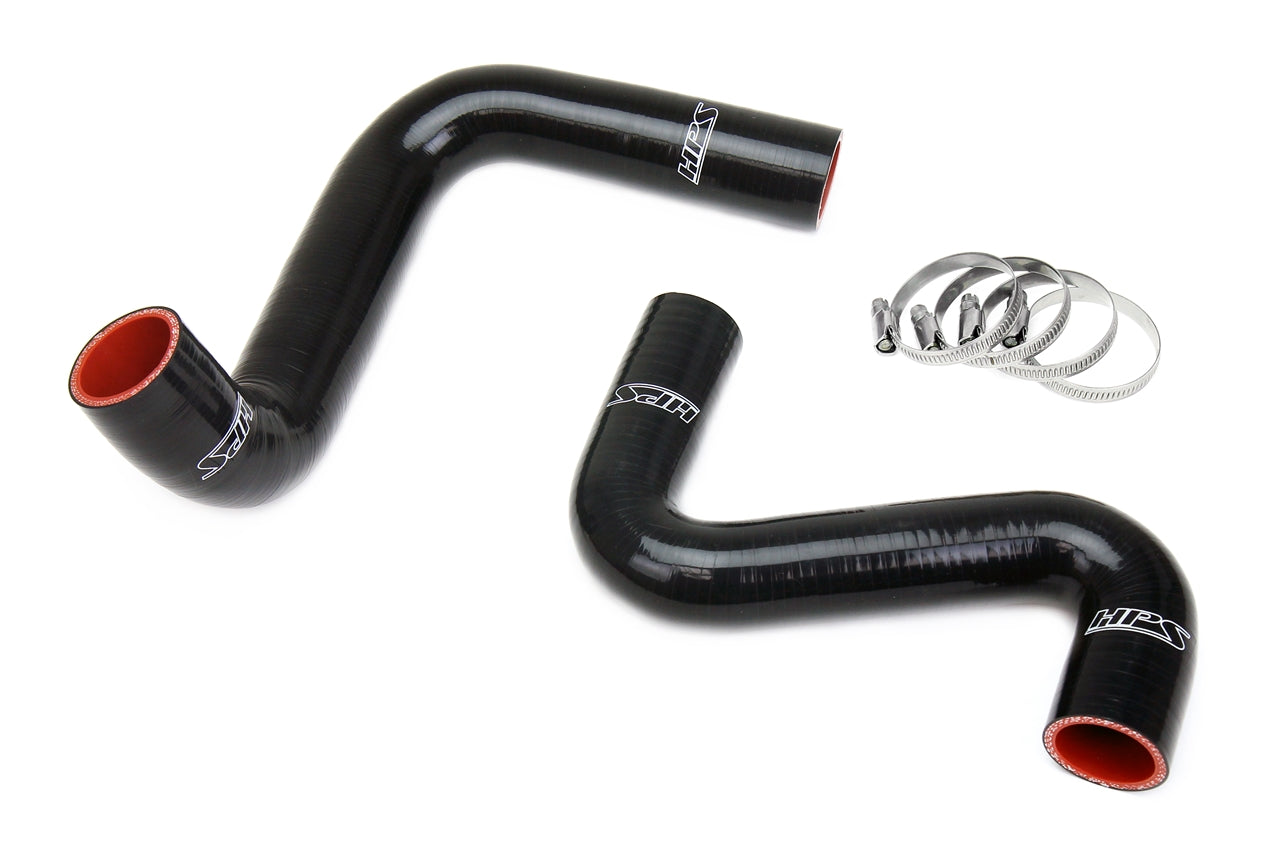
1. Pre-Made LS Swap Radiator Hose Kits
This is often the easiest and most convenient option. Several companies specialize in LS swap parts and offer complete radiator hose kits designed specifically for the 240SX. These kits typically include upper and lower radiator hoses, sometimes with pre-bent sections and couplings. These kits are usually tailored for specific radiator locations (e.g., stock location, tucked location).
Pros:
- Direct bolt-on (usually).
- Designed for optimal coolant flow.
- Professional appearance.
- Reduces guesswork and potential errors.
Cons:
- Can be more expensive than other solutions.
- May not fit perfectly with heavily customized swaps.
- Limited flexibility in design.
Before purchasing a pre-made kit, verify its compatibility with your specific radiator (e.g., aftermarket aluminum radiator) and its mounting position. Also, check customer reviews to assess the kit's fitment and quality.
2. Using Flexible Radiator Hoses
Flexible radiator hoses, often made of stainless steel with silicone couplers, offer a more universal approach. They can be bent and shaped to the desired configuration. Some kits are designed specifically for swaps, offering a mix of flexible hose and pre-formed sections for critical bends.
Pros:
- Highly adaptable to various configurations.
- Durable and resistant to high temperatures.
- Can be cut to length.
- Visually appealing for some.
Cons:
- Can be more expensive than standard rubber hoses.
- Requires careful cutting and fitting to prevent leaks.
- The ribbed surface can potentially restrict coolant flow if not properly sized.
- May require additional clamps or supports to prevent sagging.
When using flexible hoses, ensure the inner diameter is sufficient for the LS engine's coolant flow requirements. Also, carefully tighten all clamps to prevent leaks. Avoid sharp bends that could kink the hose.
3. Fabricating Custom Hoses with Straight and Angled Hose Sections
This method involves using a combination of straight and angled rubber or silicone hose sections, connected with aluminum or stainless steel couplers. This allows for a truly custom fit but requires more skill and planning.
Pros:
- Provides the most flexibility in design.
- Allows for precise hose routing.
- Can be more cost-effective than pre-made kits (depending on the materials used).
- A custom fit improves the aesthetics of the engine bay.
Cons:
- Requires careful measurement and planning.
- More time-consuming than other options.
- Potential for leaks if not properly assembled.
- Requires a good understanding of hose routing and coolant flow.
Here's a step-by-step guide for fabricating custom hoses:
- Measure and Plan: Use a flexible wire or hose to mock up the desired hose routing. Measure the length of each section and note the required angles. Consider the position of the thermostat housing, radiator inlets/outlets, and any potential obstructions.
- Select Hose Sections: Choose hose sections with the appropriate inner diameter and bend angles. Common angles include 45-degree, 90-degree, and 135-degree bends. Silicone hoses offer superior heat resistance and longevity compared to rubber hoses.
- Cut and Trim: Carefully cut the hose sections to the required length using a sharp utility knife or hose cutter. Ensure the cuts are clean and square.
- Assemble with Couplers: Connect the hose sections using aluminum or stainless steel couplers. Use hose clamps designed for the hose type (e.g., worm-gear clamps, T-bolt clamps) to secure the hoses to the couplers.
- Test and Adjust: Install the assembled hoses and check for proper fitment and clearance. Make any necessary adjustments.
- Secure the Hoses: Secure the hoses to prevent rubbing or sagging. Use hose clamps, zip ties, or custom brackets to keep the hoses in place.
4. Modifying Existing Hoses
In some cases, you might be able to modify existing radiator hoses by cutting and splicing them. This is generally not recommended unless you have significant experience and are confident in your abilities. The reliability of this method can be questionable unless done correctly.
Pros:
- Potentially the cheapest option.
Cons:
- Very difficult to achieve a reliable and leak-free seal.
- High risk of failure.
- Not recommended for high-performance applications.
- Could lead to dangerous overheating if not done properly.
If you choose to modify existing hoses, use high-quality couplers and clamps, and ensure the splices are securely joined.
Essential Considerations
Regardless of the chosen method, several factors are crucial for a successful installation:
- Hose Diameter: Use hoses with an inner diameter that matches the radiator and engine outlet/inlet sizes. Too small a diameter can restrict coolant flow, while too large a diameter can make sealing difficult. Typically, LS engines use 1.25" (32mm) or 1.5" (38mm) radiator hose fittings. Consult your engine and radiator specifications.
- Hose Material: Choose hoses made from high-quality materials that can withstand the high temperatures and pressures of the cooling system. Silicone hoses are preferred over rubber hoses for their superior heat resistance and longevity.
- Hose Clamps: Use high-quality hose clamps to secure the hoses to the fittings. Worm-gear clamps are suitable for most applications, but T-bolt clamps offer superior clamping force for high-performance applications. Never over-tighten hose clamps, as this can damage the hose.
- Hose Routing: Plan the hose routing carefully to avoid sharp bends, kinks, and contact with engine components. Keep the hoses away from exhaust manifolds and other heat sources.
- Coolant Type: Use the correct type of coolant for your LS engine. Most LS engines require a Dex-Cool-compatible coolant. Mixing different types of coolant can lead to corrosion and damage to the cooling system.
- Bleeding the System: After installing the radiator hoses and filling the cooling system, properly bleed the system to remove any air pockets. Air pockets can cause overheating and damage to the engine. The LS engine typically has bleed screws on the thermostat housing or water pump.
- Expansion Tank/Overflow: Ensure that the cooling system has a properly functioning expansion tank or overflow reservoir to accommodate coolant expansion and contraction.
Tools and Materials
To complete the radiator hose installation, you will need the following tools and materials:
- Radiator hoses (pre-made kit, flexible hoses, or hose sections)
- Hose couplers (if fabricating custom hoses)
- Hose clamps
- Utility knife or hose cutter
- Measuring tape
- Pliers or hose clamp pliers
- Socket set and wrenches
- Coolant
- Funnel
- Safety glasses
- Gloves
Conclusion
Proper radiator hose fitment is crucial for the reliable and efficient cooling of your 240SX LS swap. While pre-made kits offer convenience, custom fabrication allows for the most flexibility. By carefully considering your options, planning the hose routing, and using high-quality materials, you can ensure that your cooling system effectively manages the heat generated by your LS engine, protecting your investment and maximizing performance. Pay close attention to proper bleeding procedures after completing the installation. Failure to do so could lead to overheating and severe engine damage. Consider using a coolant pressure tester to verify that there are no leaks after the install. Good luck!