240sx Manual Window Regulator: A How-to Guide
So, your 240SX's manual window regulator is giving you trouble, huh? Grinding, slipping, or just plain stuck? Don't worry, replacing it is a manageable job for a seasoned DIYer. This guide will walk you through the process, step-by-step, with all the technical details you need to know.
Tools & Materials You'll Need
Before you dive in, gather the following:
- New Window Regulator: Make sure you get the correct one for your year and side (driver or passenger).
- Socket Set: Metric sizes, including 10mm, 12mm, and possibly 14mm. A deep socket set can be helpful.
- Wrench Set: Again, metric sizes to match your socket set.
- Screwdrivers: Phillips head and flathead screwdrivers of various sizes.
- Trim Removal Tools: Essential for removing door panels without damage. Plastic tools are preferred.
- Pliers: Needle-nose and regular pliers will come in handy.
- Penetrating Oil: Like PB Blaster or WD-40. For loosening stubborn bolts.
- Work Gloves: To protect your hands.
- Eye Protection: Safety glasses are a must.
- Shop Rags: For cleaning up spills and greasy parts.
- Optional: A magnetic parts tray to keep track of small screws and bolts.
- Optional: A helper – having an extra pair of hands can make certain steps easier.
Step 1: Door Panel Removal
The first step is gaining access to the inside of the door. This means removing the door panel. This process can vary slightly depending on the year of your 240SX, but the general principles are the same.
- Remove the Door Handle Bezel: Typically, this pops out with a flathead screwdriver or trim removal tool. Be careful not to scratch the surrounding plastic.
- Remove the Window Crank: This is held on by a clip. You'll need a specialized window crank removal tool or a thin, bent piece of metal to push the clip off. Be patient; this can be tricky. If you can't get the clip off, you can sometimes carefully pry the crank off with a flathead screwdriver, but be prepared to damage the plastic.
- Remove Any Screws: Look for screws around the perimeter of the door panel, especially near the door handle, armrest, and bottom edge. Remove them using the appropriate screwdriver.
- Detach the Door Panel: Using your trim removal tools, carefully pry the door panel away from the door frame. Start at the bottom corners and work your way around. The panel is held on by plastic clips that can break easily, so be gentle.
- Disconnect Electrical Connectors: Once the door panel is loose, disconnect any electrical connectors attached to it. These may include connectors for the power mirrors (if equipped) and door lights.
- Remove the Door Panel: Lift the door panel up and off the door frame.
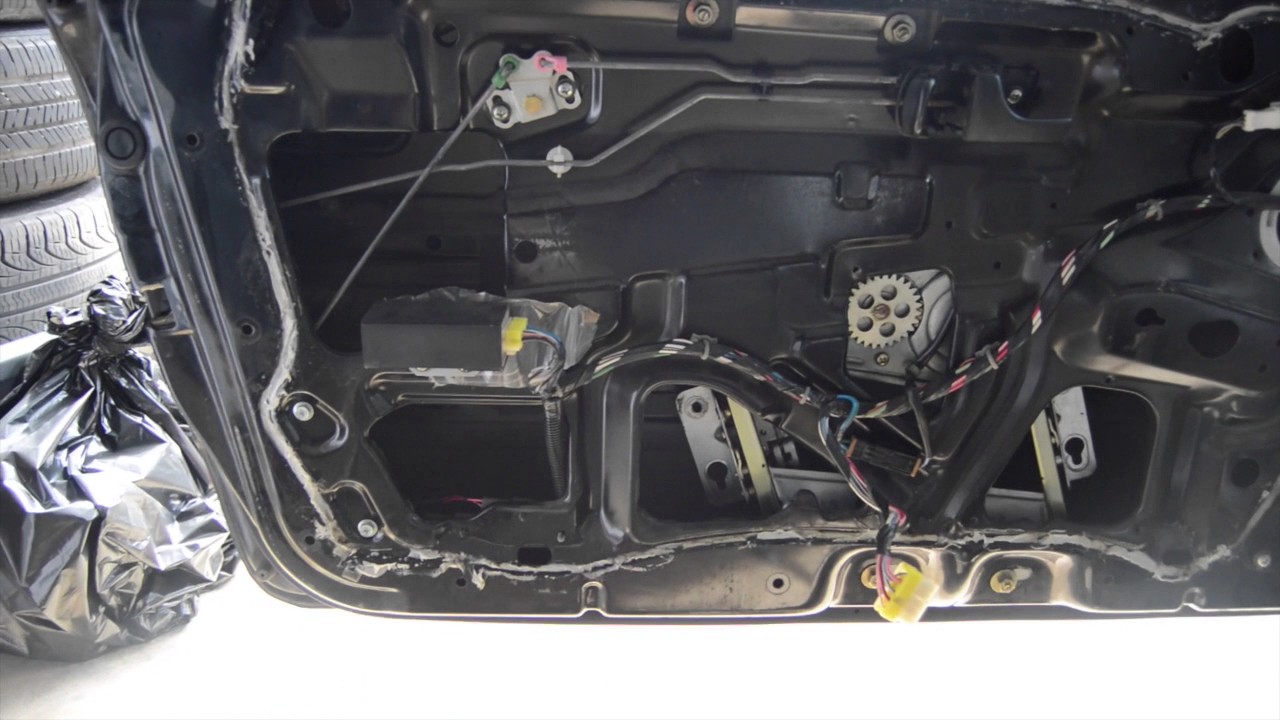
Step 2: Accessing the Regulator
With the door panel removed, you'll see a plastic vapor barrier covering the access holes in the door. Carefully peel this back to expose the inner workings of the door. Avoid tearing it if possible, as you'll need to reattach it later.
Locate the window regulator. It's the mechanism connected to the window crank, with a series of arms and gears that move the window up and down. You'll likely see it bolted to the inner door panel.
Step 3: Detaching the Window from the Regulator
This is a crucial step, and it requires care to avoid damaging the window. The window is typically attached to the regulator carriage by a clamp or bolts.
- Lower the Window: Lower the window until you can see the attachment points between the window and the regulator carriage through one of the access holes.
- Loosen the Window Attachment: Depending on the design, you may need to loosen bolts or clips holding the window to the carriage. Use your socket set or pliers to do this. *Don't completely remove the bolts yet; just loosen them.*
- Support the Window: This is critical! Once the window is detached, it will want to slide down into the door. Have a helper hold it, or use tape to secure it in the upper position. Masking tape or painter's tape works well for this.
- Completely Detach the Window: Now that the window is supported, you can completely remove the bolts or clips. Carefully lift the window up and secure it in the raised position, making absolutely sure it won't fall.
Step 4: Removing the Old Regulator
Now it's time to remove the old regulator. This usually involves removing several bolts that secure it to the inner door panel.
- Locate the Regulator Mounting Bolts: Identify all the bolts holding the regulator to the door. These are usually around the perimeter of the regulator assembly.
- Apply Penetrating Oil: Spray penetrating oil on the bolts to loosen them up, especially if they're rusty. Let the oil soak in for a few minutes.
- Remove the Mounting Bolts: Use your socket set or wrench set to remove the mounting bolts. Keep track of the bolts as you remove them; you'll need them to install the new regulator. A magnetic parts tray is very helpful here.
- Remove the Regulator: Once all the bolts are removed, carefully maneuver the regulator out of the door. You may need to twist and turn it to get it past other components inside the door.
Step 5: Installing the New Regulator
With the old regulator removed, you can now install the new one. This is essentially the reverse of the removal process.
- Position the New Regulator: Carefully position the new regulator inside the door, aligning it with the mounting holes.
- Install the Mounting Bolts: Install the mounting bolts, tightening them securely. *Don't overtighten them*, as you could strip the threads.
- Attach the Window to the Regulator: Carefully lower the window and align it with the regulator carriage. Reattach the window using the bolts or clips you removed earlier. Tighten the bolts securely, but again, *don't overtighten them.*
- Test the Operation: Before reassembling the door panel, test the window operation. Turn the window crank to raise and lower the window. Make sure it moves smoothly and doesn't bind. If it binds, check the alignment of the regulator and the window.
Step 6: Reassembly
Once you're satisfied with the window operation, you can reassemble the door panel.
- Reconnect Electrical Connectors: Reconnect any electrical connectors you disconnected earlier.
- Reattach the Vapor Barrier: Carefully reattach the vapor barrier to the door. Use tape or sealant if necessary to ensure a good seal.
- Position the Door Panel: Align the door panel with the door frame.
- Snap the Door Panel into Place: Push the door panel onto the door frame, snapping the plastic clips into place.
- Install Screws: Reinstall any screws you removed earlier.
- Reinstall the Window Crank: Reinstall the window crank, making sure the clip is properly seated.
- Reinstall the Door Handle Bezel: Snap the door handle bezel back into place.
Final Checks
Before you call it a day, perform a final check to ensure everything is working properly.
- Test the Window Operation: Raise and lower the window several times to make sure it moves smoothly.
- Check the Door Lock: Make sure the door locks and unlocks properly.
- Check the Door Handle: Make sure the door handle opens the door properly.
- Inspect the Door Panel: Make sure the door panel is securely attached and there are no gaps or loose edges.
If everything checks out, congratulations! You've successfully replaced your 240SX's manual window regulator. This job can save you a significant amount of money compared to taking it to a mechanic. Remember to take your time, be patient, and double-check your work along the way.
Important Note: While this guide provides a general overview of the process, specific details may vary depending on your 240SX's model year and trim level. Always consult your vehicle's service manual for the most accurate and up-to-date information. Working on your car can be dangerous. Always take appropriate safety precautions, and if you're not comfortable performing any of these steps, seek professional assistance.