240sx Skyline Tail Light Conversion
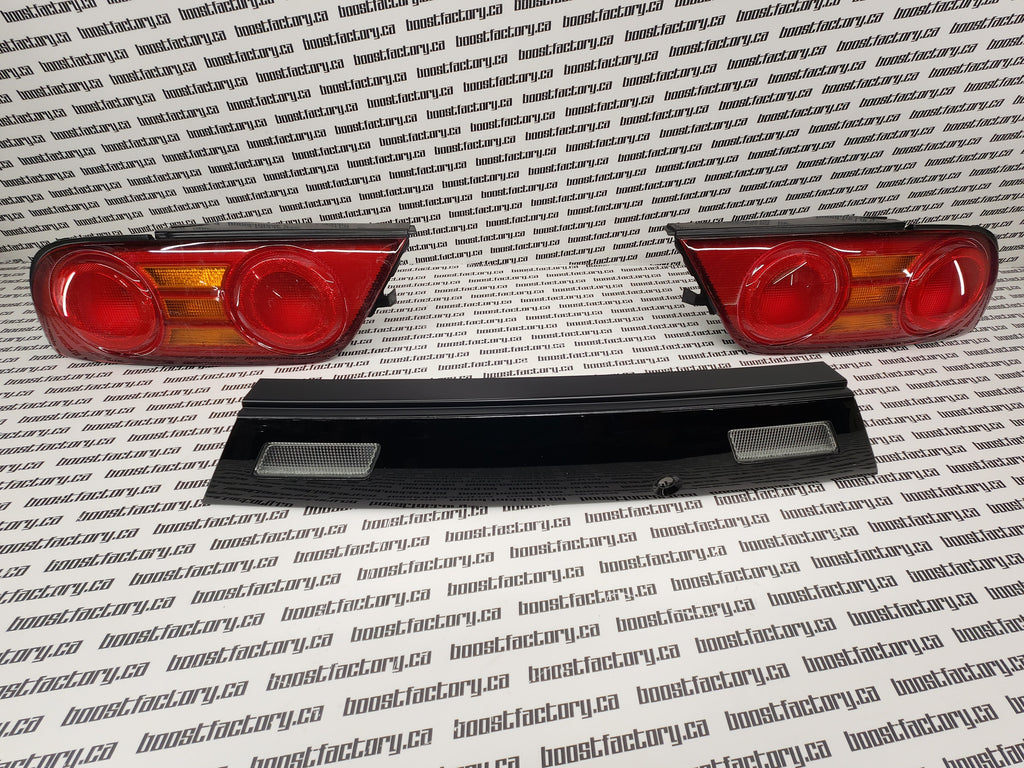
The Nissan 240SX, a beloved sports coupe from the late '80s and '90s, is a popular platform for modification. Among the many modifications available, one stands out for its aesthetic impact and connection to Nissan's performance heritage: the 240SX Skyline tail light conversion. This modification involves replacing the stock 240SX tail lights with those from a Nissan Skyline, typically the R32 or R33 generation. This article provides a comprehensive overview of this conversion, covering the reasons for its popularity, the components involved, the installation process, and important considerations to keep in mind.
Why Convert to Skyline Tail Lights?
The primary reason for undertaking a 240SX Skyline tail light conversion is aesthetics. The Skyline's distinctive round tail lights offer a more aggressive and sporty look compared to the original 240SX tail lights. Many enthusiasts believe the Skyline lights give the 240SX a more modern and JDM (Japanese Domestic Market) feel, aligning it more closely with Nissan's performance image. Here are some more specific reasons:
- Aesthetic Appeal: The Skyline tail lights offer a unique and visually striking appearance.
- JDM Style: It enhances the JDM look of the 240SX, a popular trend in car modification.
- Personalization: It allows owners to customize their 240SX and set it apart from others.
- Aggressiveness: The round tail lights contribute to a more aggressive and sporty stance.
- Rarity: It provides a sense of exclusivity and uniqueness.
Components Required for the Conversion
A successful 240SX Skyline tail light conversion requires several key components. The specific components can vary slightly depending on the specific Skyline tail lights being used (e.g., R32 vs. R33), but the following list covers the essential items:
- Skyline Tail Lights: Obviously, the core component. These can be sourced from various online retailers, JDM importers, or junkyards. Ensure you purchase a complete set, including all bulbs and wiring harnesses if possible. Consider the condition of the lights; cracks, fading, or broken mounting tabs will affect the final result.
- Conversion Harness: This is a crucial component that simplifies the wiring process. A conversion harness adapts the 240SX's wiring to the Skyline tail lights, preventing the need for cutting and splicing wires. Many reputable aftermarket companies offer these harnesses specifically designed for this conversion. Using a conversion harness is highly recommended for ease of installation and to avoid potential electrical issues.
- Mounting Brackets (Optional): Depending on the specific tail lights and the fitment desired, you may need to fabricate or purchase custom mounting brackets. Some conversions require minor modifications to the 240SX's body panel for a perfect fit. These brackets help ensure a secure and flush installation.
- License Plate Relocation Kit (Optional): The Skyline tail lights often have a different configuration than the 240SX lights, potentially requiring the relocation of the license plate. Aftermarket license plate relocation kits are readily available for the 240SX.
- Tools: Basic hand tools, including sockets, wrenches, screwdrivers, wire strippers, and a multimeter, are necessary for the installation.
- Wiring Supplies (If not using a harness): If you choose not to use a conversion harness, you'll need wiring supplies such as wire, connectors, heat shrink tubing, and a soldering iron. Soldering and heat shrinking are highly recommended for durable and reliable connections.
Installation Process: A Step-by-Step Guide
The 240SX Skyline tail light conversion, while not overly complex, requires careful attention to detail. The following steps provide a general guideline for the installation process. Always consult the instructions provided with your specific conversion kit or harness, as procedures may vary.
- Preparation: Disconnect the negative terminal of the battery to prevent electrical shorts. Gather all the necessary tools and components. Inspect the new tail lights for any damage.
- Remove the Existing Tail Lights: Access the tail light assembly from inside the trunk. Disconnect the wiring harnesses from the stock tail lights. Remove the mounting bolts or screws securing the tail lights to the body. Carefully remove the tail lights from the vehicle.
- Prepare the Wiring (Using a Conversion Harness): If using a conversion harness, connect it to the 240SX's existing tail light wiring harness. The harness should be plug-and-play, requiring no cutting or splicing. Double-check the connections to ensure they are secure and properly aligned.
- Prepare the Wiring (Without a Conversion Harness): If not using a harness, you will need to identify the function of each wire on both the 240SX and Skyline tail lights (ground, running lights, brake lights, turn signals). Use a multimeter to verify the wiring. Carefully cut and splice the wires, ensuring proper connections. Soldering and heat shrinking the connections are crucial for long-term reliability. Insulate all connections thoroughly to prevent shorts.
- Install the Skyline Tail Lights: Mount the Skyline tail lights into the 240SX's body. This may require using the optional mounting brackets or making minor modifications to the body panel. Ensure the tail lights are securely fastened and aligned properly.
- Connect the Wiring: Connect the wiring harness (or the spliced wires) to the Skyline tail lights. Double-check all connections to ensure they are secure.
- Test the Lights: Reconnect the negative terminal of the battery. Test all the tail light functions (running lights, brake lights, turn signals, reverse lights) to ensure they are working correctly. If any lights are not working, double-check the wiring connections and the bulbs.
- Install the License Plate Relocation Kit (If Necessary): If the Skyline tail lights interfere with the original license plate location, install the license plate relocation kit according to the manufacturer's instructions.
- Final Adjustments: Make any necessary adjustments to the tail light alignment or the license plate location. Ensure all wiring is neatly tucked away and secured to prevent it from interfering with the trunk mechanism.
Important Considerations and Potential Issues
While the 240SX Skyline tail light conversion is a popular modification, several important considerations and potential issues should be addressed:
- Fitment Issues: Achieving a perfect fit can sometimes be challenging, particularly with older or aftermarket tail lights. Minor modifications to the 240SX's body panel or the tail light mounting tabs may be necessary.
- Wiring Compatibility: Ensure the wiring is compatible between the 240SX and the Skyline tail lights. Using a conversion harness significantly simplifies this process. Incorrect wiring can lead to electrical problems and damage to the vehicle's electrical system.
- Legal Compliance: Check local laws and regulations regarding tail light modifications. Some areas may have specific requirements for tail light color, brightness, and visibility.
- Water Leaks: Ensure the tail lights are properly sealed to prevent water leaks into the trunk. Use weather stripping or sealant if necessary.
- Bulb Compatibility: Verify that the bulbs used in the Skyline tail lights are compatible with the 240SX's electrical system. Different bulb types may require different voltage or wattage.
- Quality of Components: Use high-quality components, particularly the conversion harness and wiring supplies. Cheap components can lead to unreliable connections and electrical problems.
- Rust Prevention: If modifications to the body are performed, ensure bare metal is treated with rust preventative primer and paint.
- Professional Installation: If you are not comfortable performing the installation yourself, consider hiring a qualified mechanic or automotive electrician.
Troubleshooting Common Problems
Even with careful planning and execution, issues can arise during or after the 240SX Skyline tail light conversion. Here are some common problems and their potential solutions:
- Lights Not Working: Check the bulbs, wiring connections, and fuses. Use a multimeter to test for voltage at the tail light connector.
- Flickering Lights: Loose wiring connections or a faulty ground can cause flickering lights. Inspect all connections and ensure they are secure.
- Dim Lights: A weak ground or a corroded connection can cause dim lights. Clean and tighten the ground connections.
- Turn Signals Not Working: Check the turn signal bulbs, flasher relay, and wiring connections. Ensure the turn signal circuit is properly wired.
- Brake Lights Not Working: Check the brake light bulbs, brake light switch, and wiring connections. Ensure the brake light circuit is properly wired.
- Water Leaks: Inspect the tail light seals and apply sealant if necessary. Check for any gaps or cracks in the tail light housing.
- Incompatible Bulbs: Verify that the bulbs are the correct type and voltage for the 240SX's electrical system. Replace incompatible bulbs with the correct ones.
Conclusion
The 240SX Skyline tail light conversion is a popular and visually appealing modification that can significantly enhance the appearance of your vehicle. By carefully planning the installation, using high-quality components, and addressing potential issues, you can achieve a successful and rewarding conversion. Remember to consult the instructions provided with your specific conversion kit or harness and to seek professional assistance if needed. With patience and attention to detail, you can transform the rear end of your 240SX and give it a unique and JDM-inspired look.