240sx Slave Cylinder Replacement
The Nissan 240sx, a darling of the drift and tuner communities, is known for its robust mechanics. However, like any vehicle, certain components are prone to wear and tear. Among these is the clutch slave cylinder, a small but vital part responsible for translating hydraulic pressure into mechanical action to disengage the clutch. When it fails, shifting gears becomes a Herculean task, if not impossible. This article provides an in-depth look at replacing the 240sx slave cylinder, offering not just the ‘how,’ but also the ‘why’ behind each step.
Understanding the Slave Cylinder's Role
Before diving into the replacement procedure, it's crucial to understand what the slave cylinder does. The clutch system, in essence, allows the engine to be temporarily disconnected from the transmission. When you press the clutch pedal, you're initiating a chain of events. First, the master cylinder, located near the pedal, pressurizes hydraulic fluid. This pressurized fluid travels through a line to the slave cylinder, mounted on the transmission bellhousing. The slave cylinder then uses this hydraulic pressure to push on a rod, which in turn actuates the clutch fork. The clutch fork then disengages the clutch disc from the flywheel, allowing you to shift gears.
A failing slave cylinder often exhibits symptoms like a soft or spongy clutch pedal, difficulty shifting into gear, or even a complete inability to shift. You might also notice fluid leaks around the cylinder itself, indicating a breach in the seals.
Tools and Materials Required
Gathering the necessary tools and materials before starting the job is crucial for a smooth replacement. Here's a comprehensive list:
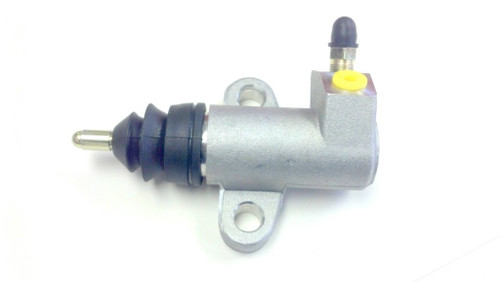
- New Slave Cylinder: Make sure it's the correct part for your 240sx model year and transmission type (KA24E, KA24DE, or SR20DET).
- Brake Fluid: Use the appropriate DOT rating specified for your 240sx (DOT 3 or DOT 4).
- Wrenches: Typically, you'll need 10mm, 12mm, and possibly 14mm wrenches.
- Flare Nut Wrench: Essential for loosening the hydraulic line without damaging the fitting. A 10mm flare nut wrench is usually required.
- Socket Set: A socket set with various sizes and extensions can be helpful for accessing tight spaces.
- Pliers: For removing clips or hose clamps.
- Brake Bleeder Kit (Optional): While not strictly necessary, a brake bleeder kit can significantly simplify the bleeding process.
- Catch Pan: To collect spilled brake fluid.
- Rags or Shop Towels: For cleaning up spills and wiping down components.
- Penetrating Oil: Helpful for loosening stubborn bolts or fittings.
- Jack and Jack Stands: To safely lift and support the vehicle.
- Wheel Chocks: For safety, chock the rear wheels.
- Safety Glasses: Protect your eyes from brake fluid and debris.
- Gloves: Protect your hands from brake fluid.
Step-by-Step Replacement Procedure
Now, let's proceed with the slave cylinder replacement. Follow these steps carefully:
- Safety First: Ensure the vehicle is parked on a level surface, engage the parking brake, and chock the rear wheels.
- Lift and Support: Use a jack to lift the front of the vehicle and securely place it on jack stands. Never work under a vehicle supported only by a jack.
- Locate the Slave Cylinder: The slave cylinder is typically mounted on the driver's side of the transmission bellhousing. It's a small cylindrical component with a hydraulic line connected to it.
- Prepare for Fluid Spillage: Place a catch pan under the slave cylinder to collect any spilled brake fluid. Brake fluid is corrosive and can damage paint.
- Loosen the Hydraulic Line: Use a flare nut wrench to carefully loosen the hydraulic line fitting. Be extremely cautious, as these fittings can be easily damaged. Apply penetrating oil if the fitting is stuck. Important: Do NOT completely remove the line at this stage, just loosen it.
- Remove Mounting Bolts: Use the appropriate wrench or socket to remove the bolts that secure the slave cylinder to the bellhousing. Typically, there are two bolts.
- Disconnect Hydraulic Line and Remove Slave Cylinder: Now, carefully disconnect the hydraulic line completely. As you disconnect it, brake fluid will start to drip. Immediately plug the end of the hydraulic line with a small cap or wrap it with a clean rag to minimize fluid loss and prevent contaminants from entering the system. Remove the old slave cylinder.
- Inspect the Pushrod: Examine the pushrod on the new slave cylinder. Some aftermarket slave cylinders have an adjustable pushrod. Ensure it's properly adjusted or set to the same length as the pushrod on the old cylinder. If the new cylinder doesn't come with a pushrod, you will need to carefully remove it from the old cylinder and install it into the new one.
- Install the New Slave Cylinder: Position the new slave cylinder onto the bellhousing and align the mounting holes. Secure it with the mounting bolts, tightening them to the manufacturer's specified torque (if available; otherwise, snug them down firmly).
- Reconnect the Hydraulic Line: Carefully reconnect the hydraulic line to the slave cylinder. Tighten the fitting snugly with the flare nut wrench. Avoid overtightening, as this can damage the fitting.
- Bleed the Clutch System: Bleeding the clutch system is essential to remove air bubbles from the hydraulic lines. Air in the system will result in a spongy clutch pedal and poor clutch engagement.
- Test the Clutch Pedal: After bleeding, pump the clutch pedal several times to build pressure. Check for a firm, consistent pedal feel. If the pedal still feels spongy, repeat the bleeding process.
- Check for Leaks: Thoroughly inspect the hydraulic line fitting and the slave cylinder itself for any signs of leaks. Tighten the fitting slightly if necessary, but avoid overtightening.
- Lower the Vehicle: Once you're confident that the system is properly bled and there are no leaks, carefully lower the vehicle from the jack stands.
- Test Drive: Take the 240sx for a short test drive to ensure the clutch operates smoothly and shifts properly. Pay attention to any unusual noises or vibrations.
Bleeding Procedure:
a. Locate the bleeder screw on the slave cylinder. It's a small screw, usually with a rubber cap covering it.
b. Attach a clear hose to the bleeder screw and run the other end of the hose into a container partially filled with brake fluid. This prevents air from being drawn back into the system.
c. Have a helper slowly depress the clutch pedal fully and hold it down.
d. While the pedal is depressed, open the bleeder screw slightly. You should see brake fluid (and possibly air bubbles) flow through the hose into the container.
e. Close the bleeder screw before your helper releases the clutch pedal.
f. Repeat steps c-e until no more air bubbles are visible in the fluid flowing through the hose.
g. Ensure the master cylinder reservoir is topped off with brake fluid throughout the bleeding process. Running the reservoir dry will introduce air into the system, requiring you to start over.
h. Once the bleeding is complete, tighten the bleeder screw and remove the hose. Reinstall the rubber cap.
Troubleshooting
Even with meticulous attention to detail, issues can arise during the slave cylinder replacement. Here are some common problems and their potential solutions:
- Hydraulic Line Fitting Seized: If the fitting is heavily corroded and refuses to budge, try applying penetrating oil repeatedly over several hours. You can also try heating the fitting gently with a heat gun (exercise caution to avoid damaging surrounding components). As a last resort, you may need to replace the hydraulic line entirely.
- Bleeder Screw Seized: A seized bleeder screw can be a major headache. Apply penetrating oil and let it soak. If it still won't budge, you may need to use a bleeder screw extraction tool or replace the entire slave cylinder.
- Spongy Clutch Pedal After Bleeding: If the clutch pedal remains spongy after bleeding, it's likely that air is still present in the system. Double-check all connections for leaks and repeat the bleeding process. Consider gravity bleeding, where you simply open the bleeder screw and allow fluid to drain slowly, or using a pressure bleeder. There could also be an issue with the master cylinder.
- Clutch Slipping After Replacement: If the clutch slips after replacing the slave cylinder, it's unlikely to be directly caused by the replacement itself. Slipping typically indicates a worn clutch disc, pressure plate, or flywheel. However, ensure the slave cylinder pushrod is properly adjusted to prevent the clutch from being partially disengaged.
Final Thoughts
Replacing the slave cylinder on a 240sx is a relatively straightforward task that can be accomplished by a reasonably skilled DIY mechanic. By understanding the function of the slave cylinder, following the steps outlined above carefully, and taking appropriate safety precautions, you can successfully restore proper clutch operation and get back to enjoying the driving experience your 240sx offers. Remember to always prioritize safety and consult a qualified mechanic if you encounter any difficulties beyond your skill level. Understanding your vehicle's systems empowers you to keep it running smoothly for years to come.