240sx Steering Rack Bushing: Replacement Guide
The Nissan 240SX, a darling of the drifting and tuning communities, is renowned for its responsive handling. A critical, often overlooked component in maintaining that crisp steering feel is the steering rack bushing. These seemingly insignificant pieces of rubber or polyurethane play a vital role in securing the steering rack to the chassis, minimizing unwanted movement and ensuring precise steering input. Over time, however, these bushings can degrade, leading to sloppy steering, wandering, and a generally diminished driving experience. This guide provides an in-depth look at replacing the steering rack bushings on a 240SX, offering insights into the process and the underlying mechanics.
Understanding the Steering Rack and Bushing Function
Before diving into the replacement procedure, it's crucial to understand the role of the steering rack and its bushings. The steering rack is a vital part of the steering system, translating the rotational motion of the steering wheel into linear motion that turns the front wheels. The rack itself is a long metal cylinder with gear teeth that engage with a pinion gear connected to the steering shaft. As the steering wheel is turned, the pinion gear rotates, moving the rack laterally. Tie rods, connected to the ends of the rack, then push or pull on the steering knuckles, causing the wheels to turn.
The steering rack bushings serve as the interface between the steering rack and the vehicle's chassis. They are typically made of rubber or polyurethane, materials chosen for their ability to absorb vibrations and minimize noise. However, their primary function is to securely locate the steering rack and prevent it from moving independently of the chassis. When these bushings are new and in good condition, they provide a firm and stable mounting point, ensuring that the steering input is directly and efficiently translated to the wheels. Conversely, when the bushings are worn, cracked, or deteriorated, they allow the steering rack to move excessively, leading to:
- Slop in the steering: A noticeable delay or "play" in the steering wheel before the wheels respond.
- Wandering: The vehicle tending to drift from side to side, requiring constant steering corrections.
- Vague steering feel: A lack of precision and feedback from the road.
- Increased vibration: More vibrations transmitted through the steering wheel.
Therefore, replacing worn steering rack bushings is a relatively inexpensive but highly effective way to restore the original handling characteristics of your 240SX.
Tools and Materials Required
Before commencing the replacement, gather the necessary tools and materials. Having everything readily available will streamline the process and minimize frustration. Essential items include:
- New Steering Rack Bushings: Choose between rubber and polyurethane. Polyurethane bushings generally offer a firmer feel and increased durability but may transmit more road noise and vibration. Consider your driving style and preferences when making your selection.
- Socket Set: Metric sockets of varying sizes are needed to remove the mounting bolts and hardware.
- Wrench Set: Metric wrenches are also required for accessing certain bolts and nuts.
- Torque Wrench: Essential for properly tightening the mounting bolts to the manufacturer's specifications.
- Jack and Jack Stands: To safely lift and support the vehicle. Never work under a vehicle supported only by a jack.
- Wheel Chocks: To prevent the rear wheels from rolling.
- Penetrating Oil: To loosen any stubborn or corroded bolts.
- Hammer: For tapping out old bushings (use with caution).
- Punch or Drift: To help drive out the old bushings.
- Grease or Lubricant: To aid in the installation of the new bushings. Silicone-based grease is recommended for polyurethane bushings.
- Safety Glasses: To protect your eyes from debris.
- Gloves: To protect your hands.
- Optional: Bushing Removal Tool: While not strictly necessary, a dedicated bushing removal tool can significantly simplify the process. These tools are designed to press out the old bushings without damaging the surrounding components.
Step-by-Step Replacement Procedure
Now, let's proceed with the step-by-step guide to replacing the steering rack bushings.
1. Vehicle Preparation
Begin by ensuring the vehicle is safely prepared for the task.
- Park the vehicle on a level surface and engage the parking brake.
- Place wheel chocks behind the rear wheels.
- Loosen the lug nuts on the front wheels.
- Use a jack to lift the front of the vehicle and securely support it with jack stands. Position the jack stands on the designated jacking points of the chassis.
- Remove the front wheels.
2. Accessing the Steering Rack
Gain access to the steering rack and its mounting points.
- Locate the steering rack, which is typically mounted to the front subframe.
- Inspect the steering rack bushings to assess their condition. Look for cracks, tears, or excessive play.
- Identify the mounting bolts that secure the steering rack to the subframe. There are usually two or three mounting points.
3. Removing the Old Bushings
This is often the most challenging part of the process. Patience and persistence are key.
- Apply penetrating oil to the mounting bolts and let it soak for several minutes. This will help loosen any corrosion.
- Carefully remove the mounting bolts using the appropriate sockets and wrenches. Be prepared for them to be tight.
- Once the bolts are removed, the steering rack should be free from the subframe at the bushing locations, but still connected to the steering linkage and tie rods.
- Now, you need to remove the old bushings. There are several methods you can use:
- Hammer and Punch Method: This method involves using a hammer and punch to carefully drive out the old bushings. Place the punch on the edge of the bushing and tap it gently with the hammer. Work your way around the bushing until it starts to move. Be careful not to damage the steering rack or the subframe.
- Bushing Removal Tool: If you have access to a bushing removal tool, this is the preferred method. Follow the instructions that come with the tool to press out the old bushings.
- Burning Method (Use with Extreme Caution): This method is not recommended due to safety concerns. It involves burning out the rubber portion of the bushing, leaving the outer metal sleeve. This can be dangerous and should only be attempted by experienced individuals with proper safety equipment and ventilation. Burning rubber releases toxic fumes.
- Clean the mounting surfaces on the steering rack and subframe to remove any debris or corrosion.
4. Installing the New Bushings
With the old bushings removed, installing the new ones is relatively straightforward.
- Apply a liberal amount of grease or lubricant to the new bushings. This will help them slide into place. Silicone grease is recommended for polyurethane bushings.
- Position the new bushings onto the steering rack.
- Carefully press the bushings into place. You can use a hammer and a socket that is slightly smaller than the outer diameter of the bushing to gently tap them in. Alternatively, a bushing installation tool can be used for a more controlled installation.
- Ensure the bushings are fully seated and aligned correctly.
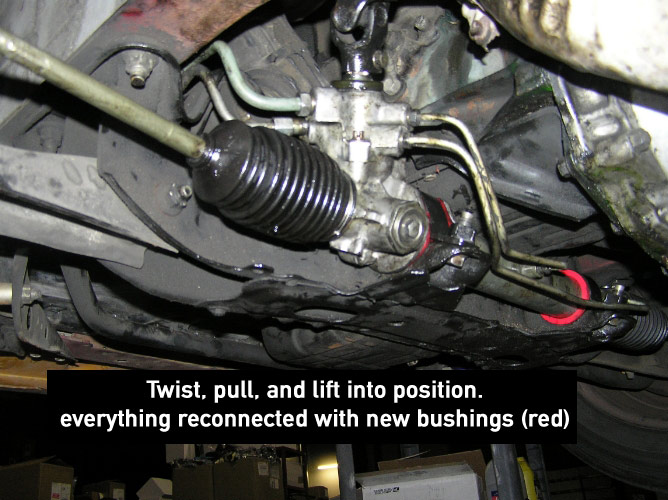
5. Reassembling the Steering Rack
Now, reassemble the steering rack to the subframe.
- Position the steering rack back onto the subframe, aligning the mounting holes.
- Install the mounting bolts and tighten them finger-tight initially.
- Using a torque wrench, tighten the mounting bolts to the manufacturer's specified torque. This is a critical step, as over-tightening can damage the bushings or the steering rack, while under-tightening can result in loose mounting. Refer to a repair manual for the correct torque specifications.
6. Final Steps
Complete the reassembly and ensure everything is properly secured.
- Reinstall the front wheels.
- Lower the vehicle back to the ground.
- Tighten the lug nuts to the manufacturer's specified torque.
- Double-check all bolts and connections to ensure they are secure.
Post-Installation Checks and Adjustments
After completing the bushing replacement, perform the following checks and adjustments:
- Test Drive: Take the vehicle for a test drive to evaluate the steering feel. You should notice a significant improvement in steering response and reduced sloppiness.
- Alignment Check: It is highly recommended to have a wheel alignment performed after replacing the steering rack bushings. This will ensure that the wheels are properly aligned and prevent premature tire wear.
- Inspect: After driving for a few miles, re-inspect the mounting bolts to ensure they remain tight.
Conclusion
Replacing the steering rack bushings on a 240SX is a relatively straightforward procedure that can significantly improve the vehicle's handling and driving experience. By following this guide and taking the necessary precautions, you can restore the crisp steering feel that the 240SX is known for. Remember to choose quality replacement bushings, use the correct tools, and always prioritize safety. Properly maintained steering rack bushings are essential for safe and enjoyable driving.