240sx Timing Chain Replacement: Step-by-step Guide
The Nissan 240SX, particularly those powered by the KA24DE engine, is a beloved platform for modification and track use. A critical component of this engine is its timing chain, responsible for synchronizing the crankshaft and camshaft(s), thereby dictating valve timing. Over time, this chain can stretch, leading to decreased engine performance and, if left unchecked, catastrophic engine failure. This guide details the procedure for replacing the timing chain on a KA24DE engine, offering insights into the mechanics involved and best practices for a successful repair.
Understanding the Timing Chain System
Before diving into the replacement process, it's crucial to understand the role and components of the timing chain system. The timing chain connects the crankshaft sprocket to the camshaft sprocket(s). As the crankshaft rotates, it drives the timing chain, which in turn rotates the camshaft(s). The precise relationship between these rotations is vital for proper engine operation. The chain also drives the water pump, which is crucial for the cooling system. Key components include:
- Timing Chain: The primary driver of the system.
- Crankshaft Sprocket: Located on the crankshaft, driving the timing chain.
- Camshaft Sprocket(s): Located on the camshaft(s), driven by the timing chain.
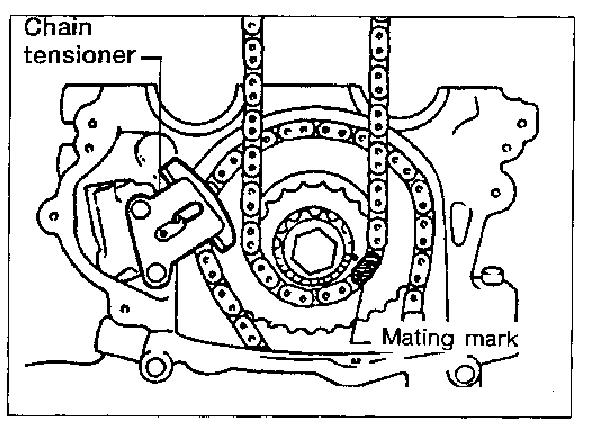
- Timing Chain Tensioner: Maintains proper chain tension, preventing slack and noise.
- Timing Chain Guides: Plastic or metal guides that direct the chain's path and prevent excessive vibration.
- Water Pump: Driven by the timing chain, it circulates coolant through the engine.
A stretched or worn timing chain can cause a variety of problems, including:
- Reduced engine power.
- Rough idling.
- Poor fuel economy.
- Check engine light (often accompanied by codes related to camshaft/crankshaft correlation).
- Noise from the timing chain area (rattling or slapping sounds).
Ignoring these symptoms can lead to the timing chain skipping teeth on the sprockets, resulting in valve timing errors. This can cause piston-to-valve contact, leading to significant engine damage.
Tools and Materials Required
Before commencing the timing chain replacement, gather the necessary tools and materials. This will streamline the process and prevent unnecessary delays. At a minimum, you will require:
- New Timing Chain Kit: Including the timing chain, sprockets (if desired), tensioner, and guides. It is highly recommended to replace all these components as a kit to ensure proper function and longevity.
- Socket Set: Metric sockets and wrenches of various sizes.
- Torque Wrench: Essential for tightening bolts to the correct specifications.
- Crankshaft Pulley Removal Tool: Specifically designed to remove the crankshaft pulley.
- Valve Cover Gasket: Replace the valve cover gasket when removing the valve cover.
- Water Pump Gasket: Necessary if replacing the water pump.
- Coolant: To refill the cooling system after replacing the water pump.
- Oil and Oil Filter: Recommended to change the oil after this service.
- RTV Silicone Sealant: For sealing the timing chain cover.
- Pliers and Screwdrivers: Assorted sizes and types.
- Penetrating Oil: To loosen stubborn bolts.
- Shop Rags and Cleaners: For cleaning parts and the work area.
- Drain Pan: To catch fluids.
- Service Manual: A service manual specific to the 240SX with the KA24DE engine is invaluable for torque specifications and detailed instructions.
Step-by-Step Timing Chain Replacement
The following steps outline the timing chain replacement procedure. Always refer to your service manual for specific torque specifications and any variations for your particular model year.
1. Preparation and Disassembly
Begin by disconnecting the negative battery cable. Drain the coolant by opening the drain cock on the radiator. Drain the engine oil. Remove the radiator, fan shroud, and cooling fan to provide ample working space.
2. Accessing the Timing Chain
Remove the accessory belts (power steering, alternator, etc.). Remove the crankshaft pulley using the appropriate removal tool. Disconnect any wiring harnesses or hoses that are attached to the timing chain cover. Remove the valve cover. Carefully disconnect and remove the distributor. Disconnect the upper radiator hose from the water pump.
3. Removing the Timing Chain Cover
Remove the bolts securing the timing chain cover. These bolts may be of varying lengths, so keep track of their locations. Gently pry the timing chain cover away from the engine block. Avoid using excessive force, as this can damage the cover or the engine block. If the cover is stuck, use a rubber mallet to gently tap around the edges. Clean the mating surfaces of the timing chain cover and the engine block to remove any old sealant or debris.
4. Setting the Engine to Top Dead Center (TDC)
Rotate the crankshaft until the timing marks on the crankshaft sprocket and camshaft sprocket(s) align with the corresponding marks on the engine. This is crucial for ensuring proper valve timing after the new chain is installed. The KA24DE is an interference engine, which means if timing is incorrect, the valves and pistons can collide, causing severe damage. Double-check that the engine is at TDC before proceeding.
5. Removing the Old Timing Chain
Loosen or remove the timing chain tensioner. Remove the timing chain guides. Carefully remove the old timing chain from the sprockets. Inspect the sprockets for wear or damage. If the sprockets are worn, replace them with new ones from the timing chain kit.
6. Installing the New Timing Chain
Install the new sprockets (if replacing). Install the new timing chain, ensuring that the timing marks on the chain align with the timing marks on the sprockets. Double-check the alignment of the timing marks before proceeding. Install the new timing chain guides. Install the new timing chain tensioner.
7. Verifying Timing and Tension
After installing the new timing chain, rotate the crankshaft by hand several revolutions to ensure that the timing marks remain aligned and that the timing chain tension is correct. Verify that the timing chain tensioner is functioning properly. If the tension is too loose or too tight, readjust the tensioner as needed.
8. Reinstalling the Timing Chain Cover
Apply a thin bead of RTV silicone sealant to the mating surface of the timing chain cover. Carefully reinstall the timing chain cover, ensuring that it is properly aligned. Tighten the bolts to the torque specifications listed in the service manual. Avoid overtightening the bolts, as this can damage the cover or the engine block.
9. Reassembly
Reinstall all the components that were removed during the disassembly process, including: valve cover (with a new gasket), distributor, crankshaft pulley, accessory belts, radiator, fan shroud, and cooling fan. Reconnect any wiring harnesses or hoses that were disconnected. Fill the cooling system with coolant. Fill the engine with oil and install a new oil filter.
10. Final Checks and Startup
Double-check all connections and fluid levels. Reconnect the negative battery cable. Start the engine and let it idle for several minutes. Check for any leaks or unusual noises. Monitor the engine temperature gauge to ensure that the engine is not overheating. Drive the vehicle for a short distance and then recheck all fluid levels and connections.
Important Considerations
- Cleanliness is crucial. Ensure all parts and surfaces are clean before reassembling.
- Torque specifications are critical. Use a torque wrench and adhere to the manufacturer's specifications.
- Inspect all components. While the engine is disassembled, inspect other components for wear or damage, such as the water pump, oil pump, and seals. Replace these components as needed.
- If unsure, seek professional help. If you are not comfortable performing this procedure, consult a qualified mechanic. Incorrect timing can lead to serious engine damage.
- Document everything. Take pictures during disassembly to aid in reassembly, especially of wiring and hose routing.
Replacing the timing chain on a KA24DE engine is a complex but rewarding task. By following these steps and paying close attention to detail, you can ensure that your engine runs smoothly and reliably for years to come.