240sx Transmission Fill Plug: Location And Fluid Change
The Nissan 240SX, especially the S13 and S14 generations, are beloved platforms for drifting, track days, and general automotive enthusiasm. While their SR20DET and KA24DE engines get most of the glory, a reliable transmission is crucial for translating horsepower into sideways action (or forward momentum, if that's your preference). Regular maintenance, including fluid changes, is key to keeping these transmissions healthy and shifting smoothly. This guide will delve into the location of the transmission fill plug on both the S13 and S14 240SX, along with a comprehensive walkthrough of the fluid change process.
Understanding the 240SX Transmission Landscape
Before diving into the specifics, it's important to understand the different transmissions that found their way into the 240SX. Broadly speaking, there are two manual transmissions commonly found: the KA24DE transmission (typically found in the naturally aspirated models) and the SR20DET transmission (found in the turbocharged models, often imported as swaps). Although visually similar, and sometimes physically interchangeable with some modification, they have internal differences. automatic transmissions also existed, though they are less common among enthusiasts. This guide focuses on the manual transmissions as they are more prevalent in modified and performance-oriented 240SX builds.
It's crucial to identify which transmission you have before proceeding. While the fill plug location is generally the same across KA and SR transmissions, the fluid capacity and recommended fluid type might differ. Refer to your vehicle's service manual or specific transmission documentation for the most accurate information.
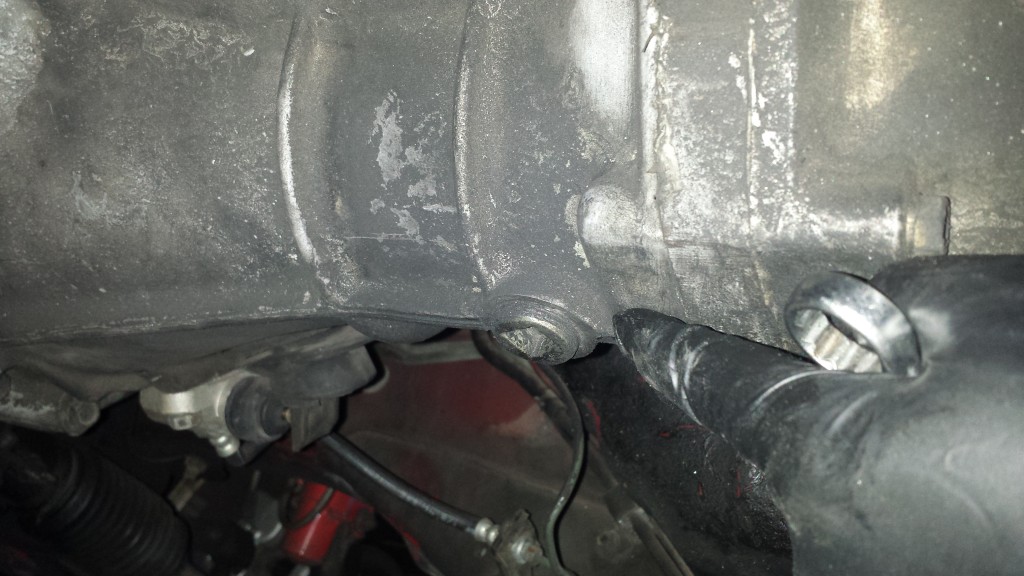
Locating the Transmission Fill Plug: A Visual Guide
The fill plug on both the KA and SR manual transmissions is located on the driver's side of the transmission casing. It's a relatively large bolt, typically requiring a 24mm socket (or a large wrench) for removal. Here's a breakdown of how to find it:
Step-by-Step Location Guide:
- Raise the Vehicle Safely: This is paramount. Use a jack and secure the vehicle with jack stands placed on the designated jacking points. Never work under a vehicle supported only by a jack.
- Locate the Transmission: It's the large component connecting the engine to the driveshaft. It will be visible underneath the car, roughly in the middle.
- Identify the Driver's Side: Stand on the driver's side of the car.
- Scan the Transmission Casing: Look for a large, horizontally oriented bolt on the side of the transmission casing. It's usually located about halfway up the side of the transmission.
- The Fill Plug: This is the fill plug. It's typically the only large bolt on that side of the transmission casing. Sometimes, there may be slight differences in the casting around the plug depending on the exact transmission model, but the general location remains consistent.
Pro Tip: Cleaning the area around the fill plug before attempting to remove it is a good practice. This prevents dirt and debris from falling into the transmission when the plug is removed. Use a wire brush or compressed air to thoroughly clean the area.
Performing a 240SX Transmission Fluid Change: A Detailed Walkthrough
Changing your 240SX's transmission fluid is a relatively straightforward process that can significantly extend the life of your transmission and improve shift quality. Here's a detailed guide:
Tools and Materials Required:
- New transmission fluid (refer to your service manual for the correct type and quantity)
- 24mm socket or wrench
- Drain pan
- Fluid pump or funnel with a long hose
- Jack and jack stands
- Gloves
- Rags or shop towels
- Torque wrench (optional, but recommended)
- Breaker bar (if the fill or drain plug is stubborn)
- Safety Glasses
Step-by-Step Fluid Change Procedure:
- Prepare the Vehicle: Safely raise and secure the vehicle using jack stands. Make sure the car is level for proper draining.
- Locate the Drain Plug: The drain plug is located on the bottom of the transmission casing. It will be similar in size to the fill plug.
- Position the Drain Pan: Place the drain pan directly underneath the drain plug.
- Remove the Drain Plug: Using the 24mm socket or wrench, carefully remove the drain plug. The fluid will start to drain immediately. Be careful, as the fluid may be hot.
- Allow the Transmission to Drain Completely: This may take 15-30 minutes. Letting it drain fully ensures that most of the old, contaminated fluid is removed.
- Inspect the Drain Plug: Check the drain plug for any metal shavings or debris. This can be an indicator of internal transmission wear. Clean the drain plug thoroughly. Some drain plugs have a magnetic tip designed to capture metal particles.
- Reinstall the Drain Plug: Once the transmission has completely drained, reinstall the drain plug. Torque it to the manufacturer's specifications (refer to your service manual). If you don't have access to torque specs, tighten it snugly but don't overtighten, as you could strip the threads.
- Locate and Remove the Fill Plug: Locate the fill plug as described in the previous section. Use the 24mm socket or wrench to remove it. This can sometimes be difficult if the plug is seized. Use a breaker bar for extra leverage if needed.
- Add New Transmission Fluid: Using the fluid pump or funnel and hose, carefully add the new transmission fluid through the fill plug hole. Refer to your service manual for the correct fluid capacity. It's best to add slightly less than the specified amount initially and then check the fluid level.
- Check the Fluid Level: The fluid level is correct when it starts to drip out of the fill plug hole. This indicates that the transmission is full to the correct level.
- Reinstall the Fill Plug: Once the fluid level is correct, reinstall the fill plug. Torque it to the manufacturer's specifications. Again, if you don't have torque specs, tighten it snugly but don't overtighten.
- Clean Up: Clean up any spilled fluid and remove the drain pan.
- Lower the Vehicle: Carefully lower the vehicle back to the ground.
- Test Drive: Take the car for a short test drive and check for any leaks around the drain and fill plugs. Also, pay attention to the shift quality to ensure the transmission is operating smoothly.
Important Note: Always dispose of used transmission fluid properly. It is considered hazardous waste and should not be dumped down the drain or into the environment. Take it to a local auto parts store or recycling center for proper disposal.
Fluid Selection and Capacity
Choosing the right transmission fluid is crucial for optimal performance and longevity. Refer to your vehicle's service manual for the recommended fluid type. Many 240SX owners prefer synthetic fluids for their improved performance and durability. Popular choices include Red Line MT-90, Amsoil Synthetic Manual Transmission Fluid, and other reputable brands. The exact fluid capacity varies depending on the transmission model, but it typically ranges from 2.5 to 3 quarts. Always double-check the capacity in your service manual.
Troubleshooting Common Issues
Several issues can arise during a transmission fluid change. Here are some common problems and potential solutions:
- Seized Fill or Drain Plug: If the fill or drain plug is difficult to remove, use a breaker bar for extra leverage. Applying heat to the area around the plug can also help to loosen it. Be cautious when using heat and avoid damaging the transmission casing.
- Stripped Threads: If the threads on the fill or drain plug are stripped, you may need to replace the plug or, in severe cases, repair the threads in the transmission casing. Using a thread repair kit (such as a Heli-Coil) can be a viable option.
- Incorrect Fluid Level: If you add too much fluid, you can remove the fill plug and allow the excess fluid to drain out. If you add too little fluid, add more until it starts to drip out of the fill plug hole.
- Leaks After Fluid Change: If you notice leaks after the fluid change, double-check that the drain and fill plugs are properly tightened and that the crush washers (if applicable) are in good condition.
Conclusion
Regular transmission fluid changes are a vital part of maintaining the health and performance of your 240SX. By following these detailed instructions, you can confidently perform this task yourself, saving money and gaining a better understanding of your vehicle. Remember to always prioritize safety and consult your service manual for specific information regarding your 240SX's transmission. Happy shifting!