5.0l Swap Oil Pan Clearance And Modification Requirements
So, you're embarking on the exciting journey of swapping a 5.0L engine into something that wasn't originally designed for it? Fantastic! You're going to love the added power and rumble. However, one of the most common roadblocks during this swap is oil pan clearance. Let's talk about the issues you might face and, more importantly, how to overcome them. Think of me as your service advisor – I’ve seen this rodeo before!
The Clearance Conundrum: Why Oil Pan Issues Arise
The problem stems from the fact that the factory 5.0L oil pan was designed for specific chassis configurations. When you introduce it to a new environment (like a classic Mustang, a Fox body that wasn't originally a 5.0, or even a custom project), the pan may interfere with things like:
- Steering linkages: This is a frequent offender, particularly with rack-and-pinion conversions or specific steering box setups.
- Crossmembers: The main structural support under the engine can definitely get in the way.
- Suspension components: Lower control arms, sway bars, and even the K-member itself can be culprits.
- Exhaust: Headers or exhaust manifolds can sometimes conflict with the oil pan, especially if you're aiming for tight clearances.
Simply put, the shape and size of the factory pan weren't meant to squeeze into the space you're asking it to occupy.
Diagnosing the Problem: Spotting the Interference
The best way to identify clearance issues is during the mock-up phase of your swap. This is where you position the engine in the engine bay before you've finalized everything. Here’s how to do it:
- Install the engine mounts: Get the engine sitting where it's supposed to be.
- Lower the engine into the bay (carefully!): Use an engine hoist and take your time. Have a helper to guide things.
- Visually inspect for obstructions: Look for contact points between the oil pan and any of the components mentioned earlier.
- Use modeling clay or putty: Place small balls of clay or putty on potential interference points. Lower the engine gently, then raise it again. The compressed clay will show you where the contact is happening and how much clearance you’re missing.
Pro Tip: If you’re using aftermarket headers or exhaust, install them during the mock-up. This will give you a complete picture of your clearance challenges.
Solutions: Addressing the Oil Pan Clearance Blues
Fortunately, you have several options for tackling oil pan clearance. The best choice depends on the severity of the problem and your budget.
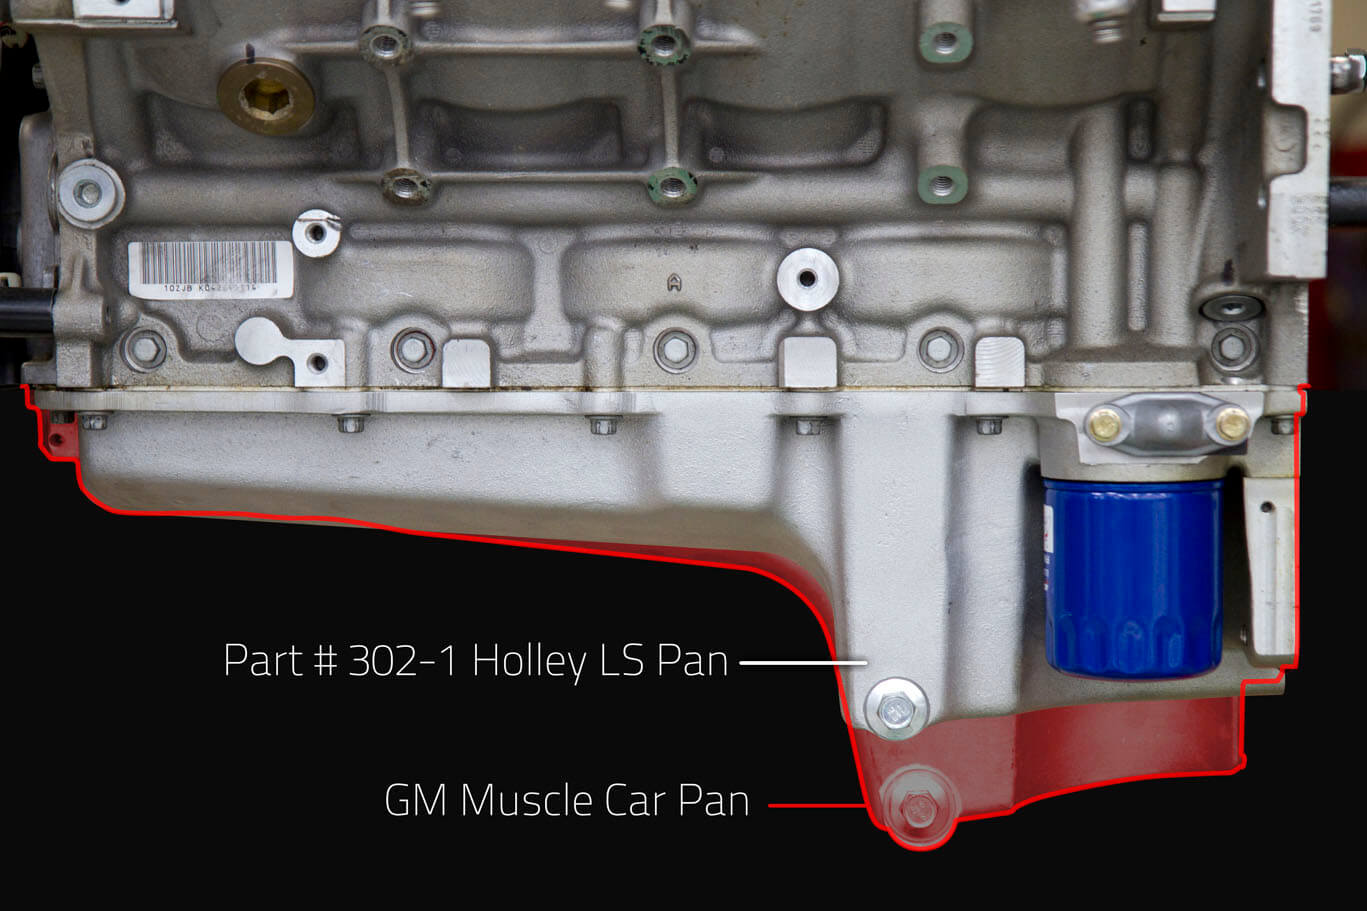
1. The Aftermarket Oil Pan: A Direct Replacement
This is often the easiest and most effective solution, especially for common swaps. Aftermarket oil pans are designed with specific vehicle applications in mind. They are often shallower, narrower, or have modified sumps to clear common obstacles. Here's what to consider:
- Pick the right pan: Research which pan is recommended for your specific chassis and the type of swap you're doing.
- Read reviews: See what other people have experienced with the pan in similar applications.
- Check oil capacity: Ensure the pan provides adequate oil capacity for your engine's needs, especially if you're planning on doing any performance upgrades or track days. 5 quarts is typically considered the bare minimum.
- Consider oil pickup tube: Many aftermarket pans require a matching oil pickup tube. Make sure to order the correct one!
Estimated Cost: $200 - $600+ depending on brand and features (baffling, windage trays, etc.).
2. Oil Pan Modification: A Hands-On Approach (Proceed with Caution!)
If you're on a tight budget or the aftermarket doesn't offer a suitable pan for your specific swap, modifying your existing oil pan is an option. However, this requires welding skills and a thorough understanding of oil pan design. Messing this up can lead to serious engine damage!
Here's the general process:
- Identify the interference: As described above.
- Plan the modification: Determine where you need to clearance the pan. Mark the area clearly.
- Drain the oil and thoroughly clean the pan: Remove all traces of oil to prevent fires during welding.
- Cut the pan: Use a cutting wheel or plasma cutter to carefully remove the interfering section.
- Fabricate a patch: Create a piece of sheet metal to weld into the opening. Make sure it's the same thickness as the original pan.
- Weld the patch: Use a MIG or TIG welder to carefully weld the patch into place. Ensure a strong, leak-proof weld.
- Grind the welds smooth: Remove any sharp edges or protrusions.
- Pressure test the pan: Fill the pan with water or oil and look for leaks. Fix any leaks before installing the pan.
Important Considerations:
- Maintain oil capacity: Avoid removing too much material, as this will reduce oil capacity. If you need to remove a significant amount, consider adding a small sump extension.
- Avoid interference with the oil pickup: Make sure the modification doesn't affect the oil pickup tube or its ability to draw oil from the pan.
- Prevent warping: Welding can warp the pan. Use heat control techniques to minimize warping.
Tools Needed: Welding machine, cutting wheel or plasma cutter, grinder, welding helmet, gloves, safety glasses, sheet metal, measuring tools, leak testing equipment.
Estimated Cost: $50 - $200+ depending on materials and welding experience (assuming you have access to the tools).
Recommendation: If you're not confident in your welding skills, it's best to leave this to a professional fabricator.
3. Engine Mount Spacers or Adaptor Plates: A Slight Repositioning
In some cases, you can gain just enough clearance by slightly repositioning the engine. This can be achieved using engine mount spacers or adaptor plates. However, be aware that this can also affect drivetrain angles and exhaust clearance.
- Consider the consequences: Before using spacers, assess how they will affect other components, such as the driveshaft, transmission mount, and exhaust system.
- Use quality spacers: Choose spacers made from durable materials and designed for your specific application.
- Check for vibration: Spacers can sometimes introduce vibrations. Monitor the engine for excessive vibration after installation.
Estimated Cost: $50 - $200 depending on the type of spacers.
4. Modify Crossmember or Suspension Components: A More Extensive Undertaking
This is generally the least desirable option, as it involves modifying the chassis itself. It can be time-consuming, expensive, and potentially compromise the structural integrity of the vehicle. However, in some extreme cases, it may be necessary. If you are going to modify a crossmember or suspension component, consult with a professional engineer to ensure the modifications are safe and structurally sound.
Estimated Cost: Variable, but potentially quite high, depending on the complexity of the modifications.
Final Thoughts: Planning is Key
Solving oil pan clearance issues is a common but manageable part of the 5.0L swap process. The key is to plan ahead, diagnose the problem accurately, and choose the solution that best fits your needs and budget. Don’t rush the mock-up phase! It will save you a lot of headaches (and money) in the long run. And remember, when in doubt, consult with experienced mechanics or fabricators. Good luck with your swap!