98 Nissan Frontier Clutch Replacement
Replacing the Clutch in a 1998 Nissan Frontier: A Step-by-Step Guide
If you're experiencing issues with your 1998 Nissan Frontier's clutch, such as slipping, difficulty shifting, or a chattering noise, it might be time for a replacement. A worn-out clutch can significantly impact your truck's performance and drivability. While it's a complex job, replacing the clutch yourself can save you a considerable amount of money on labor costs. This guide provides a detailed, step-by-step process to help you through the clutch replacement on your 98 Nissan Frontier. Always prioritize safety and consult a qualified mechanic if you're unsure about any part of the process.
Tools and Materials You'll Need
Before you begin, gather all the necessary tools and materials. Having everything readily available will make the job smoother and more efficient. Here's a comprehensive list:
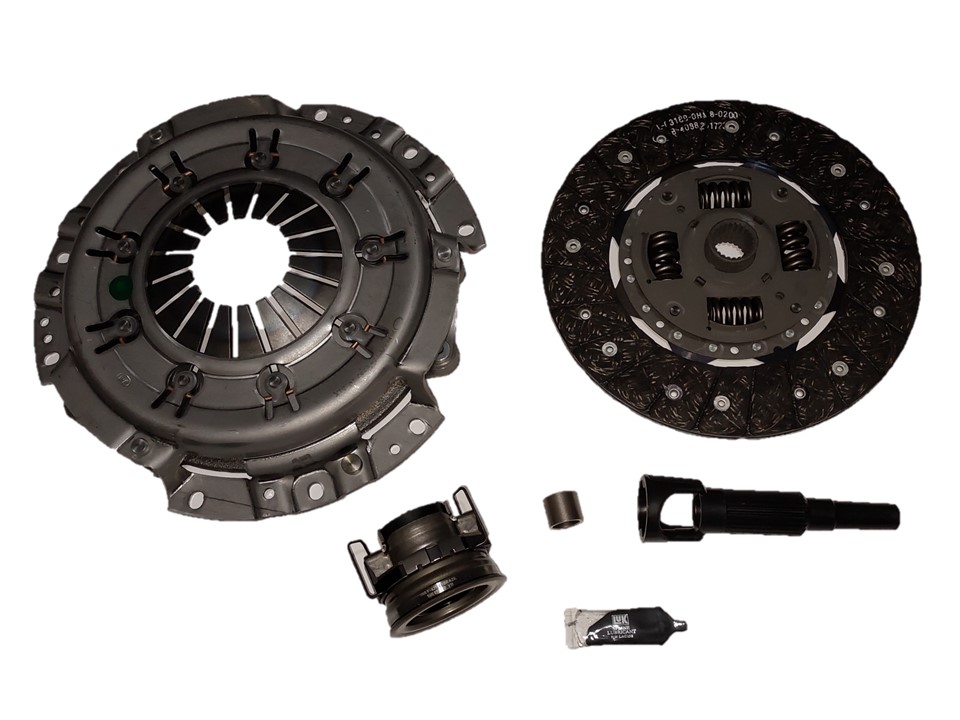
- New clutch kit (including clutch disc, pressure plate, and throw-out bearing) specific to a 1998 Nissan Frontier
- Pilot bearing or bushing
- Clutch alignment tool
- Floor jack and jack stands (heavy-duty)
- Wheel chocks
- Metric socket set
- Metric wrench set
- Torque wrench
- Screwdrivers (Phillips and flathead)
- Pliers
- Hammer
- Punch or drift
- Penetrating oil (e.g., WD-40)
- Transmission jack (highly recommended)
- Safety glasses
- Gloves
- Drain pan
- New transmission fluid (correct type for your Frontier)
- Shop rags
- Cardboard or drop cloth to protect the work area
- Optional: Impact wrench
Safety First!
Safety is paramount when working on any vehicle. Take the following precautions:
- Always wear safety glasses to protect your eyes from debris.
- Always wear gloves to protect your hands.
- Always use jack stands to support the vehicle. Never work under a vehicle supported only by a jack.
- Disconnect the negative battery terminal to prevent electrical shorts.
- Work in a well-ventilated area.
- Be mindful of hot exhaust components.
- Consult a repair manual specific to your 1998 Nissan Frontier for detailed torque specifications and diagrams.
Step-by-Step Clutch Replacement Guide for Your 98 Frontier
Now, let's get into the actual clutch replacement process. Remember to take your time and pay attention to detail.
1. Prepare the Vehicle
Park your Nissan Frontier on a level surface, engage the parking brake, and chock the rear wheels. Disconnect the negative battery terminal. This prevents any accidental electrical issues during the repair process.
2. Raise and Secure the Vehicle
Use a floor jack to raise the front of the Frontier. Position the jack stands under the frame rails behind the front wheels. Ensure the jack stands are securely in place before lowering the vehicle onto them. Then, raise the rear of the truck and secure it with jack stands in a similar fashion.
3. Remove the Shift Lever
Inside the cab, remove the shift knob and any console trim surrounding the shift lever. Depending on your model, you might need to disconnect electrical connectors for power windows or other accessories. Remove the bolts holding the shift lever assembly to the transmission. Carefully remove the shift lever from the transmission.
4. Disconnect the Driveshaft
Mark the driveshaft and differential flange to ensure proper reinstallation. Disconnect the driveshaft from the rear differential. Support the driveshaft as you remove it to prevent it from falling. Slide the driveshaft out of the transmission and set it aside in a safe place. Be careful not to damage the slip yoke. Plug the transmission tail housing to prevent fluid leakage.
5. Disconnect Electrical and Mechanical Components
Under the vehicle, disconnect any electrical connectors attached to the transmission, such as the backup light switch and any sensors. Disconnect the clutch slave cylinder from the transmission. You might need to use penetrating oil to loosen the fittings. Be careful not to damage the hydraulic lines. Secure the slave cylinder out of the way. Also, disconnect any linkage that connects the transmission to the vehicle's frame.
6. Support the Engine and Transmission
Use a floor jack with a block of wood to support the engine oil pan. This will prevent the engine from tilting excessively when the transmission is removed. Position a transmission jack under the transmission to support its weight. Secure the transmission to the jack with straps.
7. Remove the Transmission Crossmember
Remove the bolts holding the transmission crossmember to the frame. Carefully lower the crossmember using the transmission jack. Set the crossmember aside.
8. Remove the Transmission
Double-check that all connections to the transmission have been disconnected. Slowly lower the transmission using the transmission jack, making sure it clears any obstacles. Wiggle the transmission back and forth to disengage it from the engine. Once the transmission is free, carefully lower it completely to the ground.
9. Inspect and Replace the Pilot Bearing/Bushing
Inspect the pilot bearing or bushing in the end of the crankshaft. If it's worn or damaged, replace it. You can use a pilot bearing puller tool or a hammer and punch to remove the old bearing. Install the new bearing using a suitable installer tool or by gently tapping it into place with a hammer and socket of the correct size.
10. Remove the Old Clutch
Loosen the bolts holding the pressure plate to the flywheel in a star pattern to prevent warping. Once the bolts are loose, remove them completely. Carefully remove the pressure plate and clutch disc. Note the orientation of the clutch disc before removing it (usually marked with "flywheel side").
11. Inspect the Flywheel
Inspect the flywheel for cracks, heat damage, or excessive wear. If the flywheel is damaged, it should be resurfaced or replaced. Clean the flywheel surface with brake cleaner.
12. Install the New Clutch
Use the clutch alignment tool to center the new clutch disc against the flywheel. Install the new pressure plate, tightening the bolts in a star pattern to the specified torque. Remove the clutch alignment tool.
13. Install the New Throw-Out Bearing
Install the new throw-out bearing onto the transmission input shaft. Apply a small amount of grease to the contact points.
14. Reinstall the Transmission
Carefully raise the transmission using the transmission jack. Align the transmission with the engine and slide it into place. It might take some maneuvering to get the input shaft to engage with the clutch disc. Once the transmission is fully seated, install the transmission bolts and tighten them to the specified torque.
15. Reinstall the Transmission Crossmember
Raise the transmission with the jack slightly to allow the installation of the crossmember. Align the crossmember and install the bolts, tightening them to the specified torque.
16. Reconnect Components
Reconnect all electrical connectors, the clutch slave cylinder, and any linkage to the transmission. Reinstall the driveshaft, aligning the marks you made earlier. Tighten the driveshaft bolts to the specified torque. Reinstall the shift lever inside the cab.
17. Lower the Vehicle
Carefully remove the jack stands and lower the vehicle to the ground.
18. Refill Transmission Fluid
Check and refill the transmission fluid to the proper level. Use the correct type of fluid specified in your owner's manual.
19. Test Drive
Reconnect the negative battery terminal. Start the engine and test the clutch operation. Check for any leaks or unusual noises. Take the 1998 Nissan Frontier for a test drive to ensure the clutch is functioning properly. The clutch might require a break-in period of a few hundred miles before it reaches its full performance.
Important Considerations
Torque Specifications: Always use a torque wrench and tighten all bolts to the manufacturer's specified torque. This is crucial for the longevity and proper function of the clutch and transmission.
Professional Assistance: If you are not comfortable with any part of this procedure, it is highly recommended to seek professional assistance from a qualified mechanic. Improper installation can lead to serious damage and safety issues.
Replacing the clutch on your 98 Nissan Frontier is a challenging but rewarding task. By following these steps carefully and prioritizing safety, you can save money and gain a better understanding of your vehicle's mechanics. Remember to consult a repair manual for specific torque specifications and diagrams. Good luck!