A Comprehensive Guide To Swapping An Ls1 V8 Into A Nissan 240sx
So, you're thinking about LS-swapping your Nissan 240SX? Excellent choice! The LS1 V8 offers a fantastic power-to-weight ratio, is relatively affordable, and has a massive aftermarket. It's a popular swap for a reason. This guide will walk you through the process, highlighting the key components and considerations you'll face. This isn't a beginner project, mind you. We're assuming you have some mechanical experience, a decent set of tools, and the ability to research and troubleshoot. Let's get started!
Planning and Preparation: The Foundation of Success
Before you even think about touching a wrench, meticulous planning is crucial. This will save you headaches and money down the road.
1. Defining Your Goals: Power and Purpose
What do you want to achieve with this swap? Are you building a drift missile, a track weapon, or a streetable cruiser? Your goals will influence your parts selection. For example, a drift car might prioritize quicker throttle response over all-out horsepower, leading to different camshaft and intake manifold choices. A track car will need robust cooling and oiling systems.
2. Budgeting: Be Realistic!
LS swaps are rarely cheap. Create a detailed budget, and then add 20% for the inevitable unforeseen expenses. Include the cost of the engine, transmission, wiring harness, mounts, cooling system, fuel system, exhaust, driveshaft, and all the miscellaneous hardware.
3. Parts List: Sourcing the Necessities
Here’s a breakdown of the essential components:
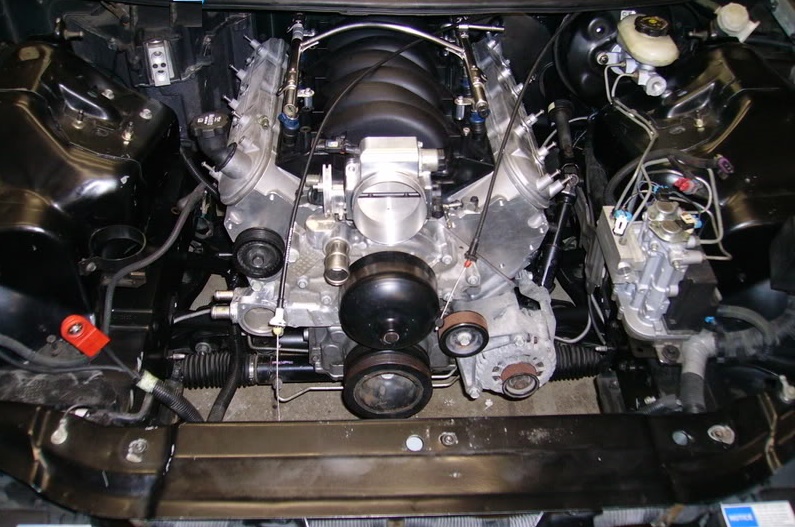
- LS1 Engine: The heart of the swap! Consider mileage, condition, and whether you'll be rebuilding it. 5.3L truck engines are a viable and cheaper alternative but require intake and potentially oil pan swaps.
- Transmission: Common choices include the T56 (6-speed manual) and the 4L60E (4-speed automatic). The T56 is popular for manual swaps, while the 4L60E is a robust automatic. Consider their gear ratios and power handling capabilities.
- Engine Mounts: Aftermarket mounts specifically designed for the 240SX LS swap are essential. These typically bolt to the factory chassis mounting points. DO NOT try to fabricate your own unless you are an experienced fabricator.
- Transmission Mount: Similar to engine mounts, a transmission mount adapter is needed to properly locate and secure the transmission to the chassis.
- Wiring Harness: You have a few options here. You can modify the factory LS1 harness, buy a standalone aftermarket harness, or use a pre-made swap harness designed for the 240SX. A standalone harness offers more flexibility but requires more wiring knowledge.
- ECU: If using a modified factory harness, you'll need to flash the ECU to remove unnecessary features and optimize it for your application. Standalone harnesses often come with their own ECU.
- Fuel System: The stock 240SX fuel system is insufficient for an LS1. You'll need a higher-capacity fuel pump, fuel lines, and possibly a new fuel pressure regulator.
- Cooling System: A larger radiator is mandatory. Aftermarket aluminum radiators designed for LS-swapped 240SXs are available. Consider electric fans for improved cooling efficiency.
- Exhaust System: Headers are necessary for proper exhaust flow. Shorty headers are easier to fit, while long-tube headers offer better performance but may require more modification. You'll also need a custom exhaust system from the headers back.
- Driveshaft: The stock 240SX driveshaft won't work. You'll need a custom driveshaft made to the correct length and with the appropriate U-joints.
- Gauges: The stock 240SX gauges likely won't work with the LS1 ECU. You'll need aftermarket gauges or a gauge cluster designed for the swap.
- Accessories: Power steering pump, alternator, A/C compressor (optional) – ensure these clear the chassis and fit with the LS1 engine.
- Clutch/Flywheel (Manual Transmission): Select a clutch and flywheel that can handle the engine's power output.
4. Tools and Workspace: Setting Up Your Garage
You'll need a well-equipped garage with a lift (highly recommended), engine hoist, engine stand, a full set of metric tools, a multimeter, a wiring crimper, and welding equipment (if you plan on doing any fabrication). Adequate lighting is also essential.
The Swap Process: Step-by-Step Guide
This is a general overview; specific steps will vary depending on your chosen parts and configuration.
1. Preparing the 240SX: Stripping It Down
Remove the original engine and transmission. Drain all fluids. Disconnect and label all wiring harnesses. Remove the radiator, exhaust system, and driveshaft. Clean the engine bay thoroughly.
2. Installing the Engine Mounts: Ensuring Proper Alignment
Install the LS swap engine mounts onto the chassis. Torque them to the manufacturer's specifications. These mounts are crucial for proper engine placement and driveline angles. Double-check that they're aligned correctly before proceeding.
3. Dropping in the Engine: A Test Fit
Using the engine hoist, carefully lower the LS1 engine into the engine bay. This is a test fit to check for clearance issues. Pay close attention to the headers, oil pan, and accessory drives. You may need to modify the transmission tunnel for transmission clearance.
4. Transmission Installation: Mating to the Engine
Install the transmission to the engine. If using a manual transmission, ensure the clutch and flywheel are properly installed and torqued. Install the transmission mount adapter and secure the transmission to the chassis.
5. Fuel System Installation: Delivering the Fuel
Install the new fuel pump, fuel lines, and fuel pressure regulator. Ensure all connections are secure and leak-free. Use fuel-safe hose and fittings. Route the fuel lines away from heat sources and moving parts.
6. Cooling System Installation: Keeping it Cool
Install the aftermarket radiator and electric fans. Connect the radiator hoses. Consider using an aftermarket coolant expansion tank. Bleed the cooling system to remove any air pockets. Air pockets can lead to overheating and engine damage.
7. Wiring Harness Installation: Making the Connections
This is arguably the most challenging part of the swap. Carefully connect the wiring harness to the engine, transmission, and ECU. Double-check all connections. Use a wiring diagram to ensure everything is wired correctly. Pay close attention to the power and ground connections. If using a standalone harness, follow the manufacturer's instructions carefully.
8. Exhaust System Installation: Letting it Breathe
Install the headers and connect them to the exhaust system. Ensure all connections are tight and leak-free. Consider using exhaust wrap to reduce heat. Ensure the exhaust system clears all chassis components.
9. Driveshaft Installation: Connecting the Power
Install the custom driveshaft. Torque the U-joint bolts to the manufacturer's specifications. Check for proper driveshaft angle. A misaligned driveshaft can cause vibrations and damage.
10. Gauges and Accessories: Monitoring the Engine
Install the aftermarket gauges or gauge cluster. Connect the sensors to the engine. Install the power steering pump, alternator, and A/C compressor (if applicable). Ensure all accessories are properly wired and functional.
11. Initial Startup and Testing: The Moment of Truth
Before starting the engine, double-check all fluid levels and connections. Turn the key to the "on" position and check for any leaks or unusual noises. Start the engine and let it idle. Monitor the gauges closely. Check for any error codes. Address any issues before driving the car.
Troubleshooting: Common Issues and Solutions
LS swaps aren't always smooth sailing. Here are some common problems you might encounter:
- Clearance Issues: Headers, oil pan, and accessory drives can often interfere with the chassis. Modification may be required.
- Wiring Problems: Incorrect wiring can cause a variety of issues, from engine misfires to complete engine failure. Double-check all connections.
- Overheating: An insufficient cooling system is a common cause of overheating. Ensure you have a large enough radiator and electric fans.
- Fuel Delivery Issues: Insufficient fuel pressure can cause the engine to run lean and potentially damage it. Ensure your fuel pump and fuel lines are adequate for the engine's power output.
- Driveline Vibrations: Incorrect driveshaft angle can cause vibrations. Adjust the transmission mount or use shims to correct the angle.
Important Tip: A scan tool is your best friend for diagnosing engine problems. It allows you to read error codes and monitor engine parameters.
Final Thoughts: Enjoy the Ride!
Swapping an LS1 into a 240SX is a challenging but rewarding project. With careful planning, meticulous execution, and a bit of patience, you can transform your 240SX into a potent and reliable machine. Remember to take your time, do your research, and don't be afraid to ask for help when you need it. Good luck, and enjoy the ride!
Disclaimer: This guide is for informational purposes only. Engine swaps can be complex and potentially dangerous. Consult with a qualified mechanic if you are unsure about any aspect of the swap. The author and publisher are not responsible for any damage or injury that may result from following this guide.