A Comprehensive Technical Guide To The Sr20det Engine Swap
So, you're wrestling with an SR20DET swap? Welcome to the club! It's a popular engine choice for a reason – potent, relatively affordable, and readily available. But let's be honest, it's not always smooth sailing. This guide tackles some common headaches and provides solutions to keep your project on track. Think of me as your experienced service advisor, here to help you navigate the quirks of this fantastic engine.
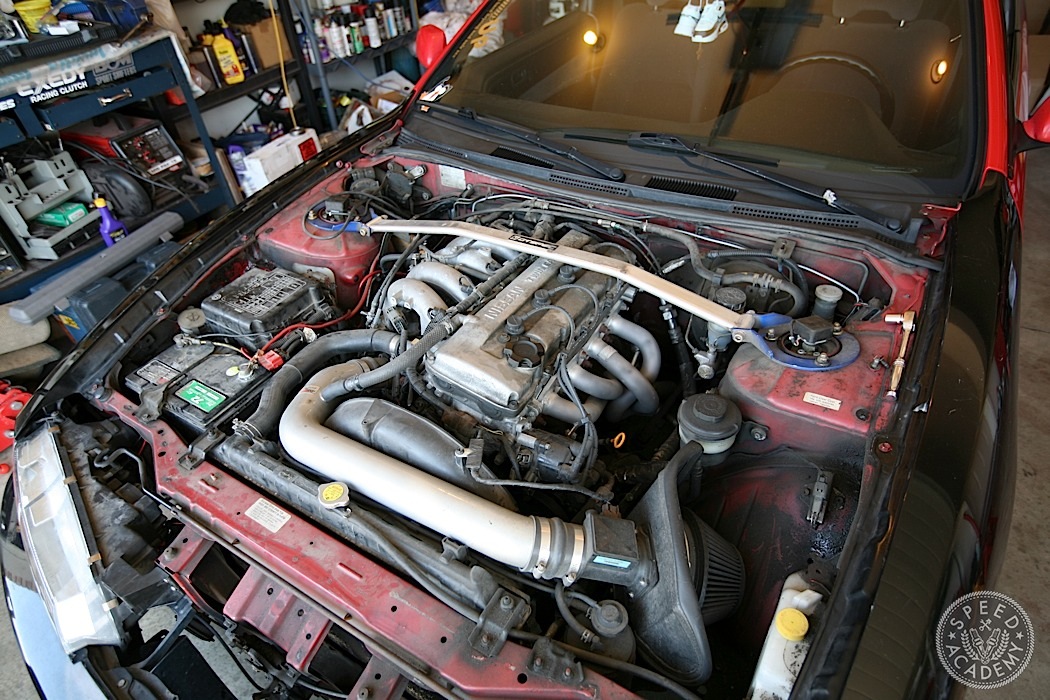
Problem 1: Wiring Woes - The Dreaded Harness
Ah, the wiring harness. The bane of many a swap. It can look like a spaghetti monster, and figuring out what connects where is crucial. The issue often boils down to identifying and connecting the essential wires to your chassis. Improper wiring can lead to a no-start condition, erratic engine behavior, or even fried electronics.
Solution: Meticulous Mapping and Professional Help When Needed
First, thoroughly inspect your harness. Label everything. Use masking tape and a permanent marker. Don't rely on memory! Obtain a wiring diagram specific to your SR20DET year and model, and your chassis year and model. These diagrams are your roadmap. Compare the diagrams and identify wires that need to be spliced, joined, or removed. Common culprits include:
- Power and Ground: Ensure proper gauge wiring for power and ground circuits. A weak ground is a frequent source of problems.
- Ignition Switch: Correctly wire the ignition switch to power the ECU and other engine components.
- Fuel Pump Relay: This is crucial for fuel delivery. Trace the wire from the ECU to the relay, and then to the fuel pump.
- Sensors: Check the wiring to the MAF sensor, throttle position sensor (TPS), coolant temperature sensor (CTS), and crank angle sensor (CAS). These are all vital for proper engine operation.
Practical Tip: Invest in a quality multimeter and learn how to use it. This is essential for testing continuity and voltage. You'll also need wire strippers, crimpers, heat shrink tubing, and solder. A decent wiring kit will cost you around $50-$100.
When to call a professional: If you're truly overwhelmed, don't be afraid to seek professional help. A competent auto electrician specializing in engine swaps can save you a lot of time, frustration, and potentially expensive damage. Expect to pay anywhere from $500-$1500 for wiring, depending on the complexity.
Problem 2: Fueling Issues - From Lean to Rich, Nothing Seems Right
Fueling problems are another common hurdle. These can manifest as a hard start, poor idle, hesitation, or a lack of power. The causes can range from incorrect fuel injectors to a faulty fuel pump or regulator.
Solution: Systematically Check Your Fuel System
Start by verifying your fuel pressure. A fuel pressure gauge is an invaluable tool. It should read around 36-43 PSI at idle with the vacuum line disconnected from the fuel pressure regulator. If it's too low, suspect a faulty fuel pump, clogged fuel filter, or a leak in the fuel lines. If it's too high, the fuel pressure regulator is likely the culprit.
Next, consider your injectors. Are they the correct size for your setup? Using injectors that are too small will cause a lean condition, while injectors that are too large will cause a rich condition. Consult with a tuning specialist to determine the appropriate injector size for your power goals. Also, consider cleaning or replacing the injectors, especially if they've been sitting for a while. You can send them to a professional injector cleaning service.
Important: Never run the engine lean. This can cause catastrophic engine damage, such as melted pistons.
Practical Tip: A new fuel pump typically costs between $100 and $300. Injectors can range from $200 to $800, depending on the size and brand. A fuel pressure gauge is a worthwhile investment at around $50-$100.
When to call a professional: If you've checked all the basics and you're still experiencing fueling issues, it's time to consult with a tuner. They can use a wideband O2 sensor to accurately measure your air/fuel ratio and make adjustments to the ECU to optimize fueling.
Problem 3: Cooling Conundrums - Overheating and Temperature Spikes
Overheating is a serious issue that can quickly lead to engine damage. Common causes include air pockets in the cooling system, a faulty thermostat, a clogged radiator, or a weak water pump.
Solution: Bleeding the System and Upgrading Components
The first step is to properly bleed the cooling system. This removes trapped air pockets that can prevent coolant from circulating effectively. Most SR20DET engines have a bleeder valve on the thermostat housing. Open this valve while filling the cooling system to allow air to escape.
Next, check your thermostat. Make sure it's the correct temperature range for your engine and that it's functioning properly. A faulty thermostat can restrict coolant flow and cause overheating.
Consider upgrading your radiator, especially if you're planning to increase the engine's power output. A larger radiator will provide better cooling capacity. Also, inspect your water pump for any signs of leakage or damage. A weak water pump can't circulate coolant effectively.
Practical Tip: A new thermostat costs around $20-$50. A high-performance radiator can range from $200 to $500. A water pump replacement will set you back around $100-$200, plus labor.
When to call a professional: If you've bled the system, checked the thermostat and water pump, and you're still experiencing overheating, it's time to consult with a mechanic. There may be a more serious underlying issue, such as a blown head gasket or a cracked cylinder head.
Problem 4: Boost Blues - Low Boost, No Boost, and Everything in Between
If you're not getting the expected boost levels, or if you're experiencing inconsistent boost, there are several things to investigate. Common causes include boost leaks, a faulty boost controller, a wastegate issue, or a problem with the turbocharger itself.
Solution: Hunting Down Leaks and Testing Components
Start by performing a boost leak test. This involves pressurizing the intake system and listening for air leaks. Common leak points include intercooler piping connections, vacuum lines, and the throttle body. Use soapy water to help pinpoint the leaks. Tighten clamps or replace damaged hoses as needed.
Next, check your boost controller. If you're using an electronic boost controller, make sure it's properly configured and that all the connections are secure. If you're using a manual boost controller, adjust it carefully to increase boost pressure. Be aware of your engine's limitations and avoid exceeding safe boost levels.
Inspect the wastegate actuator and flapper valve. Make sure the actuator is moving freely and that the flapper valve is sealing properly. A faulty wastegate can prevent the turbocharger from building boost.
Finally, inspect the turbocharger itself for any signs of damage or wear. Check the turbine and compressor wheels for cracks or bent blades. Also, check for excessive play in the turbocharger shaft.
Practical Tip: A boost leak tester can be made relatively cheaply using PVC pipe and fittings, or purchased for around $50-$100. A new boost controller can range from $100 to $500, depending on the type and features. Turbocharger repair or replacement can be expensive, ranging from $500 to $2000, depending on the model.
When to call a professional: If you've checked all the basics and you're still experiencing boost issues, it's time to consult with a turbocharger specialist. They can diagnose the problem and recommend the appropriate repair or replacement.
Problem 5: Mounting Misery - Fitment Fiascos and Clearance Conflicts
Sometimes, the biggest challenge is simply getting the SR20DET to physically fit into your chassis. Clearance issues with the firewall, transmission tunnel, and exhaust manifold are common. Engine mounts are also crucial for proper alignment and vibration dampening.
Solution: Strategic Modifications and Aftermarket Support
Engine mounts are paramount. Use mounts specifically designed for the SR20DET swap into your chassis. These mounts will ensure proper engine placement and minimize vibrations. Aftermarket options are often available for better strength and adjustability.
Clearance issues are a common problem. Inspect the engine bay carefully and identify any areas where the engine is contacting the chassis. Minor modifications, such as hammering or cutting sheet metal, may be necessary. Be sure to reinforce any areas that are weakened by these modifications.
The exhaust manifold can also be a source of clearance problems. Aftermarket manifolds are often designed for better fitment and performance. Consider using a downpipe that is specifically designed for the swap.
Practical Tip: Engine mounts can range from $100 to $300. An aftermarket exhaust manifold can cost anywhere from $300 to $1000. Expect to spend additional money on welding and fabrication if extensive modifications are required.
When to call a professional: If you're not comfortable with welding or fabrication, it's best to consult with a qualified mechanic or fabricator. They can ensure that the modifications are done safely and correctly.
Final Thoughts: The SR20DET swap is a challenging but rewarding project. By addressing these common problems systematically and seeking professional help when needed, you can overcome these hurdles and enjoy the performance and reliability of this fantastic engine. Remember to take your time, be patient, and don't be afraid to ask for help. Good luck with your swap!