A Step-by-step Technical Guide To Swapping A 1jz-gte Into A Nissan 240sx
The Nissan 240SX, known for its lightweight chassis and inherent driftability, has long been a popular platform for engine swaps. Among the most coveted is the Toyota 1JZ-GTE, a robust and responsive inline-six turbocharged engine known for its high power potential. This article provides a detailed, step-by-step guide to swapping a 1JZ-GTE into an S13 or S14 240SX, outlining the key technical considerations and challenges involved. This is not a simple bolt-on affair, but with careful planning and execution, the result is a formidable and exciting machine.
Step 1: Acquisition and Preparation
Before any wrenches are turned, careful acquisition and preparation are paramount.
1JZ-GTE Engine Sourcing
The 1JZ-GTE was originally found in Japanese market Toyota models such as the Soarer, Supra (JZA70), and Chaser. When sourcing an engine, consider these factors:
- Condition: Thoroughly inspect the engine. Check for signs of leaks, excessive wear, and any indication of prior abuse. A compression test is highly recommended to assess the health of the piston rings and cylinders.
- Wiring Harness: A complete, uncut wiring harness is essential. Splicing and modifying an incomplete harness can lead to frustrating electrical issues.
- ECU: Verify the ECU (Engine Control Unit) is included and in good working order. While aftermarket ECUs are a popular upgrade, starting with the factory ECU can simplify the initial setup.
- Turbochargers: Inspect the turbochargers for shaft play and oil leaks. Rebuilding or replacing the turbos may be necessary.
- Accessories: Ensure that you have all the necessary accessories, including the alternator, power steering pump (if retaining power steering), and AC compressor (if retaining AC).
- Generation: The 1JZ-GTE came in various iterations. The early models, known as the "small turbo" models, had parallel twin CT12A turbos. Later models featured a single CT15B turbo, which is often preferred for its better response and power potential.
240SX Preparation
Preparing the 240SX involves removing the existing engine and drivetrain components and addressing any necessary chassis modifications.
- Engine Removal: Disconnect all wiring, fuel lines, coolant hoses, and exhaust components connected to the existing engine (typically a KA24DE or SR20DET). Carefully remove the engine and transmission from the engine bay.
- Cleaning: Thoroughly clean the engine bay to remove any grease, grime, or debris. This will make the subsequent installation process much easier.
- Wiring Harness Removal: Remove the existing engine wiring harness from the 240SX. This will be replaced with the 1JZ-GTE wiring harness.
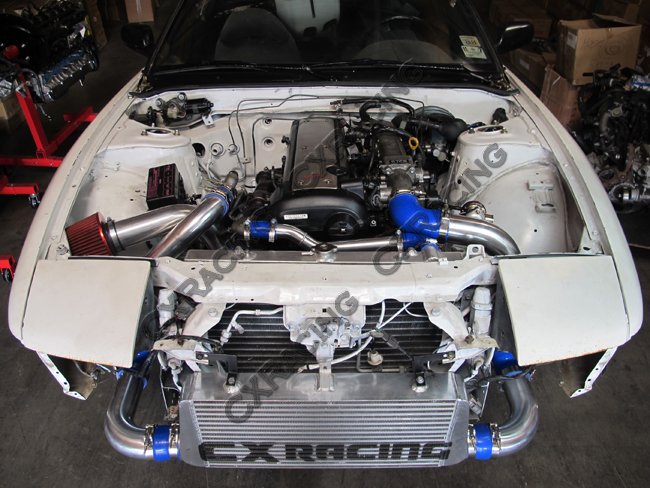
- Chassis Reinforcement: Consider reinforcing the chassis, especially around the engine mounts and transmission tunnel. The 1JZ-GTE produces significantly more power than the original engines, and reinforcement will help prevent chassis flex and potential damage. Welding in seam welds to the chassis is a common practice.
Step 2: Mounting and Drivetrain
This step involves physically mounting the 1JZ-GTE engine and connecting it to a suitable drivetrain.
Engine Mounts
Aftermarket engine mount kits are essential for properly mounting the 1JZ-GTE in the 240SX chassis. These kits typically include:
- Engine Mount Brackets: These brackets attach to the engine block and provide a mounting point for the engine.
- Chassis Mounts: These mounts attach to the 240SX chassis and provide a mounting point for the engine.
- Polyurethane or Rubber Bushings: These bushings isolate the engine vibrations from the chassis. Polyurethane bushings offer greater stiffness and reduced engine movement but can transmit more vibration.
Carefully align the engine in the engine bay, ensuring that it is properly centered and positioned. Tighten the engine mount bolts to the manufacturer's specified torque.
Transmission Considerations
The stock 240SX transmission is generally not suitable for the power output of the 1JZ-GTE. Several transmission options are commonly used:
- Toyota R154: This 5-speed transmission was originally found in Toyota Supras and is a popular choice for 1JZ-GTE swaps. It is relatively strong and readily available. Requires an adapter plate to bolt to the 1JZ and modifications to the transmission tunnel.
- Nissan Z32 300ZX Transmission: Another good option that can handle the power. This requires an adapter plate.
- BMW ZF Transmissions (GS6-53DZ): Often pulled from a 335i or 328i. A popular option as it’s strong and relatively affordable.
- Aftermarket Transmissions: Companies like Tremec offer high-performance transmissions designed for high-power applications. These transmissions are typically more expensive but offer superior strength and reliability.
Regardless of the transmission choice, a custom driveshaft will be required to connect the transmission to the 240SX differential. The driveshaft should be properly balanced to prevent vibrations.
Differential
The stock 240SX differential can be upgraded with a limited-slip differential (LSD) to improve traction. An LSD distributes power evenly to both rear wheels, preventing wheel spin and improving acceleration. Common LSD options include clutch-type, Torsen-type, and viscous-type.
Step 3: Wiring and Electronics
Integrating the 1JZ-GTE wiring harness into the 240SX electrical system is one of the most challenging aspects of the swap. A meticulously labeled and properly integrated harness is critical for reliable engine operation.
Harness Modification
The 1JZ-GTE wiring harness needs to be modified to integrate with the 240SX chassis wiring. This involves:
- Pinout Identification: Carefully identify each wire in the 1JZ-GTE wiring harness and its corresponding function. Wiring diagrams for both the 1JZ-GTE and the 240SX are essential.
- Power and Ground Connections: Connect the 1JZ-GTE power and ground wires to the appropriate terminals in the 240SX electrical system.
- Sensor Connections: Connect the 1JZ-GTE sensors (e.g., coolant temperature sensor, oil pressure sensor) to the corresponding gauges in the 240SX instrument cluster.
- Fuel Pump Wiring: The 1JZ-GTE requires a high-flow fuel pump to provide adequate fuel supply. Wire the fuel pump relay to the 1JZ-GTE wiring harness.
- Ignition Wiring: Connect the 1JZ-GTE ignition wiring to the 240SX ignition system.
Several companies offer pre-made wiring harnesses specifically designed for 1JZ-GTE swaps into 240SX chassis. These harnesses can significantly simplify the wiring process.
ECU Options
While the factory 1JZ-GTE ECU can be used, many enthusiasts opt for an aftermarket ECU for greater tuning flexibility and control. Popular aftermarket ECU options include:
- AEM EMS: A comprehensive engine management system with advanced tuning capabilities.
- Haltech Elite: Another popular ECU option known for its user-friendly interface and advanced features.
- Link ECU: A versatile ECU that offers a wide range of features and tuning options.
- Megasquirt: A DIY ECU that is highly customizable and affordable.
An aftermarket ECU allows you to fine-tune the engine's fuel and ignition maps, optimize performance, and compensate for modifications such as larger injectors or turbo upgrades.
Step 4: Cooling and Fuel Systems
Ensuring adequate cooling and fuel delivery is crucial for reliable engine operation.
Cooling System
The 1JZ-GTE generates a significant amount of heat, so an upgraded cooling system is essential. Consider these modifications:
- Radiator: Install a high-performance aluminum radiator with a larger core volume than the stock radiator.
- Cooling Fans: Upgrade to electric cooling fans to provide better airflow at low speeds.
- Thermostat: Install a lower-temperature thermostat to help keep the engine running cooler.
- Coolant Hoses: Use high-quality silicone coolant hoses to prevent leaks and withstand high temperatures.
Fuel System
The stock 240SX fuel system is not capable of supplying enough fuel for the 1JZ-GTE. Upgrading the fuel system is necessary to prevent fuel starvation and potential engine damage.
- Fuel Pump: Install a high-flow fuel pump capable of delivering the required fuel pressure and volume.
- Fuel Injectors: Upgrade to larger fuel injectors to provide adequate fuel delivery.
- Fuel Pressure Regulator: Install an adjustable fuel pressure regulator to maintain consistent fuel pressure.
- Fuel Lines: Replace the stock fuel lines with larger diameter fuel lines to reduce fuel pressure drop.
Step 5: Exhaust System
A custom exhaust system is necessary to properly vent the exhaust gases from the 1JZ-GTE. The exhaust system should be designed to minimize backpressure and maximize exhaust flow.
- Turbo Manifold: Use a high-quality turbo manifold that is designed for the 1JZ-GTE and the specific turbocharger being used.
- Downpipe: A custom downpipe will be required to connect the turbocharger to the exhaust system. The downpipe should be as short and straight as possible to minimize backpressure.
- Exhaust Piping: Use mandrel-bent exhaust piping with a diameter of at least 3 inches.
- Muffler: Choose a muffler that provides a balance between performance and sound.
Step 6: Testing and Tuning
Once the engine swap is complete, thorough testing and tuning are essential to ensure reliable and optimal performance.
- Fluid Checks: Check all fluid levels (oil, coolant, brake fluid, power steering fluid) and top off as needed.
- Leak Checks: Check for any leaks in the cooling system, fuel system, and exhaust system.
- Initial Startup: Start the engine and let it idle for a few minutes. Monitor the engine temperature and oil pressure.
- Road Testing: Take the car for a short test drive and gradually increase the engine load. Monitor the engine's performance and listen for any unusual noises.
- Tuning: Dyno tuning is highly recommended to optimize the engine's fuel and ignition maps. A professional tuner can fine-tune the engine to achieve maximum power and efficiency while ensuring reliable operation. Consider using a wideband O2 sensor for precise air/fuel ratio monitoring.
Important Note: Engine swaps require a thorough understanding of automotive mechanics and electrical systems. If you are not comfortable performing these tasks yourself, it is highly recommended to seek the assistance of a qualified mechanic. Incorrect installation or tuning can lead to engine damage or failure.
Successfully swapping a 1JZ-GTE into a Nissan 240SX is a challenging but rewarding project. By following these steps and paying close attention to detail, you can transform your 240SX into a potent and exhilarating performance machine. Remember, patience, meticulous planning, and a deep understanding of the underlying systems are key to a successful swap.