Analysis Of Aftermarket Camber Adjustment Kits For The Nissan 240sx Suspension
The Nissan 240SX, a darling of the drift and tuning communities, often sees its suspension modified to improve handling, stance, and performance. One of the most common adjustments enthusiasts make is correcting or adding camber, the angle of the wheel relative to the vertical, as viewed from the front of the car. While the stock 240SX suspension offers limited camber adjustment, the aftermarket is flooded with camber adjustment kits. This article provides a detailed analysis of the different types of camber adjustment kits available for the 240SX, highlighting their pros, cons, and installation considerations.
Understanding Camber and its Effects
Before diving into the kits, it's crucial to understand why you might want to adjust camber. Camber is measured in degrees, with negative camber meaning the top of the tire is leaning inwards towards the center of the car, and positive camber meaning it’s leaning outwards.
Here's a brief overview of the effects of camber:
- Negative Camber: Increases grip during cornering by keeping the tire flatter on the road surface when the car leans. It can also improve handling characteristics in performance driving situations. However, excessive negative camber can lead to uneven tire wear, reduced braking performance, and increased stress on suspension components.
- Positive Camber: Rarely desired in performance applications. It typically indicates suspension issues or excessive wear in suspension components.
- Zero Camber: Provides the most even tire wear in a straight line but may compromise cornering grip.
The optimal camber setting depends on the intended use of the vehicle. A street car will usually benefit from a modest amount of negative camber (-0.5 to -1.5 degrees), while a track car might require significantly more (-2 to -4 degrees or even more, depending on the track and tire compound).
Types of Aftermarket Camber Adjustment Kits
The aftermarket offers several solutions for adjusting camber on the 240SX. These can be broadly categorized as follows:
1. Camber Plates (Front)
Description: Camber plates replace the factory strut top mounts. They typically feature a slotted or adjustable upper bearing housing that allows you to slide the strut assembly inboard or outboard, thereby changing the camber angle. Some camber plates also allow caster adjustment.
Pros:
- Wide Range of Adjustment: Camber plates offer the most significant range of camber adjustment compared to other options.
- Ease of Adjustment: Adjustments are typically made at the top of the strut tower, making them relatively easy to access.
- Improved Handling: Along with camber adjustment, they can also often reduce strut tower flex, further enhancing handling.
Cons:
- Increased Noise, Vibration, and Harshness (NVH): Most camber plates use spherical bearings instead of rubber bushings, which can transmit more road noise and vibrations into the cabin. This is especially noticeable on street cars. Some manufacturers offer plates with dampening features, but these are often more expensive.
- Higher Cost: Camber plates are generally the most expensive camber adjustment option.
- Potential Clearance Issues: Depending on the design, camber plates may require modifications to the strut tower opening or inner fender to provide adequate clearance.
Installation Considerations: Installation is relatively straightforward, involving removing the existing strut assembly and replacing the top mount with the camber plate. However, proper alignment after installation is essential. Torque specifications are critical, and you'll likely need to cut or modify the strut tower opening to accommodate the adjustment range.
2. Camber Bolts (Front and Rear)
Description: Camber bolts are eccentric bolts that replace the upper strut mounting bolts (front) or the upper control arm mounting bolts (rear). The eccentric shape allows for a small amount of camber adjustment as the bolt is rotated.
Pros:
- Low Cost: Camber bolts are the most affordable camber adjustment option.
- Easy Installation: Installation is relatively simple, requiring only basic tools and minimal disassembly.
Cons:
- Limited Adjustment Range: Camber bolts offer only a small amount of adjustment, typically +/- 1-2 degrees. This may not be sufficient for more aggressive setups.
- Potential for Slippage: If not properly tightened, camber bolts can slip, causing the alignment to change.
- Compromised Strength: Replacing OEM bolts with aftermarket camber bolts *could* compromise the strength of the suspension, particularly under extreme stress. Always use high-quality bolts from reputable manufacturers.
Installation Considerations: Simply remove the existing bolts and replace them with the camber bolts, rotating them to achieve the desired camber angle. Use a reliable alignment tool to monitor the camber angle. Torque the bolts to the manufacturer's specification. A thread locker, like Loctite, is highly recommended to prevent slippage.
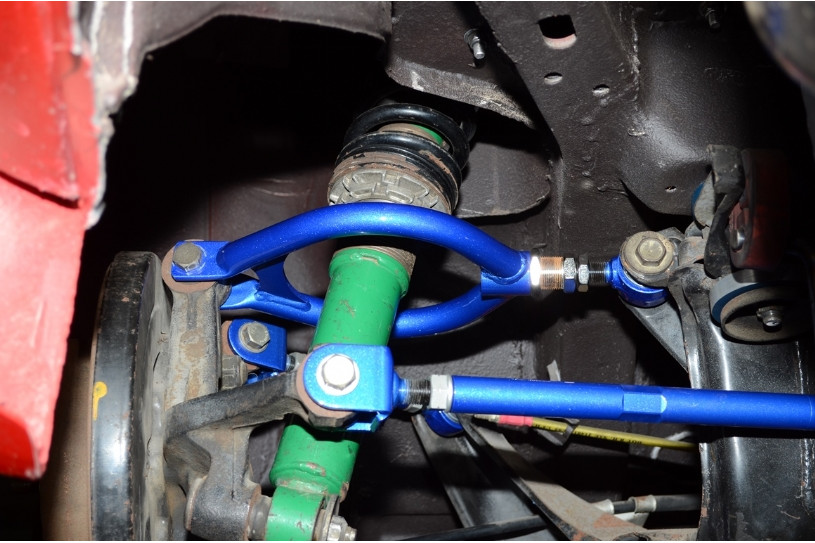
3. Adjustable Upper Control Arms (Rear)
Description: Adjustable upper control arms replace the factory upper control arms in the rear suspension. They typically feature a threaded body with adjustable end links, allowing you to lengthen or shorten the arm, thus changing the camber angle.
Pros:
- Good Adjustment Range: Adjustable upper control arms offer a decent range of camber adjustment, typically more than camber bolts.
- Improved Handling: Replacing worn or damaged OEM control arms with adjustable units can improve handling and stability.
- Durability: High-quality adjustable control arms are often stronger than the factory units.
Cons:
- Medium Cost: More expensive than camber bolts, but less expensive than camber plates.
- Potential Clearance Issues: Aggressively adjusted control arms can sometimes lead to clearance issues with the chassis or other suspension components.
- Requires Careful Adjustment: Adjusting the length of the control arms affects both camber and toe. It's essential to adjust both parameters accurately to achieve proper alignment.
Installation Considerations: Installation involves removing the existing upper control arms and replacing them with the adjustable units. Precise measurement and adjustment are critical to achieving the desired camber and toe angles. A professional alignment is highly recommended after installation.
4. Offset Bushings (Rear)
Description: Offset bushings are polyurethane or rubber bushings with an offset center bore. When installed in the rear suspension components (often the rear knuckles), they change the pivot point and thereby alter the camber angle. These are less common but can be used to fine-tune adjustments or correct minor camber issues. Some offset bushings also correct for toe.
Pros:
- Relatively Inexpensive: They are generally cheaper than adjustable control arms and camber plates.
- Can Improve Bushing Performance: Replacing worn factory bushings with polyurethane alternatives can improve handling response and reduce suspension deflection.
Cons:
- Limited Adjustment: The amount of camber adjustment is fixed by the offset of the bushing. It offers very little fine-tuning capability.
- Installation Can Be Difficult: Pressing out the old bushings and pressing in the new ones requires specialized tools and can be time-consuming.
- Increased NVH (with Polyurethane): Polyurethane bushings, while providing better handling, can increase noise, vibration, and harshness compared to rubber bushings.
Installation Considerations: This typically requires specialized tools like a bushing press. The old bushings must be pressed out of the control arms or knuckles, and the new offset bushings must be pressed in with the correct orientation to achieve the desired camber change. It's crucial to consult the manufacturer's instructions for proper installation and orientation. Alignment is still recommended after installation.
Choosing the Right Kit
The best camber adjustment kit for your 240SX depends on several factors, including your budget, driving style, intended use of the vehicle, and desired level of adjustability.
Here's a quick guide:
- Street Car with Mild Modifications: Camber bolts (front and rear) or offset bushings (rear) may be sufficient.
- Track Car or Aggressively Modified Street Car: Camber plates (front) and adjustable upper control arms (rear) are recommended.
- Budget-Conscious Track Enthusiast: Camber bolts (front) and adjustable upper control arms (rear) can provide a good balance of performance and affordability.
Important Considerations
- Quality Matters: Always choose high-quality kits from reputable manufacturers. Cheap kits may be made from inferior materials and may not provide accurate or reliable adjustments.
- Professional Alignment: A professional alignment is essential after installing any camber adjustment kit. This will ensure that the suspension geometry is properly set and that the car handles safely and predictably.
- Tire Wear: Monitor tire wear closely after adjusting camber. Excessive negative camber can lead to uneven tire wear, requiring you to rotate your tires more frequently or adjust the camber angle to a more conservative setting.
- Other Suspension Components: Camber adjustment can affect other suspension parameters, such as toe and caster. Consider upgrading other suspension components, such as tie rod ends and ball joints, to ensure optimal performance and durability.
- Spring Rates and Dampening: Significant camber changes often necessitate adjustments to spring rates and damper settings to maintain optimal handling. Consult with suspension experts or conduct thorough testing to fine-tune your suspension setup.
By carefully considering your needs and choosing the right camber adjustment kit, you can significantly improve the handling and performance of your Nissan 240SX.