Automatic Shift Kit Installation And Calibration Guide
An automatic transmission shift kit can significantly improve your vehicle's performance, offering firmer, quicker shifts and increased durability. While professional installation is always recommended, a mechanically inclined individual can install a shift kit with the right tools, knowledge, and a healthy dose of patience. This guide provides a comprehensive overview of the process, from preparation to calibration, enabling you to approach this project with confidence. However, improper installation can lead to serious transmission damage, so proceed with caution and consult a professional if you are unsure about any step.
Understanding Automatic Transmission Shift Kits
Before diving into the installation, it's crucial to understand what a shift kit does. An automatic transmission relies on hydraulic pressure to engage different gears. A shift kit modifies this pressure, typically by replacing or modifying valves and springs within the valve body. This results in:
- Firmer Shifts: Reduced slippage during gear changes translates to more power delivered to the wheels.
- Quicker Shifts: Faster gear changes improve acceleration and overall responsiveness.
- Increased Durability: Reduced slippage means less heat and wear on the transmission components.
Different shift kits offer varying levels of firmness. Some are designed for everyday driving, providing a subtle improvement, while others are geared towards performance applications, delivering aggressive shifts. Choose a kit that aligns with your driving style and the intended use of your vehicle.
Choosing the Right Shift Kit
Selecting the correct shift kit for your specific vehicle is paramount. Consider the following factors:
- Vehicle Make, Model, and Year: Shift kits are designed for specific transmissions. Ensure the kit is compatible with your vehicle.
- Transmission Type: Identify your transmission model (e.g., 4L60E, 700R4, AOD). This information is typically found on a sticker on the transmission itself.
- Desired Shift Firmness: Choose a kit that matches your driving style and preferences. Read reviews and research different brands to understand their characteristics.
Reputable brands like Transgo, B&M, and Superior Transmission Parts offer a wide range of shift kits. Read reviews and compare features before making a purchase. Consider consulting with a transmission specialist for advice on selecting the best kit for your needs.
Tools and Materials Required
Having the right tools and materials on hand will make the installation process much smoother. Here's a list of essentials:
- Shift Kit: The chosen shift kit, complete with all necessary components and instructions.
- Socket Set and Wrenches: A comprehensive set of metric or SAE sockets and wrenches, depending on your vehicle.
- Torque Wrench: Essential for tightening bolts to the correct specifications.
- Screwdrivers: Both flathead and Phillips head screwdrivers.
- Pliers: Needle-nose pliers and regular pliers.
- Drain Pan: To collect transmission fluid.
- Funnel: For refilling the transmission fluid.
- Transmission Fluid: Use the correct type of fluid specified in your vehicle's owner's manual.
- Gasket Scraper: To clean old gasket material from the valve body and transmission case.
- Clean Rags or Shop Towels: For wiping up spills and keeping the work area clean.
- Parts Tray: To organize small parts and prevent them from getting lost.
- Safety Glasses: To protect your eyes from debris.
- Gloves: To protect your hands from transmission fluid.
- Service Manual: A service manual for your vehicle can be invaluable for understanding the transmission's design and operation.
Automatic Shift Kit Installation: Step-by-Step Guide
Disclaimer: This is a general guide. Always refer to the specific instructions provided with your shift kit. The steps may vary slightly depending on the kit and your vehicle's transmission.
- Preparation:
- Park your vehicle on a level surface and engage the parking brake.
- Disconnect the negative battery cable.
- Raise the vehicle safely using jack stands. Never work under a vehicle supported only by a jack.
- Draining the Transmission Fluid:
- Locate the transmission drain plug (if equipped) or the transmission pan.
- Place a drain pan underneath the transmission.
- Loosen the drain plug (or pan bolts) and allow the fluid to drain completely.
- Remove the transmission pan. Be prepared for residual fluid to spill.
- Removing the Valve Body:
- Carefully disconnect any electrical connectors attached to the valve body.
- Loosen and remove the valve body mounting bolts. Support the valve body as you remove the last few bolts to prevent it from falling.
- Carefully lower the valve body from the transmission.
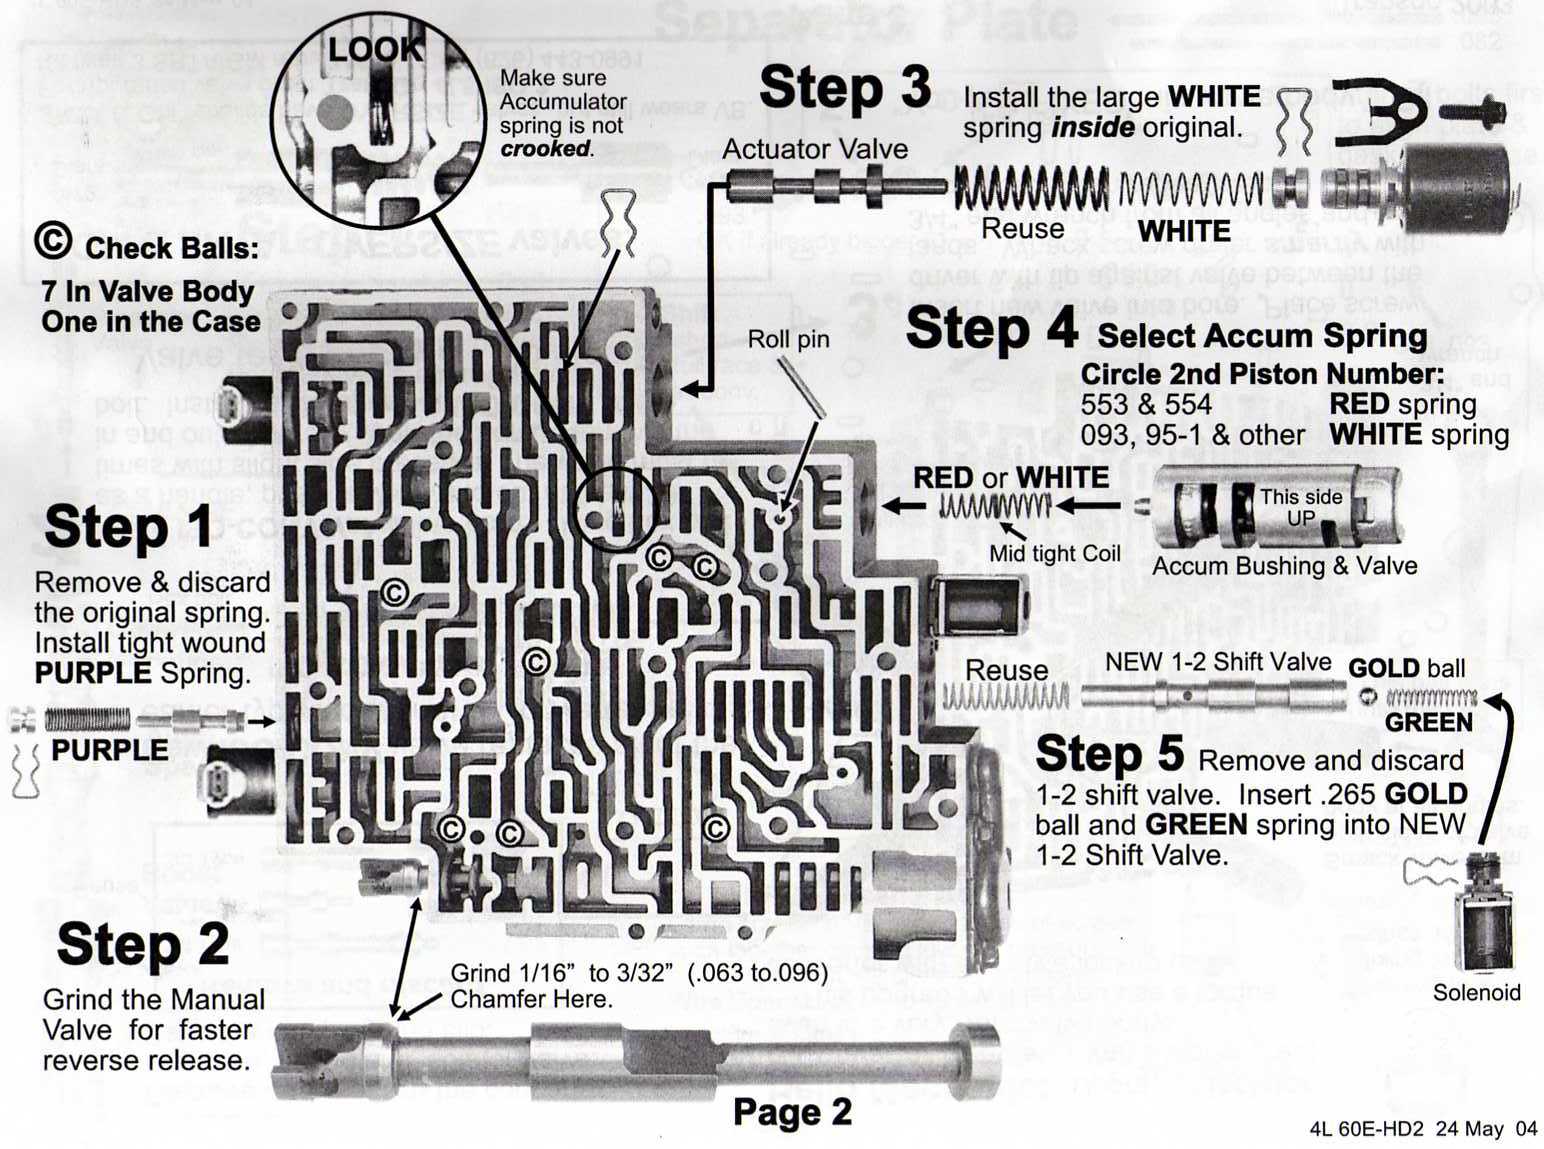
- Installing the Shift Kit Components:
- Refer to the shift kit instructions for specific installation procedures.
- Typically, this involves replacing or modifying valves, springs, and separators plates within the valve body.
- Pay close attention to the orientation of each component.
- Keep everything clean and organized.
- Use a parts tray to prevent small parts from rolling away.
- Reinstalling the Valve Body:
- Clean the valve body mounting surface on the transmission case.
- Install a new transmission pan gasket.
- Carefully align the valve body with the transmission case and install the mounting bolts.
- Tighten the bolts to the torque specifications listed in the service manual or shift kit instructions.
- Reconnect any electrical connectors.
- Reinstalling the Transmission Pan:
- Clean the transmission pan thoroughly.
- Install a new transmission pan gasket.
- Position the transmission pan and install the pan bolts.
- Tighten the bolts to the torque specifications listed in the service manual.
- Refilling the Transmission Fluid:
- Locate the transmission fill tube.
- Insert a funnel into the fill tube.
- Add the correct type and amount of transmission fluid specified in your vehicle's owner's manual.
- Check the fluid level using the transmission dipstick. Add more fluid as needed.
- Final Steps:
- Reconnect the negative battery cable.
- Lower the vehicle.
- Start the engine and let it idle for a few minutes.
- Check for leaks around the transmission pan and valve body.
- Test drive the vehicle to evaluate the shift performance.
Automatic Shift Kit Calibration and Adjustment
Some shift kits may require calibration or adjustment after installation. This typically involves adjusting the TV (Throttle Valve) cable or the modulator valve. The purpose of these adjustments is to fine-tune the shift points and firmness. Refer to the shift kit instructions and your vehicle's service manual for specific calibration procedures. Improper calibration can lead to erratic shifting or transmission damage.
Understanding TV Cable Adjustment
The TV cable plays a crucial role in telling the transmission how much throttle the engine is using. An incorrectly adjusted TV cable can lead to delayed shifts, harsh shifts, or even premature transmission failure. Proper TV cable adjustment ensures that the transmission shifts at the correct times and with the appropriate firmness.
Troubleshooting Common Issues
After installing a shift kit, you might encounter a few common issues. Here's how to address them:
- Harsh Shifting: This can be due to excessive pressure. Check the shift kit instructions for adjustments to reduce firmness.
- Delayed Shifting: This may indicate a problem with the TV cable adjustment or low fluid level.
- Slipping: Slipping can occur if the shift kit wasn't installed correctly or if the transmission was already damaged. This often requires professional diagnosis.
- No Shifting: Double-check all connections and ensure the valve body is properly installed. This could also indicate a more serious transmission issue.
Final Thoughts
Installing an automatic transmission shift kit can be a rewarding project, offering improved performance and enhanced driving experience. However, it requires careful attention to detail and a thorough understanding of your vehicle's transmission. If you are uncomfortable with any aspect of the installation process, seek professional assistance. By following this guide and taking your time, you can successfully install a shift kit and enjoy the benefits of firmer, quicker shifts.
Disclaimer: This guide is for informational purposes only. The author and publisher assume no responsibility for any damage or injury resulting from the use of this information. Always consult with a qualified mechanic before attempting any automotive repairs.