Ball Joint Removal Procedures And Special Tools
Ball joints are crucial components of your vehicle's suspension system, connecting the control arms to the steering knuckles. They allow for smooth and controlled movement, enabling you to steer and navigate turns safely. Over time, ball joints can wear out due to constant stress and exposure to the elements. Recognizing the signs of ball joint failure and understanding the ball joint removal procedures is essential for vehicle maintenance and safety.
Identifying Worn Ball Joints
Before delving into the removal process, it's important to diagnose whether your ball joints are actually failing. Common symptoms include:
- Clunking or knocking noises: Especially when going over bumps or turning.
- Steering issues: Such as looseness, wandering, or difficulty keeping the vehicle straight.
- Uneven tire wear: Often on the inside or outside edge of the tire.
- Vibrations: Felt in the steering wheel, particularly at higher speeds.
- Visual inspection: Look for excessive play or looseness in the ball joint when the suspension is unloaded. You may need to use a pry bar to check for movement.
If you suspect worn ball joints, have them inspected by a qualified mechanic. Ignoring these symptoms can lead to more significant suspension damage and compromise your vehicle's handling.
Essential Special Tools for Ball Joint Removal
Removing and replacing ball joints can be challenging, and certain special tools are necessary to ensure a safe and effective job. Attempting to remove them without the proper tools can damage other suspension components or cause injury. Here's a rundown of the most commonly used tools:
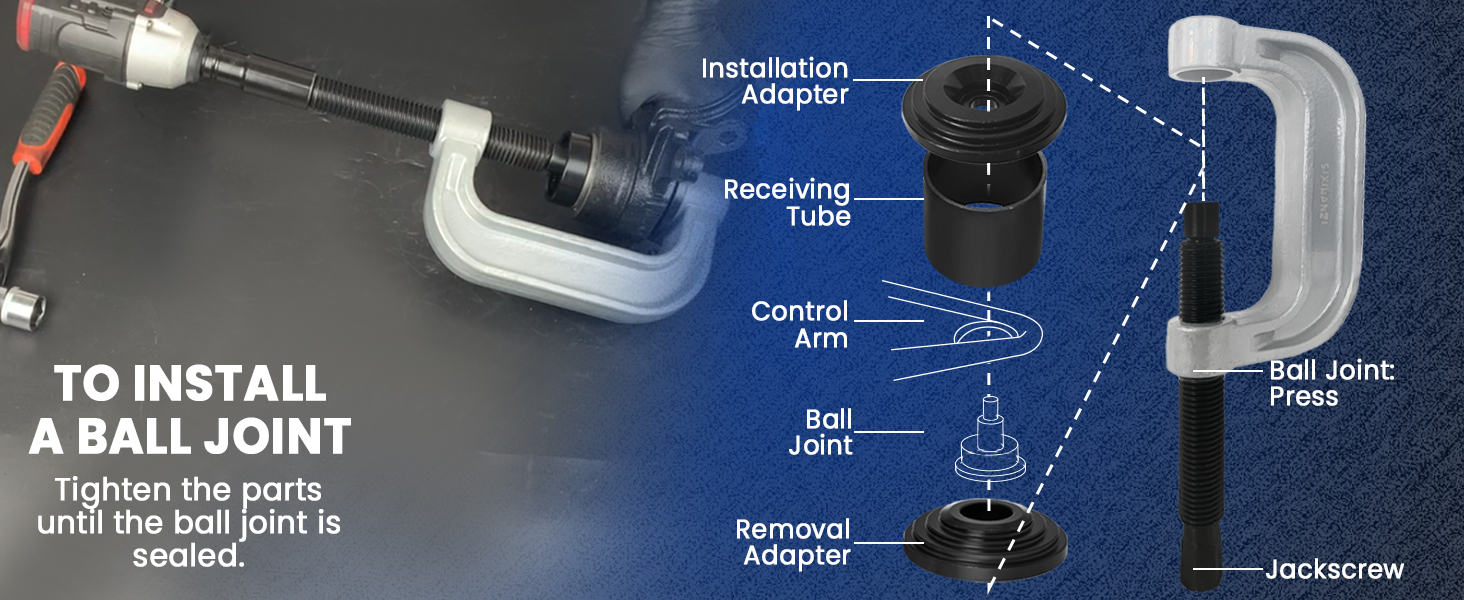
- Ball Joint Press (C-Clamp): This is the most crucial tool. It applies controlled pressure to push the ball joint out of its housing. A quality ball joint press comes with various adapters to fit different ball joint sizes and configurations.
- Ball Joint Separator (Pickle Fork): A wedge-shaped tool used to separate the ball joint from the steering knuckle or control arm. While effective, using a pickle fork can damage the ball joint boot, so it's best reserved for situations where the ball joint is being replaced anyway.
- Hammer: A heavy hammer (e.g., a ball-peen hammer) is often needed to assist in loosening the ball joint or driving out stubborn components.
- Sockets and Wrenches: A variety of metric sockets and wrenches are essential for disconnecting the ball joint from the surrounding suspension components.
- Torque Wrench: Absolutely critical for tightening the new ball joint to the manufacturer's specified torque.
- Pry Bar: Useful for leverage and separating components.
- Safety Glasses and Gloves: Always prioritize safety when working on your vehicle.
- Penetrating Oil: Applying penetrating oil to rusted or seized components can make the removal process much easier.
- Wheel Chocks: For safety, always chock the wheels opposite the side you are working on.
- Jack and Jack Stands: Essential for lifting and securely supporting the vehicle. Never work under a vehicle supported only by a jack.
General Ball Joint Removal Procedures
The specific ball joint removal procedures can vary slightly depending on the vehicle make and model. Always consult your vehicle's repair manual for specific instructions. However, the following steps provide a general overview:
- Preparation:
- Park the vehicle on a level surface and engage the parking brake.
- Loosen the lug nuts on the wheel of the side you will be working on.
- Chock the rear wheels (if working on the front suspension).
- Use a jack to lift the vehicle and securely support it with jack stands. Never work under a vehicle supported only by a jack.
- Remove the wheel.
- Disconnect Surrounding Components:
- Disconnect any brake lines, ABS sensors, or other components that might be attached to the steering knuckle or control arm near the ball joint. Be careful not to damage these components.
- Remove the cotter pin and loosen the castle nut securing the ball joint to the steering knuckle. Do not remove the castle nut completely at this stage.
- Separate the Ball Joint:
- This is where the ball joint separator or ball joint press comes in. If using a pickle fork, insert it between the steering knuckle and the ball joint and strike the fork with a hammer to separate the joint. Be aware that this will likely damage the ball joint boot.
- If using a ball joint press, position the appropriate adapters around the ball joint and use the press to apply pressure, pushing the ball joint out of the steering knuckle. This is the preferred method, as it is less likely to damage surrounding components.
- Once the ball joint is separated from the steering knuckle, fully remove the castle nut.
- Remove the Ball Joint from the Control Arm (If Applicable):
- Some ball joints are pressed into the control arm, while others are bolted.
- If bolted, simply remove the bolts holding the ball joint in place.
- If pressed, use the ball joint press with the appropriate adapters to press the ball joint out of the control arm.
- Inspect the Mounting Surface:
- Clean the mounting surface on the control arm or steering knuckle where the new ball joint will be installed. Remove any rust or debris.
Installing the New Ball Joint
Installation is essentially the reverse of removal. Follow these steps:
- Install the New Ball Joint:
- If the ball joint is pressed in, use the ball joint press to carefully press the new ball joint into the control arm or steering knuckle. Ensure it is properly seated and aligned.
- If the ball joint is bolted in, install the new ball joint and tighten the bolts to the manufacturer's specified torque.
- Reattach the Ball Joint to the Steering Knuckle:
- Insert the ball joint stud into the steering knuckle and install the castle nut. Tighten the nut to the manufacturer's specified torque.
- Install a new cotter pin through the castle nut and the ball joint stud. Bend the ends of the cotter pin to secure it. Never reuse an old cotter pin.
- Reconnect Surrounding Components:
- Reattach any brake lines, ABS sensors, or other components that you disconnected earlier. Ensure they are properly secured.
- Reinstall the Wheel:
- Reinstall the wheel and tighten the lug nuts to the manufacturer's specified torque in a star pattern.
- Lower the vehicle to the ground.
- Final Checks:
- Double-check all connections to ensure they are secure.
- Have the vehicle's alignment checked by a qualified mechanic. Replacing ball joints can affect the alignment.
Important Safety Considerations
Working on your vehicle's suspension can be dangerous. Always follow these safety precautions:
- Wear safety glasses and gloves.
- Never work under a vehicle supported only by a jack. Use jack stands.
- Consult your vehicle's repair manual for specific instructions and torque specifications.
- If you are not comfortable performing this work yourself, seek assistance from a qualified mechanic.
When to Seek Professional Help
While this guide provides a general overview of ball joint removal procedures, it is important to assess your own skills and comfort level. If you are unsure about any aspect of the process or lack the necessary tools, it is always best to seek assistance from a qualified mechanic. Incorrectly installed ball joints can lead to serious safety issues.
Furthermore, some vehicles have more complex suspension systems that require specialized knowledge and equipment. In these cases, professional help is highly recommended. Remember, your safety and the safety of others on the road should always be your top priority.