Carpet Replacement And Sound Deadening Installation
Carpet replacement is a common task, often undertaken for aesthetic reasons – a refresh of a tired interior. However, it presents a golden opportunity to address another, often overlooked, aspect of vehicle comfort and refinement: sound deadening. This guide dives deep into the process of both carpet replacement and sound deadening installation, exploring the underlying principles and offering practical advice for a successful outcome. We will focus on understanding the types of materials involved, the techniques for applying them, and the expected results, going beyond a simple "how-to" and delving into the "why" behind each step.
Understanding the Acoustic Environment of a Car
Before ripping out that old carpet, it’s essential to appreciate the various sources of noise that contribute to the overall acoustic experience within a vehicle. These can be broadly categorized as:
- Road Noise: Generated by tire interaction with the road surface, this noise transmits through the suspension components and chassis, eventually radiating into the cabin. The type of road surface, tire design, and vehicle speed all play a significant role.
- Engine Noise: Combustion, mechanical movement, and exhaust pulses all contribute to engine noise. This noise is transmitted through the engine mounts, firewall, and even the vehicle's structure.
- Wind Noise: Turbulent airflow around the vehicle's body creates pressure fluctuations, leading to noise that enters through seals around doors, windows, and other openings. Aerodynamic design is crucial in minimizing this, but aftermarket improvements can also make a big difference.
- Drivetrain Noise: Gear whine, differential hum, and driveshaft vibrations contribute to this category, especially noticeable in older or poorly maintained vehicles.
Sound deadening aims to reduce the transmission and amplification of these noises within the cabin, creating a quieter and more comfortable environment. Effective sound deadening doesn't just block sound; it works by damping vibrations and absorbing sound energy.
Materials for Carpet Replacement and Sound Deadening
Selecting the right materials is paramount to achieving the desired outcome. Here's a breakdown of common options:
Carpet
Automotive carpet is specifically designed to withstand the harsh conditions of a vehicle interior: UV exposure, temperature fluctuations, and abrasion. It typically consists of a durable face fiber (often nylon or polypropylene) bonded to a backing material. When choosing replacement carpet, consider the following:
- Material: Nylon offers excellent durability and stain resistance, while polypropylene is more budget-friendly but less resistant to wear.
- Weight: Heavier carpets generally offer better insulation and a more luxurious feel.
- Molding: Pre-molded carpets are shaped to fit the vehicle's floor pan, simplifying installation. Universal carpets require trimming and fitting.
- Color and Texture: Match the existing interior or choose a new style to personalize the cabin.
Sound Deadening Materials
Sound deadening materials fall into several categories, each addressing a specific aspect of noise control:
- Damping Mats (Constrained Layer Dampers - CLD): These materials, such as Dynamat or Second Skin Damplifier Pro, consist of a layer of viscoelastic polymer bonded to a thin layer of aluminum. They are designed to damp vibrations in metal panels, reducing resonance and preventing them from acting as "speakers" that amplify noise. CLD tiles should cover approximately 25-50% of the panel surface for optimal effect. Too much coverage adds unnecessary weight without significant additional benefit.
- Sound Absorption Materials: These materials, like closed-cell foam (CCF) or mass-loaded vinyl (MLV), are designed to absorb airborne sound waves. CCF, such as Dynamat Dynaliner or Second Skin Overkill, typically comes in sheets of varying thickness and is often applied over damping mats. MLV is a dense, heavy material that acts as a sound barrier, blocking noise transmission. It's particularly effective against low-frequency noise.
- Sound Blocking Materials: Mass Loaded Vinyl (MLV). This material acts as a dense barrier, physically blocking sound waves from passing through. It's particularly effective against mid-to-low frequency noise and is often used in conjunction with damping mats and CCF. When using MLV, it's crucial to seal seams and edges properly to prevent sound leakage.
- Spray-on Sound Deadeners: These are applied as a liquid that cures to form a damping layer. While convenient for hard-to-reach areas, they generally offer less performance than CLD tiles for a given thickness.
The Installation Process: A Step-by-Step Guide
The installation process requires patience, attention to detail, and the right tools. Here's a general outline:
1. Preparation and Disassembly
This is arguably the most important step. Start by removing all seats, consoles, trim panels, and the existing carpet. Thoroughly clean the bare metal floor pan, removing any rust, dirt, or debris. Addressing rust is crucial, as sound deadening materials can trap moisture and exacerbate corrosion if applied over existing rust. Use a wire brush or grinder to remove loose rust, followed by a rust converter to neutralize any remaining corrosion.
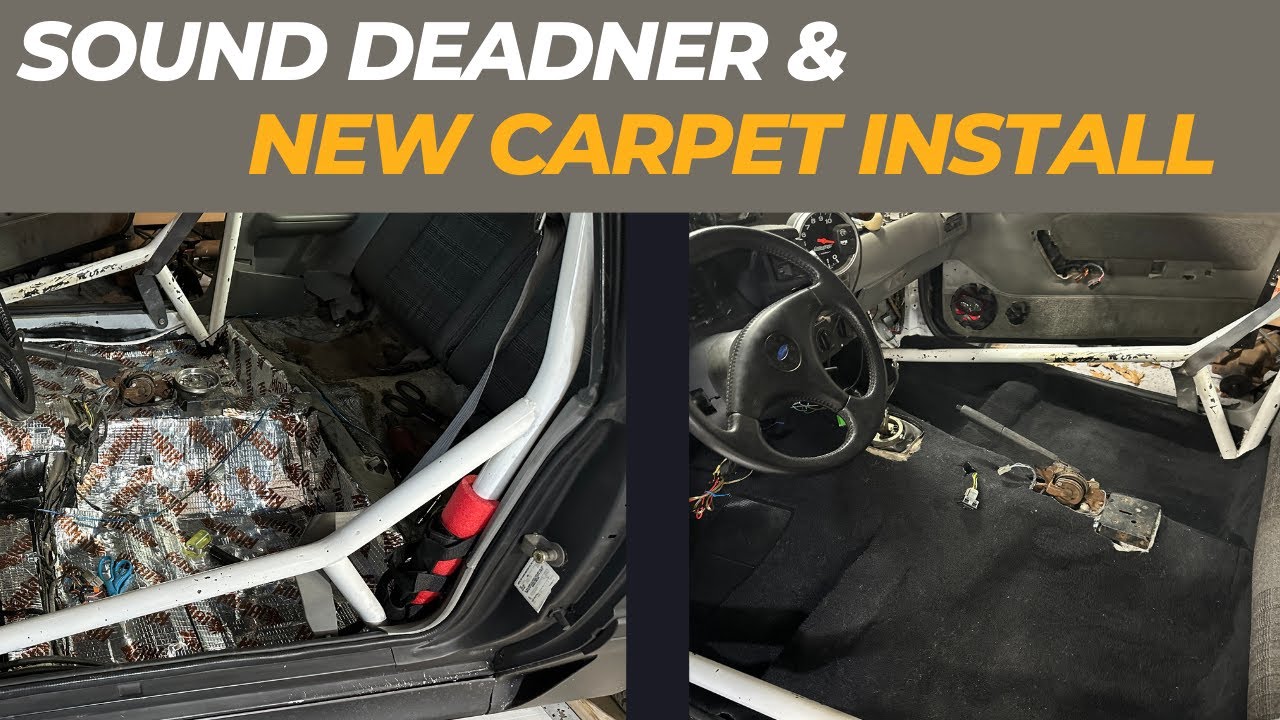
2. Damping Mat Application (CLD)
Cut the damping mat into manageable pieces. Apply the CLD to the large, flat areas of the floor pan, targeting areas prone to vibration, such as the transmission tunnel and wheel wells. Use a roller to firmly press the mat onto the metal surface, ensuring complete adhesion. This eliminates air gaps and maximizes the damping effect. Remember, 25-50% coverage is generally sufficient. Focus on areas that resonate when tapped.
3. Sound Absorption Material Application (CCF and/or MLV)
Next, apply the sound absorption material. CCF is typically applied directly over the CLD, covering as much of the surface area as possible. MLV, if used, should be installed over the CCF. When installing MLV, pay close attention to sealing seams and edges. Use a high-quality seam tape or sealant to create an airtight barrier. Ensure proper overlaps for better sound blocking performance. Remember to cut holes for seat bolts and other necessary attachments.
4. Carpet Installation
With the sound deadening installed, it's time to install the new carpet. If using a pre-molded carpet, carefully position it over the floor pan, aligning it with the contours of the vehicle. If using a universal carpet, you'll need to trim and fit it to the floor pan. Use the old carpet as a template. Ensure the carpet is properly secured and doesn't interfere with any moving parts.
5. Reassembly
Reinstall all trim panels, consoles, and seats. Ensure everything is properly secured and functioning correctly. Double-check all connections and fasteners. Take your time and be methodical during the reassembly process to avoid damaging any components or creating new rattles.
Tips and Considerations
- Ventilation: Work in a well-ventilated area, especially when using adhesives or spray-on products.
- Safety: Wear appropriate safety gear, including gloves, eye protection, and a respirator if necessary.
- Tools: A sharp utility knife, a roller, a heat gun (for conforming CLD to complex shapes), and seam tape are essential tools.
- Patience: This is a time-consuming process. Don't rush it. Take breaks and ensure you're doing each step correctly.
- Weight: Be mindful of the added weight. MLV, in particular, can add significant weight to the vehicle.
- Budget: Sound deadening materials can be expensive. Plan your budget accordingly.
- Research: Research specific products and techniques before starting the project. Online forums and reviews can provide valuable insights.
Expected Results
A well-executed carpet replacement and sound deadening installation can significantly reduce road noise, engine noise, and wind noise within the vehicle cabin. This results in a more comfortable and refined driving experience, making it easier to hear music, converse with passengers, and enjoy the ride. While it won't eliminate noise entirely, the reduction in noise levels can be substantial, especially on older vehicles or those with minimal factory sound deadening.
The degree of improvement will depend on the quality of the materials used, the thoroughness of the installation, and the original noise levels of the vehicle. However, with careful planning and execution, a noticeable and worthwhile improvement in acoustic comfort can be achieved.
Important Note: Sound deadening is a process of diminishing noise, not eliminating it entirely. Expect a reduction, not complete silence.
By understanding the principles of sound deadening and carefully following the steps outlined in this guide, you can transform your vehicle's interior into a quieter and more enjoyable space. While challenging, the reward of a more refined driving experience is well worth the effort.