Design And Wiring Of A Custom Switch Panel For Accessory Control
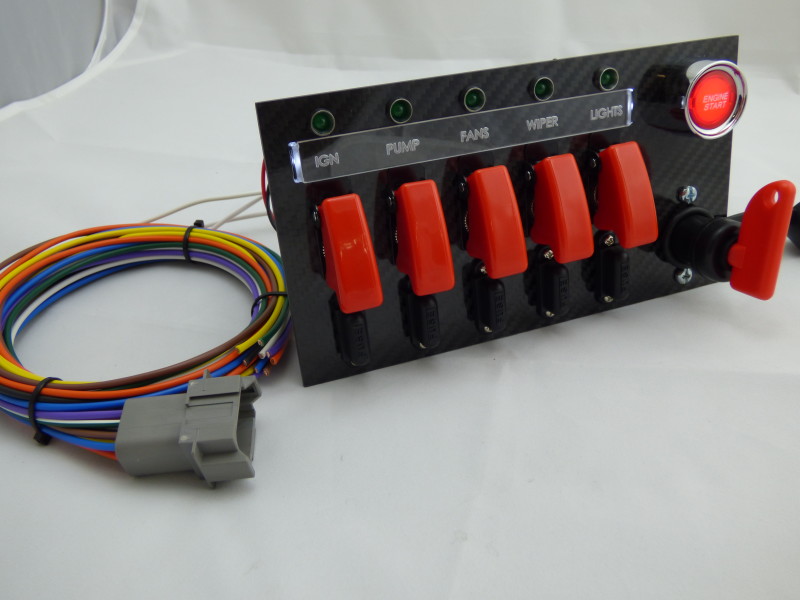
So, you're looking to add some accessories to your vehicle – maybe some auxiliary lights, a winch, an upgraded sound system, or even some off-road gadgets. Great! But now you're facing the wiring spaghetti monster under your dash and the prospect of drilling a million holes for individual switches. That's where a custom switch panel comes in. It's a cleaner, more organized, and frankly, a more professional way to manage your vehicle's aftermarket upgrades. This article will walk you through the design and wiring of a custom switch panel, addressing common challenges and offering practical solutions.
Why a Custom Switch Panel?
Before we dive into the how-to, let's solidify the why. Think about it: each accessory typically comes with its own switch and wiring. Without a central hub, you end up with a tangled mess of wires running everywhere, making troubleshooting a nightmare. A custom switch panel offers several advantages:
- Organization: Consolidates all accessory controls in one location, eliminating clutter.
- Aesthetics: Provides a clean, professional look to your vehicle's interior.
- Safety: Allows for proper fusing and wiring, minimizing the risk of electrical fires or damage.
- Ease of Use: Makes controlling accessories intuitive and straightforward.
- Future-Proofing: Simplifies the addition of new accessories in the future.
Planning Your Custom Switch Panel
The first step is careful planning. This is where you determine the size, layout, and functionality of your panel. Consider these factors:
1. Accessory Count
How many accessories do you plan to control? Be realistic and consider future additions. It's better to have extra switches than to run out of space later. A good rule of thumb is to add 2-3 extra slots for future upgrades.
2. Switch Type
There are various switch types available, each with its own pros and cons:
- Rocker Switches: Common, durable, and available in various styles (illuminated, momentary, etc.). A good all-around choice.
- Toggle Switches: Classic look, readily available, but can be less durable than rocker switches.
- Push-Button Switches: Offer a clean, modern look, often used for momentary functions like a horn or winch.
- Touchscreen Controllers: High-tech option, but can be more expensive and prone to failure in harsh environments.
Choose switches that match your aesthetic preferences and functional requirements. Consider illuminated switches for easy visibility at night.
3. Location
Where will you mount your switch panel? Common locations include:
- Dashboard: Easy access, but can require modifications to your dash.
- Overhead Console: Keeps the panel out of the way, but can be challenging to wire.
- Center Console: Good compromise between access and aesthetics.
- Custom Mount: Fabricate a custom bracket for a unique location.
Choose a location that's easily accessible, doesn't obstruct your view, and allows for safe wiring.
4. Power Requirements
Determine the amperage draw of each accessory. This will dictate the gauge of wire you need to use and the size of the fuses. Incorrectly sized wiring and fuses can lead to electrical fires! Refer to the accessory's documentation for its power requirements. When in doubt, overestimate the amperage draw slightly to provide a safety margin.
Materials and Tools Needed
Here's a list of essential materials and tools:
- Switch Panel Housing: Pre-made or custom-fabricated panel. Consider aluminum or plastic.
- Switches: As many as you need, plus a few extras.
- Wiring: Automotive-grade wire in various gauges (12 AWG, 14 AWG, 16 AWG are common).
- Fuse Block: To protect your circuits. A blade-style fuse block is a good option.
- Fuses: Correct amperage for each accessory.
- Relays: For high-amperage accessories like lights and winches.
- Wire Connectors: Butt connectors, ring terminals, spade connectors.
- Heat Shrink Tubing: To insulate and protect connections.
- Zip Ties: To keep wiring organized.
- Wire Loom: To protect wires from abrasion.
- Tools:
- Wire Strippers/Crimpers
- Multimeter
- Soldering Iron (Optional, but recommended for secure connections)
- Heat Gun (For heat shrink tubing)
- Drill and Drill Bits
- Screwdrivers
- Pliers
- Voltmeter
Expect to spend between $50 and $200 on materials, depending on the complexity of your setup and the quality of the components.
Wiring Your Custom Switch Panel: A Step-by-Step Guide
Now for the fun part! Here's a simplified wiring diagram and step-by-step instructions:
1. Grounding
Establish a solid ground connection. Run a heavy-gauge wire (e.g., 8 AWG or thicker) from the negative terminal of your battery to a central grounding point on your vehicle's chassis. This ensures a good electrical connection for all your accessories.
2. Power Source
Connect a heavy-gauge wire (matching the ground wire) from the positive terminal of your battery to a high-amperage fuse (e.g., 80A or 100A) near the battery. This fuse protects the entire system. From the fuse, run the wire to the main power input of your fuse block. Always disconnect the negative terminal of your battery before working on any electrical wiring!
3. Wiring the Fuse Block
The fuse block is the heart of your switch panel. Connect the main power wire to the input terminal of the fuse block. Then, run a wire from each fuse output to one terminal of a switch on your panel. This is where you'll use appropriately sized fuses for each individual accessory. Consult the accessory's specifications for the correct fuse size.
4. Wiring the Switches
Each switch will have at least two terminals (and often three or more, depending on the type). One terminal is for the power input (from the fuse block), and the other is for the power output to the accessory. If your switch has a third terminal for illumination, connect it to a suitable 12V source (e.g., the vehicle's parking light circuit). Use appropriate gauge wire for each accessory based on its amperage draw. For example, a low amp draw accessory may only need 16 AWG.
5. Wiring Relays (If Needed)
For high-amperage accessories like lights, winches, and electric fans, you'll need to use relays. A relay is an electrically operated switch that allows a low-current circuit (your switch panel) to control a high-current circuit (the accessory). The switch on your panel will trigger the relay, which in turn will connect the battery power to the accessory.
Here's a typical relay wiring setup:
- Pin 85: Ground
- Pin 86: Connected to the switch output on your switch panel.
- Pin 30: Connected to a fused power source (directly from the battery).
- Pin 87: Connected to the positive wire of the accessory.
6. Connecting to Accessories
Run wires from the switch panel (or relays, if used) to the corresponding accessories. Use appropriate connectors and ensure proper insulation. Use wire loom to protect the wires from abrasion and secure them with zip ties to prevent them from dangling or rubbing against sharp edges.
7. Testing and Troubleshooting
Before buttoning everything up, test each accessory to ensure it's working correctly. Use a multimeter to check for voltage at each connection. If an accessory isn't working, double-check your wiring, fuses, and relays. A common mistake is incorrect grounding. Ensure all ground connections are clean and secure.
Tips for a Professional Installation
- Use a Wiring Diagram: Create a detailed wiring diagram before you start. This will help you avoid mistakes and simplify troubleshooting.
- Label Everything: Use a label maker to identify each wire and switch. This will save you time and frustration later on.
- Use Quality Components: Don't skimp on wiring, connectors, and fuses. Investing in quality components will ensure a reliable and long-lasting system.
- Protect Your Wires: Use wire loom, heat shrink tubing, and zip ties to protect your wires from abrasion, heat, and moisture.
- Keep Wires Organized: Route wires neatly and securely. Avoid creating a tangled mess of wires.
- Test Thoroughly: Before you finalize the installation, test each accessory thoroughly to ensure it's working correctly.
Troubleshooting Common Issues
- Accessory Not Working: Check the fuse, wiring connections, and relay (if used). Use a multimeter to check for voltage at each point in the circuit.
- Switch Not Illuminating: Check the wiring to the switch's illumination terminal. Ensure it's properly connected to a 12V source.
- Fuse Keeps Blowing: The accessory is drawing too much current. Check the accessory's specifications and ensure the fuse is the correct size. Also, check for shorts in the wiring.
- Dim Lights: Indicates a voltage drop. This can be caused by undersized wiring, poor ground connections, or a weak battery.
Building a custom switch panel can seem daunting, but with careful planning and attention to detail, it's a manageable project that will significantly improve the functionality and aesthetics of your vehicle. Remember to prioritize safety and use quality components. If you're not comfortable working with electrical wiring, consult a qualified automotive electrician. Labor costs can range from $200-$600 for a professional installation, depending on the complexity of the setup.