Diagnosis And Replacement Of The Fuel Tank Sending Unit
The fuel tank sending unit, often referred to as the fuel level sensor, is a critical component of your vehicle's fuel system. Its primary function is to measure the amount of fuel in the tank and relay that information to the fuel gauge on your dashboard. A malfunctioning sending unit can lead to inaccurate fuel readings, leaving you stranded unexpectedly or, at the very least, causing considerable anxiety about your fuel level. This article will guide you through the diagnosis and replacement process, empowering you to tackle this repair with confidence.
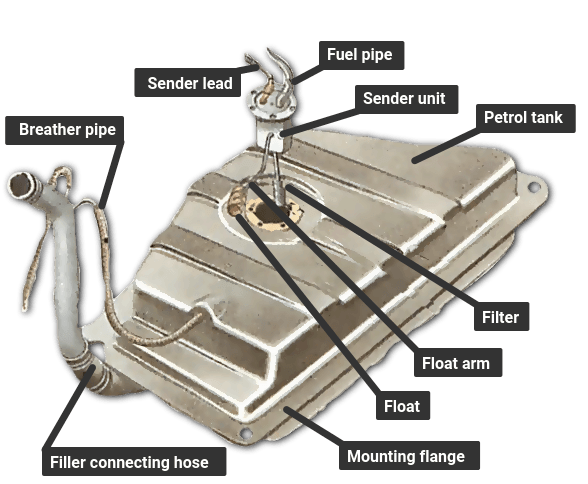
Understanding the Fuel Tank Sending Unit
Before diving into the diagnosis and replacement procedures, it's helpful to understand what the fuel tank sending unit is and how it works.
The sending unit is typically located inside the fuel tank, often attached to the fuel pump module. It consists of a float connected to a variable resistor. As the fuel level rises and falls, the float moves accordingly, changing the resistance in the circuit. This change in resistance is interpreted by the vehicle's computer and displayed as a fuel level reading on the dashboard gauge.
There are different types of sending units, but the most common type utilizes a float arm that moves along a resistive card. Older vehicles might use simpler mechanical systems, but the underlying principle remains the same: to translate fuel level into an electrical signal.
Symptoms of a Failing Fuel Tank Sending Unit
Identifying a faulty fuel tank sending unit early can prevent inconvenient breakdowns. Here are some common symptoms to watch out for:
- Inaccurate Fuel Gauge Readings: This is the most obvious symptom. The gauge might fluctuate wildly, show empty when the tank is full, or show full when the tank is empty.
- Fuel Gauge Stuck at a Certain Level: The gauge might remain fixed at a specific level, regardless of the actual fuel level. For example, it might be perpetually stuck at half a tank.
- Fuel Light Stays On: Even after filling the tank, the low fuel light may remain illuminated.
- Erratic Fuel Gauge Behavior: The gauge might jump around erratically, providing inconsistent readings that don't match the actual fuel level.
- Check Engine Light: In some cases, a faulty sending unit can trigger the check engine light. Diagnostic codes related to the fuel level sensor will be stored.
Diagnosing a Faulty Fuel Tank Sending Unit
When you suspect a problem with your fuel tank sending unit, a systematic diagnosis is essential. Here's a step-by-step guide:
Step 1: Visual Inspection
Begin with a visual inspection. Check the wiring harness connected to the fuel tank sending unit for any signs of damage, corrosion, or loose connections. Sometimes, a simple wiring issue can mimic a faulty sending unit.
Step 2: Scan for Diagnostic Trouble Codes (DTCs)
Use an OBD-II scanner to check for any diagnostic trouble codes (DTCs) related to the fuel level sensor. Common codes include P0460 (Fuel Level Sensor Circuit Malfunction), P0461 (Fuel Level Sensor Circuit Range/Performance), P0462 (Fuel Level Sensor Circuit Low Input), and P0463 (Fuel Level Sensor Circuit High Input). These codes can provide valuable clues about the nature of the problem.
Important: Note that a DTC doesn't always pinpoint the exact cause. It indicates an issue within the circuit, which could be the sensor itself, the wiring, or even the vehicle's computer.
Step 3: Testing the Sending Unit with a Multimeter
A multimeter is your best friend in diagnosing the sending unit. You'll need to access the sending unit connector (usually found on top of the fuel tank or inside the tank). Here's how to proceed:
- Identify the Sending Unit Wires: Consult your vehicle's repair manual or wiring diagram to identify the wires connected to the sending unit. Typically, there will be a power wire, a ground wire, and a signal wire (the wire that carries the fuel level information to the gauge).
- Measure Resistance: With the ignition off, disconnect the sending unit connector. Set your multimeter to measure resistance (Ohms). Connect the multimeter leads to the signal wire and the ground wire.
- Move the Float Arm (If Possible): If you can access the float arm, manually move it up and down. Observe the resistance readings on the multimeter. The resistance should change smoothly and proportionally to the float arm's position.
- Interpret the Results: A significant change in resistance as you move the float arm indicates the sending unit is likely functioning correctly. A lack of change in resistance, or an erratic/jumpy reading, suggests a faulty sending unit. An open circuit (infinite resistance) or a short circuit (zero resistance) also points to a problem.
Step 4: Checking the Wiring
If the sending unit itself appears to be functioning correctly, the problem might lie in the wiring. Use the multimeter to check for continuity between the sending unit connector and the vehicle's computer. A lack of continuity indicates a broken or damaged wire.
Also, check for voltage at the power wire with the ignition on. You should see a voltage reading close to the vehicle's battery voltage (around 12-14 volts).
Replacing the Fuel Tank Sending Unit
If your diagnosis confirms a faulty fuel tank sending unit, replacement is the next step. This process can vary depending on the vehicle's make and model, but here's a general overview:
Safety First!
Warning: Working with fuel systems can be dangerous. Fuel is flammable and can create explosive vapors. Always work in a well-ventilated area, disconnect the negative battery cable, and avoid open flames or sparks. Wear safety glasses and gloves. Have a fire extinguisher nearby.
Step 1: Gather Your Tools and Parts
You'll need the following:
- New fuel tank sending unit (ensure it's the correct part for your vehicle)
- Fuel line disconnect tool (if required)
- Socket set and wrenches
- Screwdrivers
- Hammer and punch (for removing retaining rings)
- Fuel-resistant gloves
- Safety glasses
- Drain pan (to catch any spilled fuel)
- New fuel filter (recommended to replace along with the sending unit)
- Penetrating oil (for loosening rusty components)
- Shop towels
Step 2: Accessing the Fuel Tank
The method for accessing the fuel tank varies significantly depending on the vehicle.
- Some vehicles have an access panel in the trunk or under the rear seat that allows you to reach the fuel pump/sending unit assembly without dropping the tank.
- Other vehicles require you to drop the fuel tank. This usually involves disconnecting fuel lines, electrical connectors, and any straps or supports holding the tank in place. Support the tank with a jack before removing the last strap.
Step 3: Removing the Fuel Pump/Sending Unit Assembly
Once you have access to the fuel tank, locate the fuel pump/sending unit assembly. Disconnect the electrical connector and any fuel lines connected to the assembly. Use a fuel line disconnect tool if necessary.
Some assemblies are held in place by a retaining ring that can be removed with a hammer and punch. Be careful not to damage the tank or the assembly during removal.
Step 4: Replacing the Sending Unit
Carefully remove the old sending unit from the fuel pump assembly. Note its orientation and how it's connected. Install the new sending unit in the same manner. It's often easier to replace the entire fuel pump module, which includes the sending unit, especially if the pump is old.
Step 5: Reinstalling the Fuel Pump/Sending Unit Assembly
Reinstall the fuel pump/sending unit assembly into the fuel tank. Ensure the retaining ring is properly secured (if applicable). Reconnect the fuel lines and electrical connector.
Step 6: Reinstalling the Fuel Tank
If you dropped the fuel tank, carefully raise it back into position and secure it with the straps or supports. Reconnect any fuel lines and electrical connectors that were disconnected.
Step 7: Testing the New Sending Unit
Before buttoning everything up, reconnect the negative battery cable and turn the ignition to the "on" position (without starting the engine). Observe the fuel gauge on the dashboard. It should now provide an accurate reading. If not, recheck your connections and ensure the new sending unit is properly installed.
Step 8: Final Steps
Start the engine and check for any fuel leaks. Monitor the fuel gauge to ensure it's functioning correctly. If everything appears to be working properly, you've successfully replaced the fuel tank sending unit.
Professional Assistance
Replacing a fuel tank sending unit can be a complex and potentially dangerous task. If you're not comfortable performing this repair yourself, it's best to seek professional assistance from a qualified mechanic. A mechanic has the experience, tools, and expertise to safely and effectively diagnose and repair fuel system issues.
By understanding the symptoms, diagnosis, and replacement procedures for the fuel tank sending unit, you can make informed decisions about your vehicle's maintenance and repair. Addressing a faulty sending unit promptly can prevent inconvenient breakdowns and ensure accurate fuel readings, giving you peace of mind on the road.