Diagnosis And Replacement Of The Power Window Relays In A 240sx
Alright, so your 240SX's power windows are acting up, eh? Probably the relays. Don't sweat it, replacing them isn't rocket science, but it does require a bit of methodical troubleshooting. This guide will walk you through diagnosing and replacing the power window relays on your S13 or S14 240SX. We'll assume you've got some basic mechanical skills and familiarity with automotive electrical systems.
Understanding the Power Window Circuit
Before we dive in, let's quickly recap how the power window system works. It's relatively simple: a switch sends a signal to a relay, which then provides power to the window motor, allowing it to move the window up or down. Relays are essentially electrically controlled switches. They use a small current to control a larger current – perfect for switching the higher amperage needed to run a window motor. In the 240SX, you typically have multiple relays involved in the power window circuit, often one for "up" and one for "down" on each window.
Understanding the circuit helps with diagnosis. If all windows are failing, you're likely looking at a common power supply issue, a blown fuse, or a problem with the master relay (if equipped). If only one window is failing, it's likely a problem specific to that window's circuit – the window motor itself, the associated relays, wiring, or the window switch.
Tools and Materials You'll Need
Gather these before you start:
- Multimeter: Absolutely essential for testing voltage and continuity. A good multimeter is your best friend when working on automotive electrical systems.
- Test Light: Another useful tool for quickly checking for power.
- Replacement Relays: Make sure you get the correct type and amperage rating. Check your owner's manual or a parts catalog for the correct part numbers. It's often a good idea to replace all the power window relays at once, especially if they're old.
- Screwdrivers (Phillips and Flathead): For removing trim panels and screws.
- Pliers: For gripping and pulling connectors.
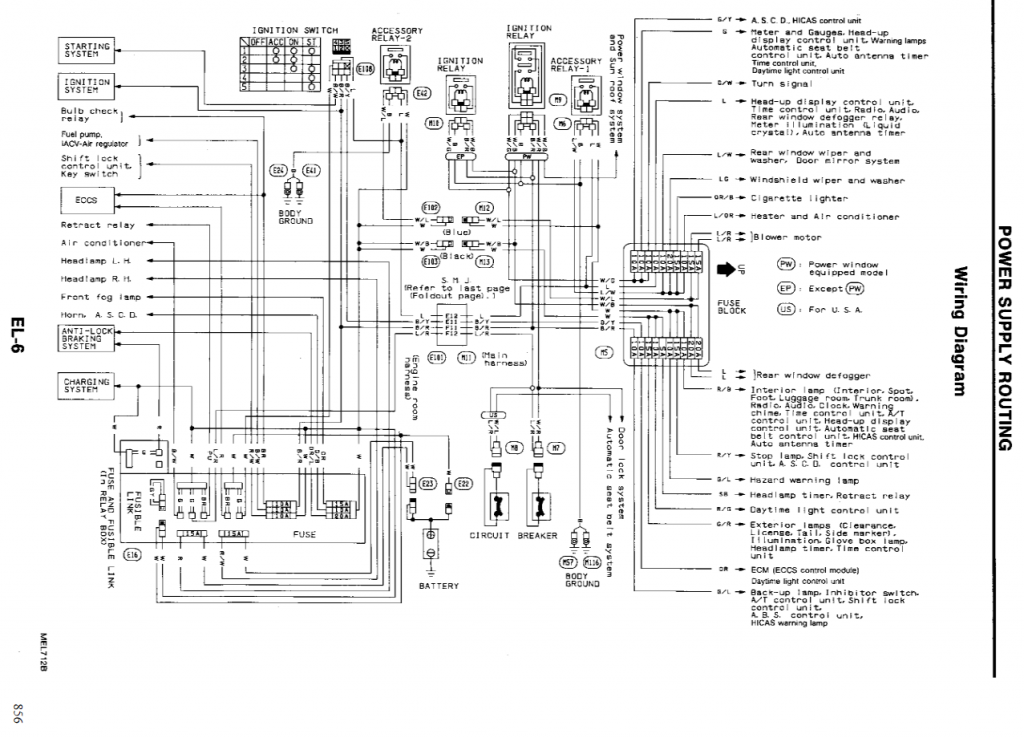
- Wiring Diagram (Optional, but Highly Recommended): Having a wiring diagram for your specific year 240SX will make troubleshooting much easier. Haynes or Chilton manuals usually have these.
- Pen and Paper or Digital Notepad: To keep track of your testing and findings.
Locating the Power Window Relays
The location of the power window relays can vary slightly depending on the year and trim of your 240SX. However, they are typically located in one of these places:
- Under the Driver's Side Dashboard: This is the most common location. You'll usually find them mounted on a relay block or near the fuse box. You might need to remove some lower trim panels to access them.
- Behind the Kick Panel (Driver's Side): Sometimes they are mounted to the firewall behind the kick panel.
- In the Engine Bay (Near the Fuse Box): Less common, but worth checking.
Once you locate the relays, identify them. The power window relays are usually standard automotive relays, often cube-shaped, and typically have four or five pins. The wiring diagram will be invaluable here. Look for markings on the relays themselves that might indicate their function.
Diagnosing a Faulty Relay
Here's where the troubleshooting begins. We'll cover a few different methods for diagnosing a faulty relay:
1. Visual Inspection
Start with a visual inspection of the relays. Look for any obvious signs of damage, such as:
- Cracked or Melted Housings: These indicate overheating, which can damage the internal components.
- Corroded Terminals: Corrosion can prevent the relay from making proper contact.
- Burn Marks: These indicate electrical arcing, which can damage the relay.
If you see any of these signs, the relay is likely bad and should be replaced.
2. The "Tap" Test
This is a quick and dirty test, but it can sometimes work. With the ignition on (but engine off) and someone operating the power window switch, gently tap the relay with the handle of a screwdriver. Sometimes, a relay with sticking contacts will start working again after being tapped. If the window starts working intermittently after tapping the relay, it's a good indication that the relay is faulty.
Note: This is not a definitive test. Just because the window doesn't start working after tapping the relay doesn't necessarily mean the relay is bad.
3. Relay Swapping (The Process of Elimination)
If you have multiple identical relays in your 240SX (for example, if you have two identical power window relays), you can try swapping them. Swap the suspected faulty relay with a relay that you know is working (e.g., another window relay that’s working). If the problem switches to the other window, you've confirmed that the relay is bad. This method is best used when you have a comparable relay to swap with.
4. Multimeter Testing (The Most Accurate Method)
This is the most reliable method for diagnosing a faulty relay. You'll need your multimeter and a wiring diagram (if possible).
- Identify the Relay Terminals: Most relays have a diagram printed on the side that shows which terminals are for the coil (the electromagnet that controls the switch) and which terminals are for the switch itself. The coil terminals are typically labeled with numbers like 85 and 86, while the switch terminals are labeled with numbers like 30 and 87.
- Test the Coil:
- Set your multimeter to measure resistance (Ohms).
- Disconnect the relay from the circuit.
- Connect the multimeter probes to the coil terminals (85 and 86).
- You should read a resistance value. An open circuit (infinite resistance) or a short circuit (very low resistance) indicates a faulty coil. A typical coil resistance is between 50 and 120 ohms. The exact value depends on the specific relay.
- Test the Switch:
- Disconnect the relay from the circuit.
- Set your multimeter to measure continuity (or resistance, if your multimeter doesn't have a continuity test).
- With the relay unactivated, test the continuity between terminals 30 and 87. There should be no continuity (infinite resistance).
- Apply 12V power to the coil terminals (85 and 86). You can use a battery or a power supply for this. This will activate the relay and close the switch.
- With the relay activated, test the continuity between terminals 30 and 87 again. There should now be continuity (very low resistance).
If the relay fails any of these tests, it's faulty and needs to be replaced.
Replacing the Relay
Once you've diagnosed a faulty relay, replacing it is straightforward:
- Disconnect the Negative Battery Terminal: This is a crucial safety step. Always disconnect the negative battery terminal before working on any electrical components.
- Locate the Faulty Relay: Use your notes from the diagnosis process to locate the relay you need to replace.
- Remove the Relay: Gently pull the relay out of its socket. It may be held in place by a clip or friction. Be careful not to damage the socket.
- Install the New Relay: Plug the new relay into the socket. Make sure it's fully seated.
- Reconnect the Negative Battery Terminal: Reconnect the negative battery terminal.
- Test the Power Windows: Test the power windows to make sure they are working properly.
Preventative Maintenance
To help prevent future relay failures, consider these tips:
- Use Quality Relays: Don't cheap out on relays. Buy reputable brands.
- Inspect Regularly: Periodically inspect the relays for signs of corrosion or damage.
- Keep Connections Clean: Clean the relay terminals and sockets with electrical contact cleaner to ensure good connections.
By following these steps, you should be able to diagnose and replace the power window relays in your 240SX. Remember to take your time, be methodical, and use a wiring diagram if possible. Good luck!