E-brake Button Mechanism Repair And Replacement Procedure
Alright, let's talk about the e-brake button. That little guy, often referred to as the parking brake release button, is surprisingly crucial for smooth operation and, more importantly, safety. When it fails, you can find yourself wrestling with the e-brake lever, potentially damaging components or even getting stuck. This article will guide you through diagnosing, repairing, and replacing the e-brake button mechanism. We'll cover the common culprits behind button failure and provide step-by-step instructions for both repair and replacement, assuming you’ve got some wrenching experience under your belt.
Understanding the E-Brake Button Mechanism
Before diving into the repair, let's understand what makes this button tick. The e-brake (emergency brake or parking brake) system typically uses a cable connected to the rear brakes. When you pull the e-brake lever, it tensions the cable, engaging the rear brakes. The button serves as a ratchet release. The lever incorporates a ratchet mechanism that locks it in the engaged position. Pressing the button disengages the ratchet, allowing you to lower the lever and release the parking brake.
The button itself usually works with a small internal spring-loaded plunger or similar mechanism. When you push the button, it moves a small piece that pushes against the ratchet pawl. This allows the teeth of the ratchet to disengage from the pawl, releasing the lever.
Common failure points include:
- Broken spring: The internal spring loses tension or snaps, preventing the button from returning to its original position.
- Worn or broken plunger/actuator: The part that directly interacts with the ratchet pawl becomes damaged, preventing proper release.
- Debris/corrosion: Dirt, rust, or other contaminants can jam the mechanism.
- Cable Issues: While not the button itself, if the cable is excessively tight or seized, it puts undue stress on the release mechanism and may feel like a button issue.
Diagnosis: Is it Really the Button?
First, confirm that the button is indeed the problem. A seized or overly tight parking brake cable can mimic button failure. To troubleshoot:
- Visual Inspection: Check the button itself. Is it visibly damaged? Is it sticking? Does it move freely at all? Look for any signs of wear, cracking, or debris.
- Cable Check: Have someone try to release the parking brake while you observe the cable underneath the vehicle near the rear wheels. Do you see any movement? If the cable is completely seized, the brakes won't release, even with a functioning button. Lubricating the cable at the connection points and pivot points *might* help, but often cable replacement is necessary.
- Button Functionality Test: With the parking brake engaged (but ideally with the wheels chocked for safety), try pressing the button repeatedly. Listen carefully. Do you hear a click? Does the lever seem to move at all, even slightly? If you hear no click or movement, the button mechanism is likely the culprit.
- Internal Mechanism Check (if possible): Some e-brake lever assemblies allow limited access to the internal mechanism by removing screws or panels. If you can get a peek inside, look for broken springs or other obvious damage. *Note:* Be careful not to disassemble anything further than you're comfortable reassembling.
Repairing the E-Brake Button Mechanism
Sometimes, the problem is simple enough to fix without replacing the entire assembly. This is more likely if the issue is debris or a sticking mechanism. Here's how to attempt a repair:
Tools Needed:
- Screwdrivers (various sizes, including Phillips and flathead)
- Needle-nose pliers
- Penetrating oil (like WD-40 or PB Blaster)
- Grease (lithium or silicone-based)
- Shop towels
Repair Procedure:
- Access the Mechanism: This is often the trickiest part. You'll need to disassemble the center console or surrounding trim to access the e-brake lever assembly. Refer to your vehicle's service manual or online resources for specific instructions. Be patient and careful not to break any plastic clips or trim pieces.
- Disassembly (Partial): Once you have access, carefully examine the assembly. Look for screws or clips holding the button mechanism in place. Disassemble only what's necessary to access the button and its surrounding components. Take pictures as you go! This will be invaluable for reassembly.
- Cleaning and Lubrication: Spray penetrating oil liberally around the button and any visible moving parts. Allow it to soak for a few minutes. Then, use a small screwdriver or pick to gently dislodge any debris or corrosion. Wipe away the dirt with a shop towel. Once clean, apply a small amount of grease to the moving parts, including the button plunger and any pivot points.
- Spring Check: If you can access the spring, examine it closely. Is it broken or compressed? If broken, replacement is usually the only option (see replacement section). If compressed, you *might* be able to carefully stretch it slightly to restore some tension, but this is a temporary fix at best.
- Reassembly and Testing: Reassemble the button mechanism and test its function. Does it move freely now? Does it engage and disengage the ratchet properly? If so, proceed to reassemble the rest of the e-brake lever assembly and center console. If not, consider replacing the entire assembly.
Replacing the E-Brake Button Mechanism
If repair isn't possible or effective, replacement is the best course of action. This typically involves replacing the entire e-brake lever assembly, as the button mechanism is often integrated. Important: Purchase a replacement assembly that is compatible with your vehicle's make, model, and year.
Tools Needed:
- Socket set (metric)
- Wrench set (metric)
- Screwdrivers (various sizes, including Phillips and flathead)
- Pliers
- Trim removal tools (optional, but helpful)
- Torque wrench
- Vehicle service manual (highly recommended)
Replacement Procedure:
- Disconnect the Battery: This is a crucial safety step. Disconnect the negative battery terminal to prevent any electrical shorts during the process.
- Access the E-Brake Lever Assembly: As with the repair procedure, you'll need to disassemble the center console and surrounding trim to access the e-brake lever assembly. Refer to your vehicle's service manual for specific instructions.
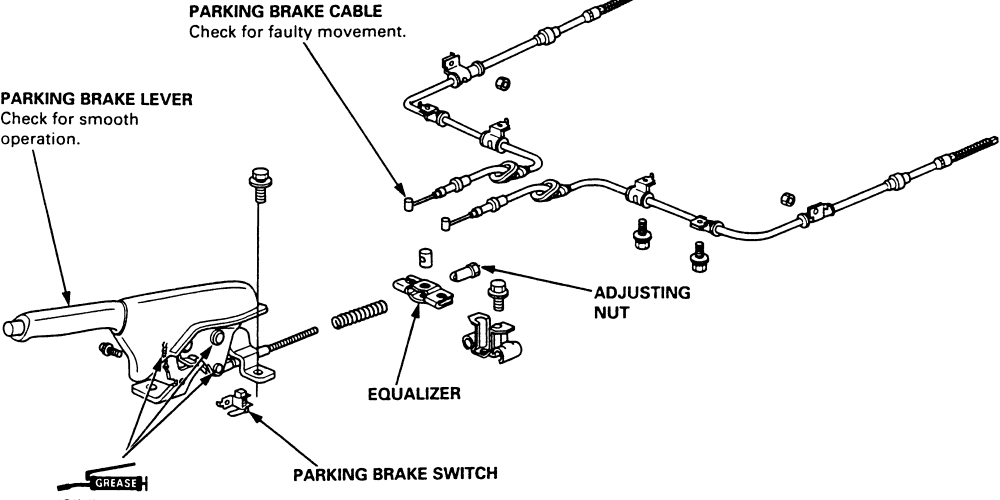
- Disconnect Cables and Wiring: Carefully disconnect any cables (including the e-brake cable) and wiring harnesses connected to the e-brake lever assembly. Pay close attention to how these are routed. Take pictures if necessary to ensure proper reassembly. The e-brake cable will likely be attached to a pivot or equalizer bar on the lever assembly. You may need to loosen or detach the cable at the rear brake calipers to provide enough slack to disconnect it from the lever. This often involves loosening a lock nut and adjuster nut.
- Remove the Old Assembly: Unbolt or unscrew the e-brake lever assembly from the vehicle's chassis. This usually involves several bolts or screws.
- Install the New Assembly: Position the new e-brake lever assembly in place and bolt or screw it to the chassis. Tighten the bolts to the torque specifications outlined in your vehicle's service manual. This is critical for ensuring proper operation and safety.
- Reconnect Cables and Wiring: Reconnect all cables and wiring harnesses, ensuring they are properly routed and secured. Double-check your pictures or notes to ensure everything is in the correct location.
- Adjust the E-Brake Cable: This is a critical step. After installing the new assembly, you'll need to adjust the e-brake cable tension. Consult your vehicle's service manual for the correct procedure. The goal is to have the e-brake engage firmly with a reasonable amount of lever travel (usually several clicks). Too little tension and the e-brake won't hold properly. Too much tension and the rear brakes could drag, causing premature wear and reduced fuel economy. Generally you'll adjust the cable tension at the point it connects to the lever assembly and sometimes at a point near the rear axle.
- Test and Verify: With the vehicle safely on the ground, test the e-brake. Engage and disengage it several times, checking for smooth operation and proper holding power. Ensure the rear brakes release completely when the lever is lowered.
- Reassemble the Center Console: Reassemble the center console and surrounding trim.
- Reconnect the Battery: Reconnect the negative battery terminal.
Important Safety Notes:
- Always use jack stands when working under a vehicle. Never rely solely on a jack.
- Disconnect the battery before working on any electrical components.
- Consult your vehicle's service manual for specific instructions and torque specifications.
- If you're not comfortable performing any of these procedures, seek professional assistance.
Replacing or repairing your e-brake button mechanism can seem daunting, but with careful preparation, the right tools, and a methodical approach, it's a task that many experienced DIYers can tackle. Remember to prioritize safety and consult your vehicle's service manual whenever necessary.