Evap Canister Hose Replacement
So, you're tackling an evap canister hose replacement? Good on you! It's a job that can often be done at home with the right tools and a little patience. A failing evap system can trigger a dreaded Check Engine Light (CEL) and make your car fail an emissions test. One common culprit is deteriorated or cracked evap canister hoses. This article will walk you through the process, covering everything from diagnosis to replacement.
Understanding the Evaporative Emission Control (EVAP) System
Before we dive into the replacement, let's quickly recap what the EVAP system does. The EVAP system is designed to prevent fuel vapors from escaping into the atmosphere. These vapors are captured in the evaporative canister (also known as the charcoal canister), which is filled with activated carbon. When the engine is running under specific conditions, the stored vapors are purged from the canister and burned in the engine. This reduces hydrocarbon emissions and contributes to a cleaner environment.
The system includes various components, most important for this discussion are:
- Fuel Tank: Where the fuel vapors originate.
- Fuel Tank Pressure Sensor: Monitors the pressure inside the fuel tank.
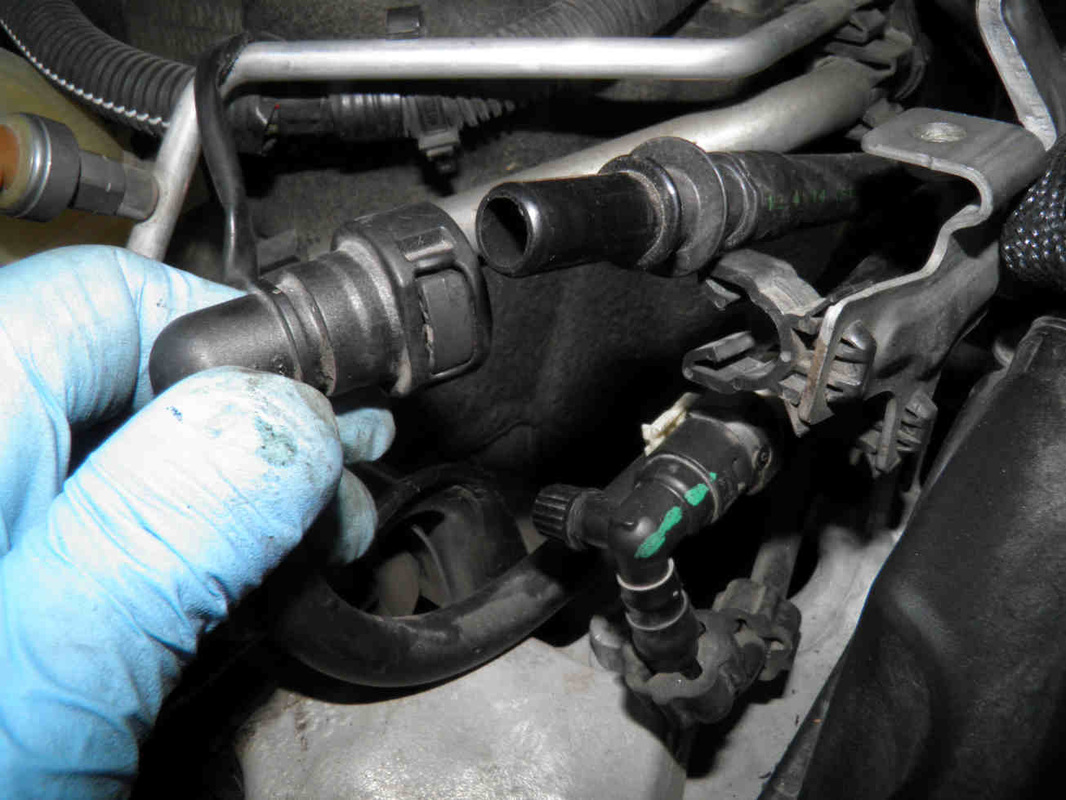
- Vapor Lines/Hoses: These lines connect the fuel tank, canister, purge valve, and other components. They are often made of rubber or plastic. These are what we're focusing on replacing.
- Evaporative Canister: Stores the fuel vapors.
- Purge Valve: Controls the flow of fuel vapors from the canister to the engine intake. It's usually vacuum-operated or electronically controlled.
- Vent Valve: Allows fresh air to enter the canister when the purge valve is open.
Leaks in any of these components, particularly the hoses, can disrupt the system's ability to contain fuel vapors, triggering error codes.
Diagnosing Evap Canister Hose Issues
How do you know if your evap canister hoses are the problem? Here are some common signs:
- Check Engine Light (CEL): This is the most common indicator. Typical trouble codes related to evap leaks include P0440, P0441, P0442, P0455, P0456, P0457. A diagnostic scan tool is essential for reading these codes.
- Fuel Odor: A noticeable smell of gasoline, especially after filling up, could indicate a leak in the system.
- Poor Fuel Economy: While not always directly related, a large evap leak can sometimes affect fuel economy.
- Difficulty Starting: In rare cases, a significant evap leak can cause starting problems.
Once you suspect an evap leak, visual inspection is crucial. Carefully examine all the evap canister hoses for:
- Cracks: Look closely for small cracks, especially around hose ends.
- Dry Rot: The rubber may become hard, brittle, and cracked due to age and exposure to heat and chemicals.
- Disconnections: Check that all hoses are securely connected to their fittings.
- Looseness: Hoses may become loose over time, leading to leaks.
Sometimes, a visual inspection isn't enough. A smoke test is a more reliable way to pinpoint evap leaks. This involves using a smoke machine to introduce smoke into the evap system. Any leaks will be readily apparent as smoke escapes. Smoke tests are especially helpful for finding small, hard-to-see leaks.
Tools and Materials You'll Need
Before you begin, gather the necessary tools and materials:
- New Evap Canister Hoses: Purchase the correct hoses for your specific vehicle make, model, and year. Do not use generic fuel hose unless specifically rated for EVAP systems. EVAP hoses are typically constructed with vapor-tight materials to minimize vapor permeation.
- Screwdrivers: Both flathead and Phillips head screwdrivers may be needed.
- Pliers: For removing hose clamps. Hose clamp pliers can be particularly helpful.
- Socket Set and Wrenches: Various sizes may be required to remove mounting brackets or other components.
- Jack and Jack Stands: If you need to access the evap canister from underneath the car. Safety first! Always use jack stands when working under a vehicle.
- Safety Glasses: Protect your eyes from debris.
- Gloves: Protect your hands from dirt and chemicals.
- Penetrating Oil: To help loosen stubborn hose connections.
- Hose Removal Tool (Optional): Can make removing stubborn hoses easier.
- Scan Tool: To clear the Check Engine Light after the repair.
- Work Light: Adequate lighting is essential.
Evap Canister Hose Replacement Procedure
Now for the main event – replacing those hoses! Here's a step-by-step guide:
- Safety First: Disconnect the negative battery cable to prevent accidental electrical shorts.
- Locate the Evap Canister: The location varies depending on the vehicle. It's often found near the fuel tank, under the car, or in the engine compartment. Consult your vehicle's service manual for the exact location.
- Access the Hoses: You may need to remove some underbody panels or other components to access the evap canister and hoses. Carefully remove any fasteners (bolts, screws, clips) and set them aside.
- Identify the Hoses: Before disconnecting anything, take pictures or make a diagram of the hose routing. This will help you ensure you reconnect everything correctly later. Pay close attention to the hose sizes and connections.
- Disconnect the Hoses: Use pliers or a hose clamp tool to remove the hose clamps. Slide the clamps away from the connection. If the hoses are stuck, try twisting them gently or using a hose removal tool. A little penetrating oil can also help. Be careful not to damage the canister or other components.
- Inspect the Fittings: Once the hoses are removed, inspect the fittings on the canister and other components for any signs of damage or corrosion. Clean the fittings with a wire brush if necessary.
- Install the New Hoses: Carefully install the new hoses, ensuring they are fully seated on the fittings. Reinstall the hose clamps, making sure they are securely tightened.
- Double-Check the Connections: Before reassembling everything, double-check that all hoses are properly connected and that the clamps are secure. Compare your work to the pictures or diagram you made earlier.
- Reassemble Components: Reinstall any underbody panels or other components that you removed to access the evap canister.
- Reconnect the Battery: Reconnect the negative battery cable.
- Clear the Check Engine Light: Use a scan tool to clear any evap-related trouble codes.
- Test Drive: Take the car for a test drive to ensure that the problem is resolved and that the Check Engine Light does not reappear.
- Monitor: Keep an eye on the car for the next few days to make sure the CEL doesn't come back on. Sometimes it takes a drive cycle or two for the system to completely reset.
Important Considerations
- Hose Quality: Use only high-quality, fuel-vapor-resistant hoses specifically designed for evap systems. Standard fuel hose is not suitable and will allow fuel vapors to permeate, leading to future leaks.
- Hose Routing: Ensure that the hoses are routed correctly and are not kinked or pinched. Kinks can restrict vapor flow and cause problems.
- Clamp Orientation: Position the hose clamps so that they are easily accessible for future maintenance.
- Don't Over-Tighten: Avoid over-tightening the hose clamps, as this can damage the hoses or fittings.
- Safety: When working with fuel systems, always take precautions to prevent fires. Work in a well-ventilated area and avoid smoking or using open flames.
- If You're Unsure: If you're not comfortable performing this repair yourself, it's always best to take your car to a qualified mechanic.
Troubleshooting After Replacement
Even after replacing the hoses, the Check Engine Light might persist or return. Here's how to troubleshoot:
- Double-Check Your Work: Ensure that all hoses are properly connected and that the clamps are secure.
- Check for Other Leaks: There may be other leaks in the evap system besides the hoses you replaced. Perform another visual inspection and consider a smoke test. Pay close attention to the fuel filler cap, purge valve, and vent valve.
- Fuel Cap: A loose or damaged fuel cap is a common cause of evap leaks. Replace the fuel cap if it's worn or damaged.
- Purge Valve: A faulty purge valve can cause evap problems. Use a scan tool to check the purge valve's operation. You can also test it manually by applying vacuum to the valve. It should hold vacuum when closed.
- Vent Valve: A malfunctioning vent valve can also trigger evap codes. The vent valve should be open when the system is not purging vapors and closed during purge.
- Fuel Tank Pressure Sensor: A failing fuel tank pressure sensor can provide inaccurate readings, leading to evap codes.
Replacing evap canister hoses is a manageable task for the DIY mechanic. By understanding the system, carefully diagnosing the problem, and following the correct procedures, you can often resolve evap leak issues and keep your car running smoothly and cleanly. Good luck!