Full Suspension Kit Geometry And Alignment Specifications
So, you're diving into the world of full suspension kits? Excellent choice! Upgrading to a full suspension kit can dramatically improve your vehicle's handling, ride quality, and overall performance. But slapping on new shocks and springs isn't enough. Understanding the geometry and alignment specifications is absolutely crucial for maximizing the kit's benefits and ensuring safe, predictable handling. This article will walk you through the key concepts, terms, and considerations involved in setting up your new full suspension.
Understanding Suspension Geometry Fundamentals
Before we get into alignment specs, let's cover some core suspension geometry principles. These influence how your car handles and responds to driver input. Ignoring them can lead to poor handling, excessive tire wear, and even dangerous instability.
Key Suspension Geometry Terms
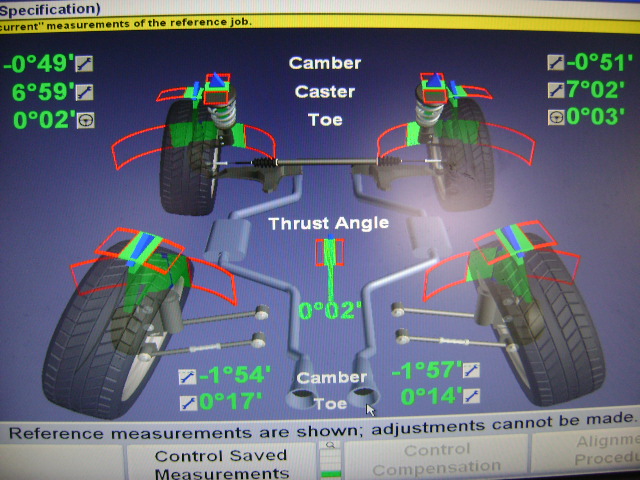
- Camber: This refers to the angle of the wheel relative to the vertical when viewed from the front. Positive camber means the top of the wheel leans outward, while negative camber means it leans inward. Camber affects tire contact patch during cornering. Too much positive camber, and only the outside edge of the tire makes contact, reducing grip. Too much negative camber, and the inside edge wears prematurely, and straight-line braking performance suffers.
- Caster: This is the angle of the steering axis relative to the vertical when viewed from the side. Think of it like the angle of the front fork on a bicycle. Positive caster means the steering axis leans back towards the rear of the car, while negative caster means it leans forward. Positive caster is generally desirable, as it promotes straight-line stability and self-centering of the steering wheel.
- Toe: This describes the angle of the wheels relative to each other when viewed from above. Toe-in means the front of the wheels point slightly inward, while toe-out means they point slightly outward. Toe significantly affects straight-line stability and tire wear. Too much toe-in can cause the tires to scrub and wear on the outside edge, while too much toe-out can cause wear on the inside edge.
- Roll Center: This is a theoretical point around which the vehicle body rolls during cornering. The location of the roll center significantly impacts the vehicle's handling characteristics, influencing body roll, weight transfer, and overall balance.
- Instant Center: This is another theoretical point, but instead of the body rolling, it represents the pivoting point of the suspension arms.
These geometric parameters are interrelated. Changing one often affects the others. For instance, lowering your car can significantly alter your camber and toe angles. That's why a proper alignment is crucial after any suspension modification.
Alignment Specifications and Their Importance
Your suspension kit will likely come with suggested alignment specifications, typically expressed in degrees (for camber and caster) and fractions of an inch or millimeters (for toe). These specs are a starting point, but they may need to be adjusted based on your driving style, the intended use of the vehicle (street, track, off-road), and the specific characteristics of your suspension kit.
Understanding the Recommended Specs
It's imperative to consult the documentation included with your full suspension kit. The manufacturer has performed countless tests to find the best angles for performance. However, these are only starting points, and there is no "one size fits all" alignment settings. Here are a few things to consider when looking at the specs:
- Street vs. Track: Street-driven cars generally benefit from more conservative alignment settings, prioritizing tire wear and straight-line stability. Track cars, on the other hand, often use more aggressive settings (e.g., more negative camber) to maximize grip in corners.
- Driving Style: If you prefer a more responsive, "point-and-shoot" driving style, you might prefer slightly more aggressive alignment settings. If you prefer a more stable, predictable feel, you might opt for more conservative settings.
- Tire Compound: Stickier tires can handle more aggressive camber settings without excessive wear.
- Vehicle Weight Distribution: Different cars have different weight distribution front-to-rear. This can influence the ideal camber settings for each axle.
Camber Adjustment
Adjusting camber usually involves using adjustable upper control arms, camber plates, or eccentric bolts (depending on the vehicle and the suspension kit). For a street car, a slight amount of negative camber (e.g., -0.5 to -1.0 degrees) is often recommended to improve cornering grip without significantly impacting tire wear. A track car might run significantly more negative camber (e.g., -2.0 to -3.0 degrees or even more) for maximum cornering performance.
Important note: Excessive negative camber can reduce braking performance and increase the risk of hydroplaning in wet conditions.
Caster Adjustment
Caster is typically adjusted using shims or adjustable lower control arms. More positive caster generally improves straight-line stability and steering feel, but it can also make the steering heavier. Most street cars benefit from as much positive caster as possible, within the factory range (or slightly beyond, if adjustable components allow). Track cars might run slightly more positive caster to improve turn-in response.
Toe Adjustment
Toe is adjusted by adjusting the tie rod ends. For a street car, a slight amount of toe-in is often recommended for straight-line stability. A track car might use a small amount of toe-out to improve turn-in response. However, toe-out can make the car feel nervous and twitchy at high speeds, and it can accelerate tire wear.
Always ensure that the toe is the same on both sides of the vehicle to avoid pulling to one side.
The Alignment Process
Getting a proper alignment requires specialized equipment, including an alignment rack and measuring tools. While you can attempt a DIY alignment using string, levels, and a good eye, the results are unlikely to be as accurate as those obtained with professional equipment. I strongly suggest visiting a reputable alignment shop.
Here's a general overview of the alignment process:
- Pre-Alignment Inspection: The technician will inspect your suspension components for wear and damage (ball joints, tie rod ends, bushings, etc.). Any worn or damaged components should be replaced before performing the alignment.
- Mounting Targets: Targets are attached to each wheel for the alignment rack to read.
- Measurements: The alignment rack measures the existing camber, caster, and toe angles on each wheel.
- Adjustments: The technician adjusts the suspension components (camber plates, control arms, tie rod ends, etc.) to bring the alignment angles within the desired specifications.
- Verification: After making adjustments, the technician re-measures the alignment angles to ensure they are within tolerance.
- Test Drive: A test drive is often performed to confirm that the car handles properly and that the steering wheel is centered.
DIY Considerations
If you're determined to perform a DIY alignment, here are a few things to keep in mind:
- Invest in Quality Tools: Accurate measuring tools are essential for achieving a decent alignment.
- Use a Level Surface: The alignment must be performed on a perfectly level surface.
- Take Your Time: Alignment is a meticulous process. Don't rush it.
- Be Prepared to Iterate: It may take several iterations of measuring and adjusting to achieve the desired results.
- Understand the Limits: Even with the best DIY tools and techniques, you're unlikely to achieve the same level of accuracy as a professional alignment.
Beyond the Specs: Fine-Tuning and Corner Balancing
Once you've achieved a good baseline alignment, you can start fine-tuning the settings to optimize performance for your specific needs. This often involves experimentation and careful observation of how the car handles in different situations.
Corner Balancing
Corner balancing is an advanced technique that involves adjusting the ride height of each corner of the car to achieve a specific weight distribution. This can improve handling balance and reduce understeer or oversteer. Corner balancing requires specialized scales and is best left to experienced professionals.
WARNING: Incorrect adjustments can be dangerous! If you are not sure what you're doing, seek professional help.
Conclusion
Understanding suspension geometry and alignment specifications is essential for maximizing the performance of your full suspension kit. While the process can seem daunting, with careful planning, attention to detail, and a willingness to learn, you can achieve significant improvements in your vehicle's handling and ride quality. Remember to consult the documentation included with your suspension kit, seek professional advice when needed, and always prioritize safety.