How To Wire Up Electric Fans 240sx
So, you're looking to ditch that stock fan and upgrade to electric fans on your 240sx? Good choice! Electric fans offer several advantages: improved cooling, potential horsepower gains (by reducing parasitic drag on the engine), and more control over your engine temperature. This guide will walk you through the wiring process, covering different wiring strategies and offering tips for a clean, reliable installation. We'll assume you have basic automotive wiring knowledge, including the ability to crimp connectors, solder, and read a wiring diagram.
Understanding the Basics
Before we dive into the wiring, let's cover the fundamental components and concepts involved. You'll need to understand these to make informed decisions and troubleshoot any potential issues.
Components
- Electric Fan(s): Obviously! These come in various sizes and CFM (cubic feet per minute) ratings. Choose fans that are appropriate for your engine and driving conditions. Consider dual fans for increased cooling capacity, especially if you live in a hot climate or track your car.
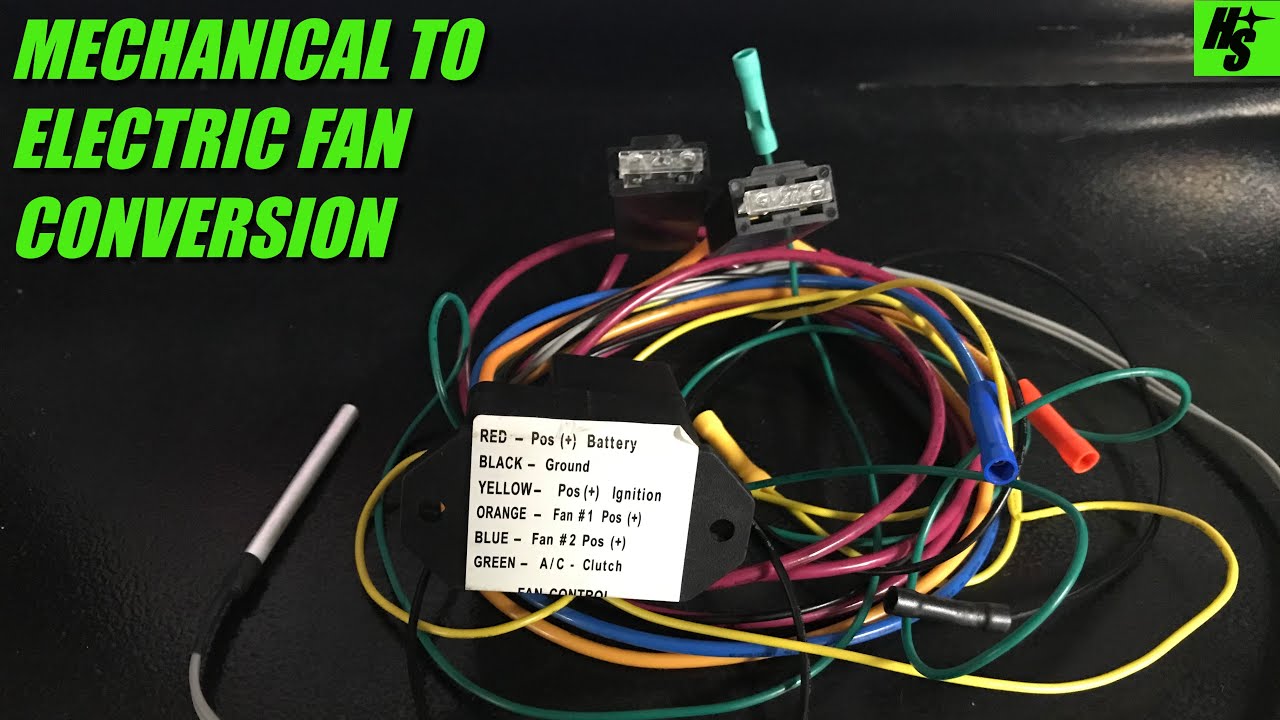
- Fan Controller (Optional but Recommended): A fan controller manages the fan's operation based on engine temperature. It's far more sophisticated than a simple on/off switch. Controllers typically use a temperature sensor placed in the radiator or engine block to determine when to activate the fans. Some controllers offer adjustable temperature settings and multiple fan speeds.
- Relays: These are electromechanical switches that allow a low-current signal (from the temperature sensor or fan controller) to control a high-current circuit (the fans). Relays are essential for protecting your wiring and switches from overload. We'll be using a standard 4- or 5-pin automotive relay.
- Temperature Sensor: If you're using a fan controller, it will likely come with a temperature sensor. If not, you'll need to purchase one separately. These sensors typically thread into the radiator or engine block and provide a resistance value that varies with temperature. The controller interprets this resistance to determine when to activate the fans.
- Wiring: Use appropriately sized wiring for the current draw of your fans. Consult the fan's specifications to determine its amperage draw. Generally, 12- or 14-gauge wire is sufficient for most electric fans, but larger fans may require 10-gauge or even 8-gauge wire. Don't skimp on wire quality! Use automotive-grade wire that's resistant to heat and abrasion.
- Fuse(s): Protect your wiring and components with appropriately sized fuses. The fuse rating should be slightly higher than the fan's amperage draw, but low enough to blow before the wiring overheats. Consult the fan's specifications and choose fuses accordingly.
- Connectors and Terminals: Use high-quality connectors and terminals to ensure secure and reliable connections. Crimp connectors are a good option, but soldering and heat-shrinking offer the most reliable connection. Consider using weatherproof connectors in areas exposed to the elements.
- Heat Shrink Tubing: Provides insulation and protection for your connections.
Key Concepts
- CFM (Cubic Feet per Minute): This measures the amount of air a fan can move. Higher CFM ratings generally mean better cooling.
- Amperage Draw: This is the amount of electrical current the fan requires to operate. It's crucial for selecting the correct wire gauge, relay, and fuse.
- Relay Trigger: This is the low-current signal that activates the relay. It can come from the ignition switch, a temperature sensor, or a fan controller.
- Grounding: A good ground connection is essential for proper electrical operation. Make sure your grounds are clean, secure, and connected to a solid chassis ground point.
Wiring Strategies
There are several ways to wire electric fans. Here are two common approaches:
1. Simple Relay Wiring (No Fan Controller)
This is the simplest method, but it offers the least control. The fan runs whenever the ignition is on, or when a specific temperature is reached if using a temperature switch. This method is not recommended for daily driving, as the fan will run constantly, potentially overcooling the engine, increasing noise, and shortening the fan's lifespan. However, it can be used as a temporary solution or for racing applications where constant cooling is desired.
Wiring Diagram (Simplified):
      Battery (+) --> Fuse --> Relay Terminal 30
      Relay Terminal 87 --> Fan (+)
      Fan (-) --> Ground
      Ignition (+) --> Relay Terminal 86
      Relay Terminal 85 --> Ground
Explanation:
- A fused wire runs from the battery positive terminal to relay terminal 30. This is the power source for the fan.
- Relay terminal 87 connects to the positive terminal of the fan.
- The fan's negative terminal is connected to a good chassis ground.
- Relay terminal 86 is connected to a 12V+ ignition source (e.g., a switched power wire from the fuse box). When the ignition is on, this energizes the relay coil.
- Relay terminal 85 is connected to ground.
Important Note: Replace "Ignition (+)" with a temperature switch if you only want the fan to activate at a specific temperature. The temperature switch will connect to ground when the target temp is reached.
2. Wiring with a Fan Controller
This is the preferred method for most applications. A fan controller allows for more precise control over fan operation, improving cooling efficiency and extending fan life. Many controllers offer features like adjustable temperature settings, multiple fan speeds, and A/C override. A/C override means the fan will turn on when the A/C is engaged, regardless of engine temperature.
Wiring Diagram (General):
      Battery (+) --> Fuse --> Relay Terminal 30
      Relay Terminal 87 --> Fan (+)
      Fan (-) --> Ground
      Fan Controller Output --> Relay Terminal 86
      Relay Terminal 85 --> Ground
      Fan Controller Power (+) --> Fused 12V+ Source
      Fan Controller Ground --> Ground
      Temperature Sensor --> Fan Controller
Explanation:
- A fused wire runs from the battery positive terminal to relay terminal 30.
- Relay terminal 87 connects to the positive terminal of the fan.
- The fan's negative terminal is connected to a good chassis ground.
- The output from the fan controller connects to relay terminal 86. The controller activates this output when the specified temperature is reached.
- Relay terminal 85 is connected to ground.
- The fan controller needs its own power and ground connections. Connect the controller's power wire to a fused 12V+ source, and the ground wire to a good chassis ground.
- The temperature sensor connects to the fan controller according to the controller's instructions.
Specific Fan Controller Instructions: Always refer to the fan controller's instructions, as wiring configurations can vary between models. Some controllers may require multiple relays for controlling multiple fans or fan speeds.
Step-by-Step Installation Guide
Here's a general guide to installing electric fans on your 240sx. This assumes you're using a fan controller and relays. Always disconnect the negative battery terminal before working on electrical systems.
- Remove the Stock Fan and Shroud: Disconnect the stock fan clutch from the water pump pulley and remove the fan and shroud assembly.
- Mount the Electric Fans: Install the electric fans on the radiator using appropriate mounting hardware (e.g., zip ties, brackets). Ensure the fans are positioned to pull air through the radiator.
- Install the Temperature Sensor: Install the temperature sensor into the radiator or engine block according to the fan controller's instructions.
- Mount the Fan Controller and Relays: Choose a location for the fan controller and relays that's protected from the elements and easily accessible. Mount them securely.
- Wire the Fans, Relays, and Fan Controller: Follow the wiring diagram for your chosen wiring strategy and fan controller. Use appropriately sized wiring, connectors, and fuses. Ensure all connections are secure and well-insulated.
Pro Tip: Use a multimeter to test for continuity and voltage at each connection before reconnecting the battery. This can help you identify and fix any wiring errors.
- Connect the Battery: Reconnect the negative battery terminal.
- Test the System: Start the engine and allow it to warm up. Monitor the engine temperature gauge and verify that the fans activate at the correct temperature. Test the A/C override function (if applicable).
- Check for Leaks: If you had to drain coolant for the temp sensor, make sure everything is sealed.
- Secure Wiring: Secure all wiring with zip ties or loom to prevent it from rubbing against sharp edges or hot components.
Troubleshooting
If your electric fans aren't working correctly, here are some common troubleshooting steps:
- Check Fuses: Blown fuses are the most common cause of electrical problems. Replace any blown fuses with the correct amperage rating.
- Check Wiring Connections: Ensure all wiring connections are secure and free from corrosion.
- Test the Relays: Use a multimeter to test the relays. Verify that the relay coil is energizing and that the contacts are switching correctly.
- Test the Fan Controller: Consult the fan controller's instructions for troubleshooting procedures.
- Check the Temperature Sensor: Use a multimeter to measure the resistance of the temperature sensor. Compare the resistance value to the manufacturer's specifications to verify that it's working correctly.
- Verify Ground Connections: Ensure all ground connections are clean, secure, and connected to a solid chassis ground point.
- Check Fan Motor: Apply 12V directly to the fan motor to see if it spins. If not, the motor may be faulty.
Final Thoughts
Wiring electric fans on your 240sx is a worthwhile upgrade that can improve cooling performance and engine efficiency. By following these instructions and taking your time, you can achieve a clean, reliable installation. Remember to prioritize safety and double-check all your work before reconnecting the battery. Good luck!