Installation And Adjustment Of A Rear Camber Kit On A Nissan 240sx
Understanding Rear Camber on a Nissan 240SX and Why You Might Need a Kit
The Nissan 240SX, a beloved rear-wheel-drive sports car, is a popular platform for modifications, including lowering and performance upgrades. However, lowering a 240SX often introduces negative camber in the rear suspension. While some negative camber can improve handling, excessive negative camber leads to uneven tire wear and reduced grip. This is where a rear camber kit comes in. This article will guide you through the installation and adjustment of a rear camber kit on your Nissan 240SX.
What is Camber? Camber refers to the angle of the wheel relative to the vertical axis when viewed from the front or rear of the vehicle. Positive camber means the top of the wheel is leaning outward, while negative camber means the top of the wheel is leaning inward.
Why Adjust Rear Camber on a 240SX?
- Correct Negative Camber After Lowering: Lowering the vehicle changes the suspension geometry, often resulting in excessive negative camber.
- Improve Tire Wear: Excessive negative camber concentrates wear on the inside edge of the tire. Adjusting camber evens out tire wear, extending tire life.
- Enhance Handling: Optimizing camber can improve cornering grip by maximizing the tire's contact patch with the road.
- Correct Camber Imbalance: If one side of the car has significantly different camber than the other, a camber kit allows you to correct this imbalance.
Choosing the Right Rear Camber Kit for Your 240SX
Several types of rear camber kits are available for the Nissan 240SX, each with its own advantages and disadvantages. Common types include:
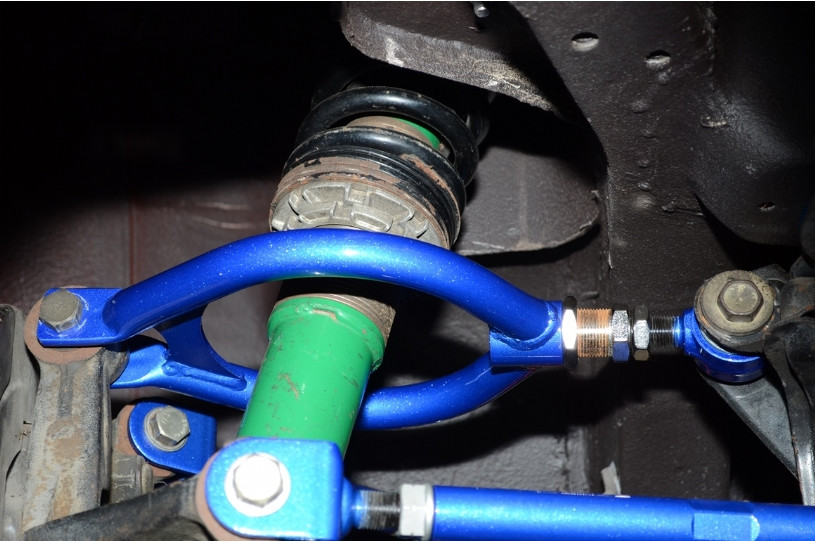
- Adjustable Upper Control Arms: These replace the factory upper control arms with adjustable units, allowing you to change the camber angle. This is generally considered the most effective and robust solution.
- Adjustable Traction Rods: While primarily designed for adjusting toe, some adjustable traction rods offer a small amount of camber adjustment. This is often insufficient for heavily lowered vehicles.
- Camber Plates: These are typically used in conjunction with coilovers and allow for camber adjustment at the top of the strut tower. These are more common on the front suspension but can sometimes be found for the rear.
When selecting a camber kit, consider the following:
- Adjustment Range: Ensure the kit offers sufficient adjustment range to correct the camber angle for your specific lowering height.
- Build Quality: Choose a kit from a reputable manufacturer with high-quality materials and construction. Look for kits with strong, durable components and reliable hardware.
- Ease of Installation: Consider your skill level and the complexity of the installation process. Some kits are easier to install than others.
- Compatibility: Verify the kit is compatible with your specific year and model 240SX.
Tools and Materials Needed
Before you begin the installation process, gather the necessary tools and materials:
- Rear Camber Kit (specifically designed for Nissan 240SX)
- Jack and Jack Stands
- Wheel Chocks
- Socket Set (Metric)
- Wrench Set (Metric)
- Torque Wrench
- Penetrating Oil (e.g., PB Blaster)
- Alignment Tool (e.g., bubble level, camber gauge, or access to an alignment machine)
- Optional: Impact Wrench
- Optional: Anti-Seize Lubricant
- Optional: New bolts and nuts (if replacing old hardware)
Step-by-Step Installation Guide (Adjustable Upper Control Arms)
This guide focuses on installing adjustable upper control arms, as they are the most common and effective type of rear camber kit. Always consult the manufacturer's instructions that come with your specific kit.
Step 1: Prepare the Vehicle
- Park the vehicle on a level surface.
- Engage the parking brake and chock the front wheels.
- Loosen the lug nuts on the rear wheels.
- Jack up the rear of the vehicle and securely support it with jack stands.
- Remove the rear wheels.
Step 2: Remove the Factory Upper Control Arms
- Apply penetrating oil to the bolts and nuts securing the factory upper control arms to the chassis and the hub. Let it soak for several minutes.
- Using the appropriate sockets and wrenches, loosen and remove the bolts and nuts. You may need to use a breaker bar if the bolts are particularly tight.
- Carefully remove the factory upper control arms.
Step 3: Install the Adjustable Upper Control Arms
- Apply anti-seize lubricant to the threads of the new adjustable upper control arm bolts.
- Install the adjustable upper control arm in the same orientation as the factory arm.
- Hand-tighten the bolts and nuts. Do not fully tighten them at this stage.
Step 4: Adjust Camber (Rough Adjustment)
- Adjust the length of the adjustable upper control arms to achieve the desired camber angle. Start with a conservative setting (e.g., -1.0 to -1.5 degrees of negative camber). Refer to your desired alignment specifications. This is a rough adjustment; precise alignment will be required later.
- You can use a bubble level or camber gauge to get an approximate measurement of the camber angle. There are also phone apps that can assist.
- Remember: Shortening the upper control arm will increase negative camber, while lengthening it will decrease negative camber (move towards positive camber).
Step 5: Torque the Bolts
- Lower the vehicle onto its wheels (but do not remove the jack stands completely). This simulates the suspension being loaded and helps prevent binding when tightening the bolts.
- Consult the vehicle's service manual or the camber kit manufacturer's instructions for the proper torque specifications for the upper control arm bolts.
- Using a torque wrench, tighten the bolts and nuts to the specified torque.
Step 6: Repeat on the Other Side
- Repeat steps 2-5 on the other side of the vehicle.
- Ensure that the camber angle is approximately the same on both sides.
Step 7: Final Check and Lower the Vehicle
- Double-check that all bolts and nuts are properly tightened.
- Remove the jack stands and lower the vehicle completely to the ground.
- Re-torque the lug nuts to the specified torque.
Final Alignment and Considerations
After installing the rear camber kit, it is crucial to have a professional wheel alignment performed. A proper alignment will ensure that the camber, toe, and caster angles are all within specifications, optimizing handling and tire wear. Ignoring this step can negate the benefits of the camber kit and lead to premature tire wear.
Key Alignment Considerations:
- Toe Adjustment: Camber adjustments often affect toe. It's important to adjust toe after adjusting camber to ensure proper handling and tire wear.
- Ride Height: If you plan to make further changes to your ride height, do so before getting the final alignment.
- Alignment Shop Expertise: Choose an alignment shop that is experienced with performance vehicles and aftermarket suspension components. They should be able to dial in the alignment to your specific driving style and preferences.
By following these steps, you can successfully install and adjust a rear camber kit on your Nissan 240SX. Remember to prioritize safety and consult with a professional if you are unsure about any part of the installation process. Proper installation and alignment will result in improved handling, reduced tire wear, and a more enjoyable driving experience.