Installation And Alignment Procedure For Spl Parts Outer Tie Rods On A 240sx
So, you're tackling the outer tie rods on your 240SX? Good choice! Upgrading to SPL Parts tie rods is a solid move for improved steering response and overall handling. This guide will walk you through the installation and alignment process, ensuring a smooth and precise experience. We'll cover everything from necessary tools to potential pitfalls, helping you get the job done right. Remember, safety first! If you're not comfortable with any of these steps, it's always best to consult a professional mechanic.
Tools and Materials You'll Need
Before you even think about touching your 240SX, make sure you have everything ready. This will save you time and frustration in the long run.
- Jack and Jack Stands: Absolutely essential for safely lifting and supporting your car. Never work under a vehicle supported only by a jack.
- Wheel Chocks: Place these behind the rear wheels for added safety.
- Socket Set: Metric sizes, including sizes appropriate for the tie rod end and jam nut. A 17mm, 19mm, and potentially a 22mm socket are good starting points.
- Wrench Set: Similar metric sizes as the socket set. You'll need these for holding the tie rod while loosening or tightening nuts.
- Torque Wrench: Crucial for tightening fasteners to the correct specifications. Look up the torque specs for your 240SX's tie rod ends and jam nuts.
- Pickle Fork (Tie Rod Separator): This tool helps separate the tie rod end from the steering knuckle. Be aware that it can damage the tie rod boot.
- Tie Rod End Puller (Optional): A less destructive alternative to the pickle fork. It applies pressure to pop the tie rod end out without damaging the boot. Highly recommended if you want to reuse your old tie rod ends (unlikely, but possible).
- Penetrating Oil: A good penetrating oil like PB Blaster or Kroil will help loosen rusted or seized fasteners. Apply generously a day or two before you start the job.
- Measuring Tape or Calipers: To measure the old tie rod length and set the new ones to a similar starting point for alignment purposes.
- Anti-Seize Lubricant: Apply this to the threads of the new tie rods to prevent them from seizing in the future.
- Alignment Tool (Toe Plates or Laser Alignment Tool - Optional): While you can get by with a tape measure for a basic toe adjustment, these tools will significantly improve accuracy.
- Hammer: For tapping the pickle fork (if used).
- Gloves: To protect your hands.
- Safety Glasses: To protect your eyes.
- Shop Rags: For cleaning up messes.
Step-by-Step Installation Guide
Now, let's get to the actual installation.
- Preparation:
- Park your 240SX on a level surface.
- Engage the parking brake and chock the rear wheels.
- Loosen the lug nuts on the front wheels (but don't remove them yet).
- Lifting the Vehicle:
- Using a floor jack, lift the front of the car and securely place it on jack stands. Make sure the jack stands are positioned on the designated jacking points.
- Remove the front wheels.
- Loosening the Tie Rod End:
- Spray penetrating oil onto the tie rod end where it connects to the steering knuckle and onto the jam nut where the tie rod meets the inner tie rod. Let it soak for at least 15-30 minutes.
- Use a wrench to hold the inner tie rod, and use another wrench to loosen the jam nut. This can be tricky if it's seized, so be patient and apply more penetrating oil if needed.
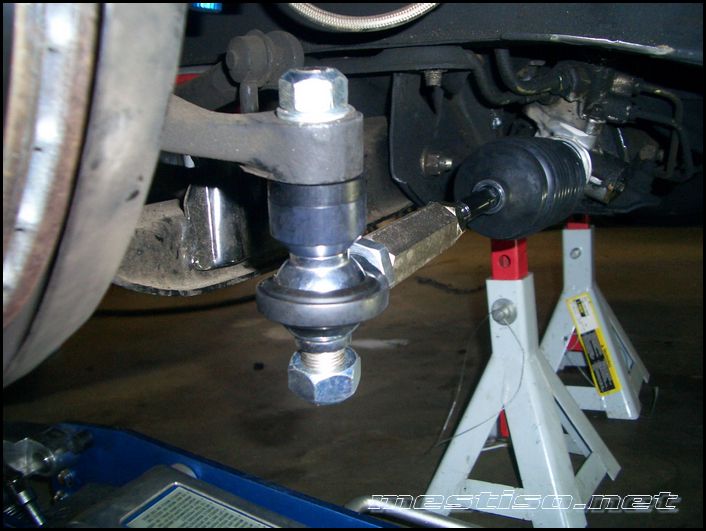
- Separating the Tie Rod End from the Steering Knuckle:
- This is where the pickle fork or tie rod end puller comes in.
- Pickle Fork Method: Insert the pickle fork between the tie rod end and the steering knuckle. Use a hammer to drive the pickle fork in until the tie rod end pops out. Important: This method will likely damage the tie rod boot.
- Tie Rod End Puller Method: Position the puller so the jaws grab the steering knuckle and the center screw presses against the tie rod end. Tighten the screw until the tie rod end pops out. This is the preferred method if you want to preserve the boot (which you probably do on the new SPL Parts tie rods!).
- Removing the Old Tie Rod:
- Once the tie rod end is separated, fully unscrew it from the inner tie rod. Make sure to count the number of turns it takes to remove the old tie rod! This will give you a baseline for setting the toe on the new tie rod. Alternatively, measure the length of the exposed inner tie rod thread.
- Installing the New SPL Parts Tie Rod:
- Apply anti-seize lubricant to the threads of the inner tie rod.
- Screw the new SPL Parts tie rod onto the inner tie rod. Match the number of turns (or exposed thread length) you counted or measured from the old tie rod. This is a critical step for getting your initial alignment close.
- Attach the new tie rod end to the steering knuckle.
- Install and tighten the nut securing the tie rod end to the steering knuckle. Torque to the manufacturer's specification (consult your 240SX service manual).
- Tighten the jam nut against the tie rod to secure it in place. Again, torque to the manufacturer's specification.
- Repeat on the Other Side: Follow the same steps for the other side of the car.
- Reinstall Wheels and Lower the Vehicle:
- Reinstall the wheels and tighten the lug nuts hand-tight.
- Carefully lower the car to the ground.
- Torque the lug nuts to the manufacturer's specification.
Alignment Procedure
Replacing tie rod ends always requires a wheel alignment. Driving with misaligned wheels will cause excessive tire wear and poor handling. Here's a breakdown of the alignment process, ranging from a basic DIY method to professional options.
DIY Toe Adjustment (Basic)
This method is only for getting you to an alignment shop safely. It's not a substitute for a proper alignment.
- Measure the Toe:
- Measure the distance between the front tires at the front of the tire and at the rear of the tire. Make sure you are measuring at the same height on both tires.
- The difference between these measurements is your toe.
- Adjust the Tie Rods:
- Loosen the jam nut on the tie rod you want to adjust.
- To increase toe-in (wheels pointing inward), shorten the tie rod by turning it inward. To decrease toe-in (wheels pointing outward), lengthen the tie rod by turning it outward. Make small adjustments (1/4 turn at a time) and re-measure the toe.
- Once you've achieved your desired toe (ideally close to zero for a temporary fix), tighten the jam nut.
- Repeat: Repeat the process on the other side if necessary.
Using Toe Plates or Laser Alignment Tool (Intermediate)
These tools provide more accurate toe readings and allow for more precise adjustments. Follow the instructions that come with your specific tool. The general process involves:
- Setting up the toe plates or laser alignment tool.
- Taking toe readings.
- Adjusting the tie rods to achieve the desired toe settings. Consult your 240SX's service manual for recommended toe specifications. A slight amount of toe-in is generally preferred for street driving.
- Rechecking the alignment after each adjustment.
Professional Alignment (Recommended)
The best and most accurate way to align your wheels is to take your 240SX to a professional alignment shop. They have sophisticated equipment and experienced technicians who can properly set all alignment angles (toe, camber, and caster). This will ensure optimal handling, tire wear, and overall driving experience.
Potential Issues and Troubleshooting
- Seized Fasteners: This is a common problem, especially on older cars. Use plenty of penetrating oil and be patient. If a fastener is severely seized, you may need to use a torch or even cut it off.
- Damaged Tie Rod Boots: If you used a pickle fork, you may have damaged the tie rod boot. Replace the boot if it's torn or cracked to prevent dirt and debris from entering the joint.
- Incorrect Toe Setting: Driving with the wrong toe setting can cause rapid tire wear. Get a professional alignment as soon as possible after replacing tie rod ends.
- Steering Wheel Off-Center: If your steering wheel is not centered after the alignment, you may need to adjust the tie rods on both sides equally to correct it.
Estimated Repair Costs
The cost of replacing outer tie rods can vary depending on several factors, including the cost of the parts, labor rates, and whether you choose to do the work yourself or hire a professional.
- SPL Parts Outer Tie Rods: Expect to pay around $200-$400 for a set of SPL Parts outer tie rods, depending on the vendor and any available discounts.
- DIY Installation: If you do the work yourself, you'll only need to pay for the parts and any tools you don't already have. The total cost could range from $200-$500, depending on tool purchases.
- Professional Installation: If you hire a mechanic, expect to pay for labor in addition to the parts. Labor costs can vary from $100-$300, depending on the shop's hourly rate. A wheel alignment typically costs between $80-$150. So, a professional installation with alignment could cost between $400-$850 or more.
Important Note: These are just estimates. It's always best to get a quote from a local mechanic before proceeding with the repair.
By following these steps and taking your time, you can successfully install and align your new SPL Parts outer tie rods and enjoy improved handling and steering response on your 240SX. Good luck, and happy driving!