Installation And Chassis Stiffening With A Weld-in Roll Cage For The 240sx
So, you're thinking about adding a weld-in roll cage to your 240SX. Excellent choice. Whether you're chasing faster lap times, adding an extra layer of safety for drift events, or just improving overall chassis rigidity, a well-installed roll cage is a fantastic upgrade. This isn't a weekend job for the faint of heart, though. It requires welding skills, patience, and a good understanding of vehicle safety. This guide will walk you through the process, highlighting key considerations and best practices. We'll cover everything from initial planning to final welding, assuming you have a basic level of mechanical knowledge and access to the necessary tools. Safety is paramount, so take your time and don't cut corners.
Planning and Preparation: The Key to Success
Before you even order the cage, thorough planning is essential. This stage lays the groundwork for a smooth and safe installation.
Choosing the Right Roll Cage Kit
Several manufacturers offer roll cage kits specifically designed for the 240SX. Consider the following factors when choosing a kit:
- Intended Use: Are you building a dedicated track car, a drift machine, or a street car with added safety? The design and construction of the cage should match your needs. A full roll cage with door bars is ideal for racing, while a roll bar might be sufficient for street use and occasional track days.
- Material: DOM (Drawn Over Mandrel) steel is the industry standard for roll cages due to its superior strength and ductility. ERW (Electric Resistance Welded) tubing is cheaper but not as strong and should be avoided for serious applications.
- Construction: Look for kits with pre-bent tubing and laser-cut mounting plates. This significantly simplifies the installation process. Check that all tubes are sized appropriately for the intended use and meet safety regulations, if applicable.
- Ease of Installation: Some kits are designed to be more DIY-friendly than others. Read reviews and look for detailed instructions and online resources before making your choice.
- Legality: Check local regulations regarding roll cages in street-driven cars. Some jurisdictions have specific requirements or restrictions.
Once you've chosen a kit, thoroughly inspect all the components for damage or defects before you begin. Verify that all the necessary parts are included.
Vehicle Preparation: Stripping Down and Cleaning Up
Preparing the vehicle is crucial for both safety and a quality installation. This typically involves the following:
- Complete Interior Removal: Remove seats, carpets, trim panels, headliner, and anything else that could be damaged by welding or interfere with the cage installation. This includes the dashboard – seriously, take it out. Trust us.
- Battery Disconnection: Disconnect the negative battery terminal to prevent electrical shorts and potential fires.
- Fuel System Precautions: Disconnect the fuel lines near the fuel tank and cap them off. Vapors are highly flammable, and welding near a fuel system is extremely dangerous. Consider emptying the fuel tank entirely.
- Cleaning: Thoroughly clean the interior of the car, especially the areas where the roll cage will be mounted. Remove any grease, dirt, rust, or paint. A wire brush, grinder with a sanding disc, and degreaser are your friends here. Clean bare metal is essential for proper weld penetration.
- Rust Repair: Inspect the floor pan and chassis for rust. Repair any rust damage before installing the roll cage. Weakened metal compromises the integrity of the entire structure.
- Fire Protection: Have a fire extinguisher readily available during the entire welding process. Seriously.
Tools and Equipment
You'll need a well-equipped workspace and the right tools to tackle this project:
- Welder: A MIG (Gas Metal Arc Welding) welder is generally recommended for roll cage installation. Ensure your welder has sufficient amperage for welding thick-walled DOM tubing. A TIG (Gas Tungsten Arc Welding) welder is also suitable, but requires more skill.
- Welding Helmet and Protective Gear: A high-quality auto-darkening welding helmet, welding gloves, a welding jacket, and safety glasses are essential for protecting yourself from sparks, heat, and harmful radiation.
- Grinder: An angle grinder with various cutting and grinding discs is necessary for preparing surfaces, cutting tubing (if needed), and cleaning up welds.
- Cut-off Wheel: Used for accurately cutting tubing to length.
- Measuring Tools: A tape measure, level, square, and angle finder are critical for accurate cage placement.
- Clamps: A variety of clamps, including C-clamps, vice grips, and welding clamps, will help hold the cage in place during fitting and welding.
- Hole Saw Kit: For cutting access holes for tubes passing through the floor or firewall.
- Floor Jack and Jack Stands: To safely lift and support the vehicle.
- Marker: For marking cut lines and hole locations.
- Hammer and Dolly: For gently shaping sheet metal around the cage.
- Penetrating Oil: To help loosen stubborn bolts.
- Rust Preventative: To protect bare metal after welding.
Roll Cage Installation: A Step-by-Step Guide
Now for the fun part – actually installing the cage. Take your time, double-check your measurements, and prioritize safety.
Step 1: Test Fitting and Placement
Before welding anything, meticulously test fit all the roll cage components. This step is crucial for ensuring proper fitment and alignment.
- Start with the Main Hoop: Position the main hoop in the car and secure it with clamps. Check for clearance with the roof, door pillars, and rear window.
- Install the Front Down Tubes: Attach the front down tubes to the main hoop and clamp them in place. Pay close attention to their placement relative to the A-pillars and dashboard.
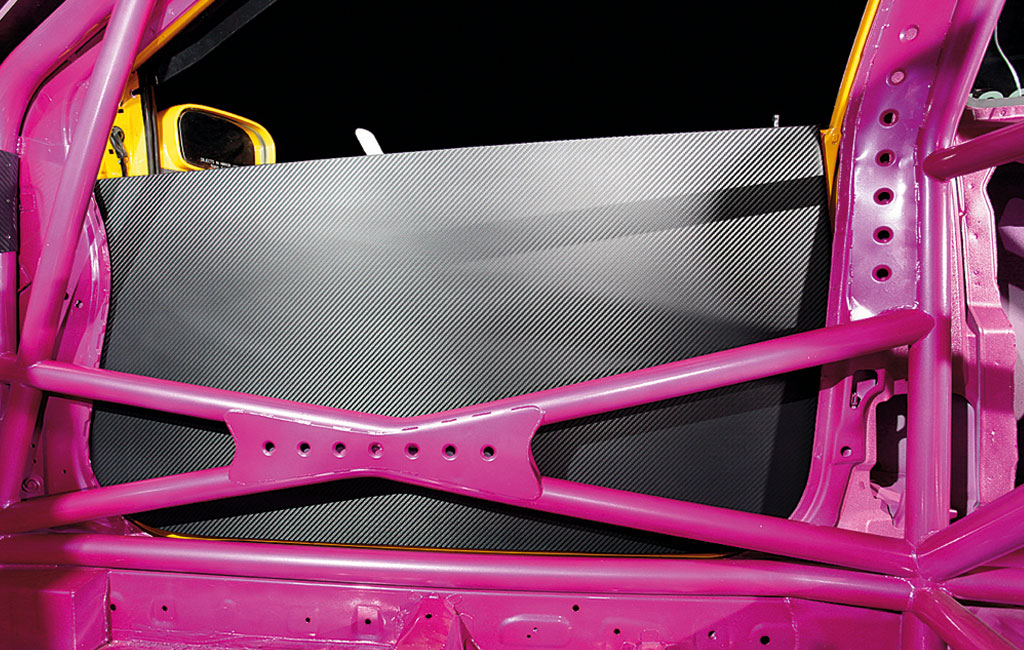
- Add the Door Bars: Fit the door bars, ensuring they provide adequate side impact protection and do not interfere with the seats or driver. The angle and height of the door bars are critical for safety.
- Rear Braces: Install the rear braces, connecting the main hoop to the rear strut towers or chassis. These braces significantly improve the cage's rigidity.
- Check for Interference: Carefully check for any interference between the roll cage and the vehicle's components, such as wiring harnesses, fuel lines, or brake lines. Reroute or modify these components as needed.
- Mark Mounting Locations: Once you're satisfied with the fitment, use a marker to clearly mark the mounting locations for each roll cage component.
Step 2: Mounting Plate Preparation and Welding
The mounting plates are the foundation of the roll cage. They must be securely welded to both the roll cage tubing and the vehicle's chassis.
- Clean the Mounting Surfaces: Grind away any paint, rust, or undercoating from the mounting locations on the chassis. Expose clean, bare metal for welding.
- Weld the Mounting Plates to the Tubing: Using your MIG or TIG welder, carefully weld the mounting plates to the roll cage tubing. Ensure the welds are strong, consistent, and free of porosity. Penetration, or the depth to which the weld fuses the metal, is key. Proper penetration equals a strong weld.
- Position and Clamp the Cage: Reposition the roll cage inside the car and clamp it securely in place, aligning the mounting plates with the marked locations on the chassis.
Step 3: Welding to the Chassis
This is the most critical part of the installation. Poor welds can compromise the entire cage. Use proper welding techniques and take your time.
- Tack Welding: Begin by tack welding the mounting plates to the chassis. This will hold the cage in place while you perform the final welding. Tack welds are small, temporary welds.
- Final Welding: Weld the mounting plates to the chassis, creating a continuous bead around the perimeter of each plate. Use a weaving motion to distribute the heat evenly and achieve good penetration. Avoid overheating the metal, which can weaken it.
- Inspection: Thoroughly inspect all welds for any defects, such as cracks, porosity, or lack of penetration. Repair any defects immediately.
- Reinforcement (Optional): For added strength, consider reinforcing the mounting points with additional plates or gussets. Gussets are triangular pieces of metal that are welded to joints to increase strength.
Step 4: Finishing Touches
Once the welding is complete, there are a few finishing touches to take care of.
- Grinding: Grind down any sharp edges or rough welds to prevent injury.
- Rust Prevention: Apply rust preventative paint to all bare metal surfaces, including the welds and mounting points.
- Padding: Install roll cage padding to protect the driver and passenger in the event of an accident. Padding is required by most racing organizations.
- Reassembly: Carefully reassemble the interior of the car, ensuring that all wiring harnesses, fuel lines, and other components are properly routed and secured.
Chassis Stiffening Considerations
A roll cage significantly improves chassis rigidity, but there are other ways to further stiffen your 240SX.
- Strut Tower Braces: Front and rear strut tower braces connect the strut towers, reducing chassis flex during cornering.
- Sway Bars: Upgrading to stiffer sway bars reduces body roll and improves handling.
- Subframe Collars: Subframe collars fill the gaps between the subframe and the chassis, improving rigidity and reducing wheel hop.
- Seam Welding: Seam welding involves welding along the existing factory seams of the chassis, further strengthening the structure. This is an advanced technique best left to experienced welders.
Installing a weld-in roll cage is a significant undertaking, but the benefits in terms of safety and performance are well worth the effort. Remember to prioritize safety, take your time, and double-check your work. With careful planning and execution, you can transform your 240SX into a safer, more capable machine. Good luck, and happy wrenching!