Installation And Management Of An Air Suspension System On An S13
So, you're thinking about bagging your S13? Air suspension is a fantastic way to achieve that slammed look while maintaining a decent ride quality and even offering performance advantages in certain situations. However, it's a significant modification, and understanding the installation and management aspects is crucial for a successful and reliable setup. This guide aims to walk you through the process, highlighting key considerations and potential pitfalls along the way.
Preparation and Planning
Before you even think about touching a wrench, meticulous planning is essential. Consider the following:
Component Selection: Choosing the Right Kit
Choosing the right kit is paramount. Look for reputable brands known for quality and reliability. Important components include:
- Air Struts/Bags: These replace your coilovers and provide the adjustable ride height. They come in various styles: sleeve-over (bag surrounds the shock), double-bellows (two-layer bag for more lift and softer ride), and rolling-sleeve (smoother ride with less friction). Consider the ride height range you desire and choose accordingly. Check the spring rate and damper adjustability if available.
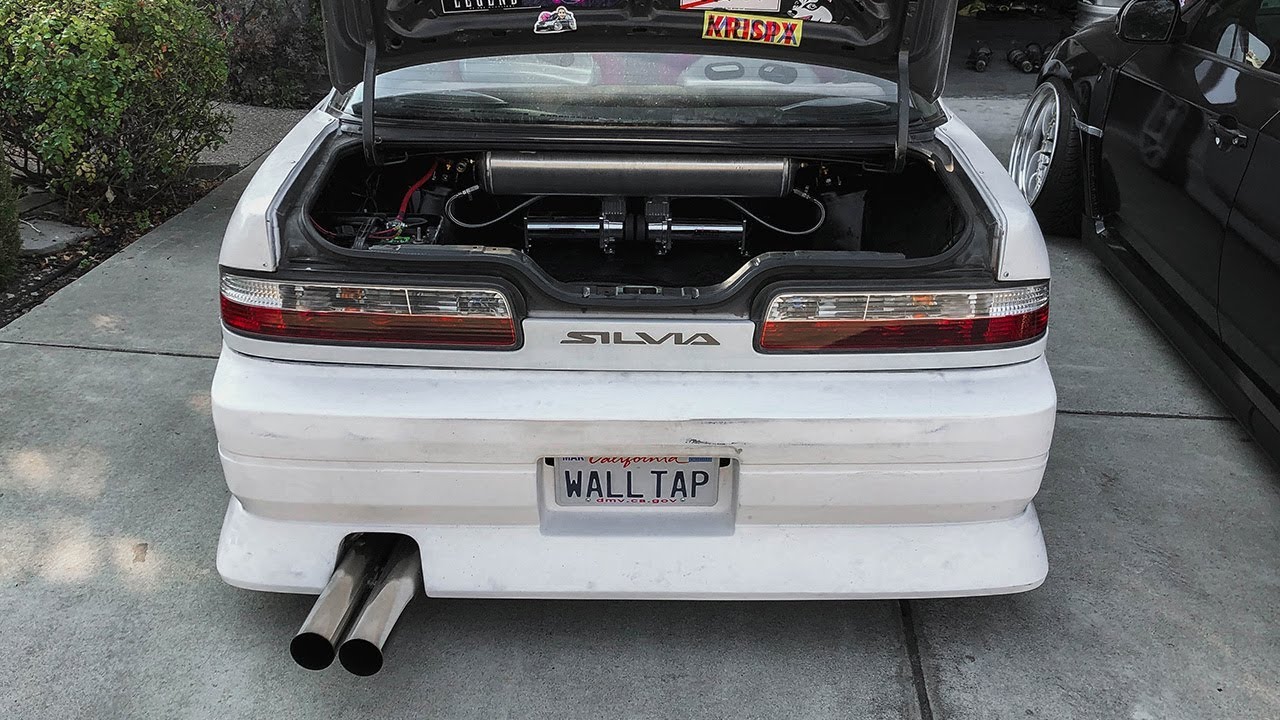
- Air Compressor: This provides the compressed air. Choose a compressor with adequate CFM (cubic feet per minute) to fill your tank quickly. ViAir and AccuAir are popular brands. Consider duty cycle - the amount of time the compressor can run continuously without overheating. A higher duty cycle is preferable.
- Air Tank: Stores compressed air, providing a readily available supply for height adjustments. Aluminum tanks are lighter than steel. Tank size affects how many rapid adjustments you can make before the compressor needs to refill.
- Air Lines and Fittings: These connect all the components. DOT-approved (Department of Transportation) air lines are highly recommended for safety and durability. PTC (Push-To-Connect) fittings are easy to use and reliable. Ensure proper sizing (typically 1/4" or 3/8") for optimal airflow.
- Air Management System: This controls the air flow to the struts. Options range from manual paddle valves to electronic controllers with presets and even smartphone connectivity. Electronic management systems often include a pressure sensor for accurate monitoring and control. Popular systems are from AccuAir, Airlift and similar.
- Wiring and Relays: Proper wiring is crucial for safety and reliability. Use appropriately sized wire and fuses, and always use relays to control high-current devices like the compressor.
Specific to the S13: Ensure the chosen kit is designed for the S13 chassis. Pay close attention to strut clearance, especially with aftermarket wheels. You might need to modify the wheel wells slightly for optimal bag clearance at full compression.
Tools and Equipment
You'll need a comprehensive set of tools. At minimum:
- Jack and jack stands (heavy-duty recommended)
- Wheel chocks
- Socket set (metric)
- Wrench set (metric)
- Torque wrench
- Wire stripper/crimper
- Multimeter
- Drill and drill bits
- Air line cutter
- Thread sealant (specifically for air fittings)
- Safety glasses
- Gloves
Installation Process
This is a general overview; always refer to the specific instructions provided with your air suspension kit.
Step 1: Removing the Existing Suspension
Safely lift and support the vehicle on jack stands. Remove the wheels. Disconnect any sensors or brake lines attached to the struts. Unbolt the existing struts from the hub and top mounts. This step is generally straightforward, but be prepared for seized bolts – penetrating oil is your friend.
Step 2: Installing the Air Struts
Install the air struts in place of the original struts. Ensure proper orientation and torque all bolts to the manufacturer's specifications. Double-check that the air lines won't be pinched or rub against anything when the suspension is compressed. Consider adding heat shielding to the air lines if they are near the exhaust.
Step 3: Mounting the Compressor and Tank
Choose a suitable location for the compressor and tank. The trunk is a common choice, but consider weight distribution and access for maintenance. Mount the compressor securely and ensure adequate ventilation to prevent overheating. The tank should also be mounted securely to prevent movement. Use vibration isolators to reduce noise and vibration from the compressor.
Step 4: Routing Air Lines
This is where careful planning pays off. Route the air lines from the compressor to the tank, then from the tank to the air management system, and finally to the air struts. Keep the air lines away from heat sources and sharp edges. Use grommets where the air lines pass through metal panels to prevent chafing. Secure the air lines with zip ties or clamps. Ensure proper bends and loops to accommodate suspension movement without stressing the lines.
Step 5: Wiring the System
Follow the wiring diagram provided with your air management system. Connect the compressor to the battery through a relay and fuse. Wire the air management controller to the ignition switch (for power) and ground. Ensure all connections are secure and properly insulated. Use a multimeter to verify proper voltage and continuity. Pay close attention to ground points! A poor ground connection can cause a multitude of problems.
Step 6: Installing the Air Management System
Mount the air management controller in a convenient location within the cabin. Connect the air lines and wiring according to the manufacturer's instructions. Program the controller with your desired settings, such as preset ride heights. Test the system thoroughly to ensure proper operation. This might involve bleeding the system initially and calibrating the sensors.
Step 7: Leak Testing
This is critical! Pressurize the system and spray all fittings and connections with soapy water. Look for bubbles, which indicate leaks. Tighten any leaking fittings or replace them if necessary. Repeat this process until all leaks are eliminated.
Management and Maintenance
Once your air suspension is installed, proper management and maintenance are essential for longevity and reliability.
Air Pressure Monitoring
Regularly monitor the air pressure in your tank and struts. Most air management systems provide digital displays. Pay attention to any significant pressure drops, which could indicate a leak. Also, be aware that ambient temperature can affect air pressure, especially on hot or cold days.
Moisture Management
Compressed air contains moisture, which can damage the air suspension components. Install a water trap or air dryer in the air line between the compressor and the tank. Periodically drain the water trap to remove accumulated moisture.
Regular Inspections
Inspect the air lines, fittings, and struts regularly for signs of wear or damage. Check for chafing, cracks, or leaks. Replace any damaged components immediately. Check the condition of the airbags themselves. Look for cracking or dry rotting.
Compressor Maintenance
Refer to the compressor manufacturer's instructions for maintenance procedures. This may include changing the air filter and lubricating the compressor. Overloading the compressor due to leaks or excessive use will significantly shorten its lifespan.
Troubleshooting Common Issues
- Air Leaks: The most common issue. Use soapy water to locate and repair leaks.
- Compressor Failure: Check the fuse and relay. If the compressor is receiving power but not running, it may be faulty.
- Slow Inflation: Could be a sign of a weak compressor, a clogged air filter, or a leak.
- Uneven Ride Height: Could be caused by a faulty height sensor or a leak in one of the air struts.
By following these guidelines and taking the time to understand your air suspension system, you can enjoy the benefits of a custom ride height and a unique driving experience with your S13. Remember to consult with experienced installers or the manufacturer's support team if you encounter any difficulties.