Installation Of An Infiniti Q45 (r200v) Differential Into A Nissan 240sx
So, you're looking to upgrade the open differential in your Nissan 240SX (S13 or S14 chassis) to something a bit more robust? Installing an Infiniti Q45 (R200V) differential is a popular and effective option. The R200V is a stronger differential than the stock R200 found in many 240SX models, and it's readily available and relatively inexpensive. This article will guide you through the process, providing detailed instructions and highlighting potential pitfalls.
Before we dive in, let's be clear: this isn't a beginner-level project. It requires a good understanding of automotive mechanics, access to proper tools, and patience. Make sure you're comfortable working on your car before attempting this swap. Improper installation can lead to component damage or even safety issues.
Required Parts and Tools
Here's a comprehensive list of what you'll need:
- Infiniti Q45 R200V Differential: Verify that you are getting the correct diff. Look for the "V" stamp on the differential housing. The ideal years are 1990-1996. Check the gear ratio before purchasing. Most Q45s have a 3.54 ratio, which will alter your acceleration and top speed. Consider what ratio best suits your needs.
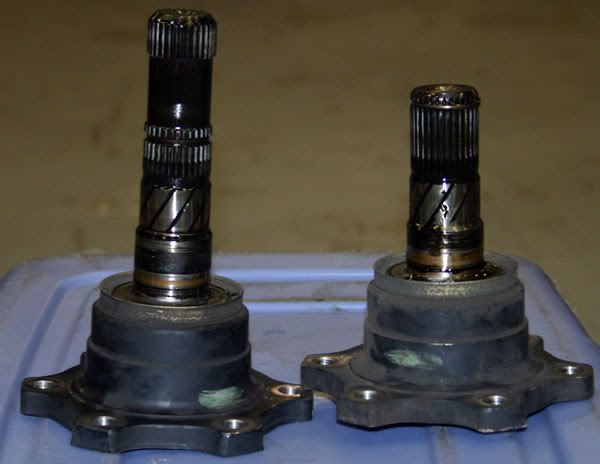
- 240SX Driveshaft (potentially): Depending on the year and model of your 240SX, and the year of the Q45 differential, you *might* need a modified or custom driveshaft. The Q45 diff has a different pinion flange than the stock 240SX diff. We'll discuss this in more detail later.
- Differential Cover: It's highly recommended to replace the differential cover with an aftermarket one, especially if you're increasing power. These covers often offer increased fluid capacity and cooling fins. Alternatively, you can use the Q45 differential cover, but it might require some modification to fit properly.
- Differential Fluid: High-quality gear oil designed for limited-slip differentials (if applicable). Consult your differential manufacturer's recommendations for the correct viscosity and additives.
- New Differential Bushings: Polyurethane bushings are a popular upgrade, offering improved durability and reduced axle tramp (wheel hop). Replacing worn rubber bushings is a must.
- Bolts and Fasteners: Have a collection of new bolts and nuts on hand. It's good practice to replace hardware that has been loosened and tightened multiple times. Specifically, get new bolts for the driveshaft flange, differential mounting bolts, and axle nuts.
- Tools:
- Jack and Jack Stands: Essential for safely lifting and supporting the vehicle.
- Wheel Chocks: For added safety.
- Socket Set: Metric sockets and wrenches in various sizes. Deep sockets are helpful.
- Torque Wrench: Crucial for tightening fasteners to the correct specifications.
- Breaker Bar: For loosening stubborn bolts.
- Pry Bar: Useful for maneuvering components.
- Hammer: For gentle persuasion.
- Punch and Hammer: For removing old bushings (if replacing).
- Bearing Press or Bushing Tool: For installing new bushings. A shop press is ideal.
- Angle Grinder or Cut-off Wheel: May be required for minor modifications.
- Drill and Drill Bits: Potentially needed for modifying the differential cover.
- Fluid Drain Pan: To catch old differential fluid.
- Gloves and Eye Protection: Safety first!
- Penetrating Oil: For loosening rusted bolts.
Step-by-Step Installation Guide
Follow these steps carefully:
1. Preparation
Before you even touch the car, gather all your parts and tools. Clean your workspace and familiarize yourself with the procedure. Spray all nuts and bolts related to the differential, driveshaft, and axles with penetrating oil. Let it soak for at least an hour, or preferably overnight. This will significantly reduce the chance of stripping or breaking bolts.
2. Vehicle Setup
Park your 240SX on a level surface. Engage the parking brake and chock the rear wheels. Loosen the lug nuts on both rear wheels. Use a jack to lift the rear of the car and securely support it with jack stands. Make sure the jack stands are placed on solid chassis points. Remove the rear wheels.
3. Disconnect the Exhaust
Depending on your exhaust setup, you may need to disconnect or remove parts of it to access the differential. Pay attention to the exhaust hangers and carefully detach them. Support the exhaust system with stands or straps to prevent it from falling.
4. Disconnect the Driveshaft
This is where things can get tricky. The Q45 differential has a different pinion flange (the part where the driveshaft bolts to) than the stock 240SX differential. There are several ways to address this:
- Option 1: Custom Driveshaft: This is the *best* solution. A custom driveshaft will be the correct length and have the appropriate flanges to mate with both the transmission and the Q45 differential.
- Option 2: Modified Driveshaft: Some shops can modify your existing 240SX driveshaft by replacing the pinion flange. This is cheaper than a custom driveshaft but may not be as robust.
- Option 3: Hybrid U-Joint: A "hybrid" U-joint can connect the stock 240SX driveshaft to the Q45 differential. However, this solution is often considered a band-aid and may introduce vibrations or premature wear. Research this option thoroughly before proceeding.
Once you've decided on your driveshaft solution, disconnect it from the differential. Mark the driveshaft and differential flange before removing the bolts to ensure proper alignment during reinstallation. Support the driveshaft to prevent it from hanging by the transmission output shaft.
5. Disconnect the Axles
Disconnect the axles from the differential. This usually involves unbolting the inner CV joints from the differential flanges. Be careful not to damage the CV joint boots. Some fluid may leak out, so have a rag ready. Once unbolted, carefully push the axles outward, away from the differential.
6. Remove the Stock Differential
Support the differential with a jack. Remove the bolts securing the differential to the subframe. There are typically four bolts. Lower the jack slowly, allowing the differential to come down. Be careful not to let it fall.
7. Prepare the Q45 Differential
Inspect the Q45 differential. Clean it thoroughly. Remove the old differential cover and install your new cover (or the Q45 cover after modifications, if necessary). Install new differential bushings using a bearing press or bushing tool. This is much easier to do with the differential out of the car.
8. Install the Q45 Differential
Lift the Q45 differential into position using the jack. Align the differential with the subframe mounting points. Install the mounting bolts and torque them to the manufacturer's specifications. Do not overtighten.
9. Reconnect the Axles
Reconnect the axles to the differential flanges. Install the bolts and torque them to the manufacturer's specifications.
10. Reconnect the Driveshaft
Reconnect the driveshaft to the differential pinion flange. Ensure the driveshaft is properly aligned and that the bolts are tightened to the correct torque specifications. This step is absolutely critical. Improperly tightened driveshaft bolts can lead to catastrophic failure.
11. Refill the Differential Fluid
Remove the fill plug from the differential cover. Fill the differential with the appropriate gear oil until it reaches the fill hole. Replace the fill plug and torque it to the manufacturer's specifications.
12. Reinstall the Exhaust
Reinstall the exhaust system, ensuring all hangers are properly attached.
13. Reinstall the Wheels
Reinstall the rear wheels. Tighten the lug nuts hand-tight. Lower the vehicle to the ground and torque the lug nuts to the manufacturer's specifications in a star pattern.
14. Test Drive
Take the car for a short test drive. Listen for any unusual noises or vibrations. Check for leaks around the differential, axles, and driveshaft. If everything seems okay, gradually increase the speed and test the differential under various conditions.
Important Considerations and Tips
- Differential Ratio: The stock 240SX differential ratio is typically 4.083 or 3.916. The Q45 differential often has a 3.54 ratio. This will affect your acceleration and top speed. A lower ratio (like 3.54) will result in slower acceleration but higher top speed. Consider your driving style and needs when choosing a differential.
- Limited-Slip Differential (LSD): Some Q45 differentials are equipped with a viscous LSD. If you have an LSD, use gear oil specifically designed for LSDs.
- Differential Cover Modifications: The Q45 differential cover may interfere with the 240SX chassis. You may need to grind or cut a small portion of the cover for clearance. Test fit the differential before finalizing the installation.
- Subframe Reinforcement: If you're increasing power significantly, consider reinforcing the rear subframe to prevent cracking.
- Professional Installation: If you're not comfortable performing this swap yourself, it's best to have it done by a qualified mechanic.
This swap offers a significant upgrade to the 240SX's drivetrain. By following these instructions carefully and paying attention to detail, you can successfully install an Infiniti Q45 differential and enjoy improved performance and reliability.