Installation Of In-channel And Tape-on Window Visors For The 240sx
Alright, let's talk about installing window visors on your 240SX. Whether you've opted for in-channel or tape-on visors, this guide will walk you through the process. We'll assume you're already comfortable with basic hand tools and understand the importance of prepping surfaces correctly. We're focusing on the 240SX here, so some nuances might be specific to this model.
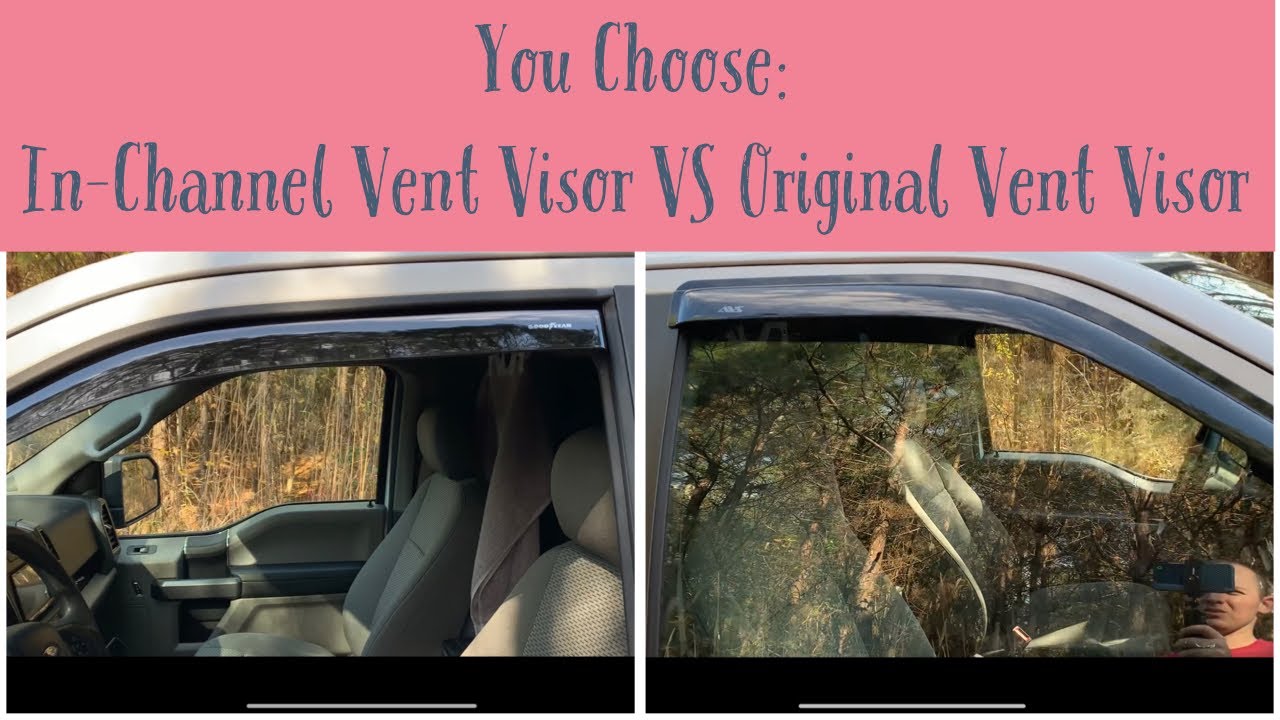
Understanding the Two Types: In-Channel vs. Tape-On
First, let's differentiate between the two main types:
- In-Channel Visors: These visors, as the name suggests, are designed to fit directly inside the window channel. They rely on friction and, sometimes, a small amount of adhesive to stay in place.
- Tape-On Visors: These adhere to the exterior of the door frame using automotive-grade adhesive tape, typically 3M VHB (Very High Bond) tape.
Both have their pros and cons. In-channel visors offer a cleaner, more integrated look, but can sometimes interfere with the window's automatic closing mechanism. Tape-on visors are generally easier to install, but the adhesive's longevity depends heavily on proper surface preparation.
Tools and Materials You'll Need
Regardless of the type of visor you choose, gather these essentials:
- Clean microfiber cloths
- Isopropyl alcohol (90% or higher is best)
- Adhesive promoter (specific to automotive applications, like 3M Adhesion Promoter 111)
- Heat gun or hairdryer (for tape-on visors, optional but recommended)
- Masking tape (for marking alignment, especially useful for tape-on)
- Soft rubber roller or squeegee (for tape-on visors to ensure good adhesion)
- Flathead screwdriver or plastic pry tool (for in-channel visor removal if needed)
- Level (optional, but helpful for ensuring straight installation of tape-on visors)
- Your chosen window visors (obviously!)
- Gloves (to keep the surfaces clean and prevent oils from your skin from interfering with adhesion)
Step-by-Step Guide: In-Channel Visor Installation
Let's dive into installing in-channel visors. These can be a bit finicky, but the clean look is often worth it.
Preparation is Key
- Clean the Window Channel: This is crucial. Thoroughly clean the inside of the window channel with isopropyl alcohol and a microfiber cloth. Remove any dirt, grime, or old residue. This step ensures the visor sits properly and minimizes friction. Allow the alcohol to completely evaporate.
- Dry Fit: Before removing any protective film or applying any adhesive, dry fit the visor into the channel. Check the fitment and ensure it aligns properly with the window frame. Some visors might have a specific orientation (left/right, front/back), so pay attention to any markings.
Installation
- Apply Adhesive Promoter (If Applicable): Some in-channel visors come with a thin strip of adhesive. If yours does, apply adhesive promoter to the area on the visor that will contact the window channel before removing the protective film from the adhesive strip. Follow the promoter's instructions for application and drying time.
- Insert the Visor: Carefully insert the visor into the window channel. Start at one end and gently work your way along, ensuring the visor is fully seated. Apply even pressure to avoid bending or breaking the visor.
- Test the Window: After installation, test the window's operation. Slowly raise and lower the window to check for any interference or binding. If the window struggles to close fully, don't force it. The visor might need to settle in. Leave the windows closed for 24-48 hours to allow the visor to properly seat and the adhesive to cure (if applicable). You can also try slightly adjusting the visor's position within the channel.
- Address Window Closing Issues: If, after a few days, the window still struggles to close, you might need to adjust the window's regulator or anti-pinch mechanism. Refer to your 240SX's service manual for instructions on how to do this. In rare cases, the in-channel visor might simply be too thick and incompatible with your window regulator.
Step-by-Step Guide: Tape-On Visor Installation
Tape-on visors are generally more straightforward, but proper surface preparation is even more critical here for long-term adhesion.
Preparation is Paramount
- Clean the Door Frame: Thoroughly clean the area on the door frame where the visor will be attached with isopropyl alcohol and a microfiber cloth. Remove any wax, grease, or dirt. Multiple passes with fresh cloths are recommended.
- Dry Fit and Mark Alignment: Dry fit the visor to the door frame. Use masking tape to mark the precise position of the visor. This will serve as a visual guide during the final installation. Pay close attention to the visor's alignment with the door frame and window edge. Use a level if you want to ensure the visor is perfectly straight.
Installation
- Apply Adhesive Promoter: Apply adhesive promoter to the area on the door frame where the tape will make contact. Follow the promoter's instructions for application and drying time. This is arguably the most important step for tape-on visors.
- Warm the Adhesive Tape: Use a heat gun or hairdryer to gently warm the adhesive tape on the visor. This will make the adhesive more pliable and improve its initial bond. Be careful not to overheat the tape, as this can damage it. Aim for a temperature that is warm to the touch, but not hot.
- Remove the Protective Film: Carefully peel back a small portion of the protective film from the adhesive tape. Align the visor with the masking tape marks you made earlier.
- Attach the Visor: Press the exposed portion of the visor onto the door frame, ensuring it's properly aligned. Gradually peel away the remaining protective film while pressing the visor firmly onto the door frame.
- Apply Pressure: Use a soft rubber roller or squeegee to apply firm, even pressure along the entire length of the visor. This will ensure good contact between the adhesive tape and the door frame. Pay particular attention to the edges of the visor.
- Allow the Adhesive to Cure: Leave the visor undisturbed for at least 24-48 hours to allow the adhesive to fully cure. Avoid washing the car or exposing the visor to extreme temperatures during this time. The longer you let it cure, the better the adhesion will be.
Troubleshooting Common Issues
Here are a few potential problems you might encounter and how to address them:
- Visor Falls Off (Tape-On): Inadequate surface preparation is the most common cause. Re-clean the surface, apply adhesive promoter properly, and ensure firm pressure during installation. Also, consider replacing the 3M tape with fresh tape if the original adhesive has been compromised. Temperature also plays a role. Ideally, install these during warmer weather (above 60F) for optimal adhesion.
- Window Doesn't Close Properly (In-Channel): As mentioned earlier, the visor might need to settle in. If the problem persists, check for proper alignment and consider adjusting the window regulator.
- Visor Rattles: This is more common with in-channel visors. You can try adding a small amount of weatherstripping adhesive to the contact points to dampen vibrations.
- Adhesive Residue: If you need to remove a visor, use an adhesive remover designed for automotive applications. Follow the product's instructions carefully to avoid damaging the paint. A heat gun can also help soften the adhesive for easier removal.
Remember, patience and attention to detail are key to a successful window visor installation. Don't rush the process, and take your time to ensure everything is properly aligned and secured. With the right tools and techniques, you can add this stylish and functional accessory to your 240SX with confidence.