Intercooler Installation And Charge Air Temperature Analysis
So, you're thinking about installing an intercooler and want to understand the science behind it all, along with the best practices for a successful install? Excellent choice! This article will guide you through the process, focusing not just on the "how," but also on the "why" behind intercooler installations and charge air temperature (CAT) analysis. We'll cover everything from basic principles to potential pitfalls, ensuring you're well-equipped for this performance upgrade.
Understanding Intercoolers and Charge Air Temperature
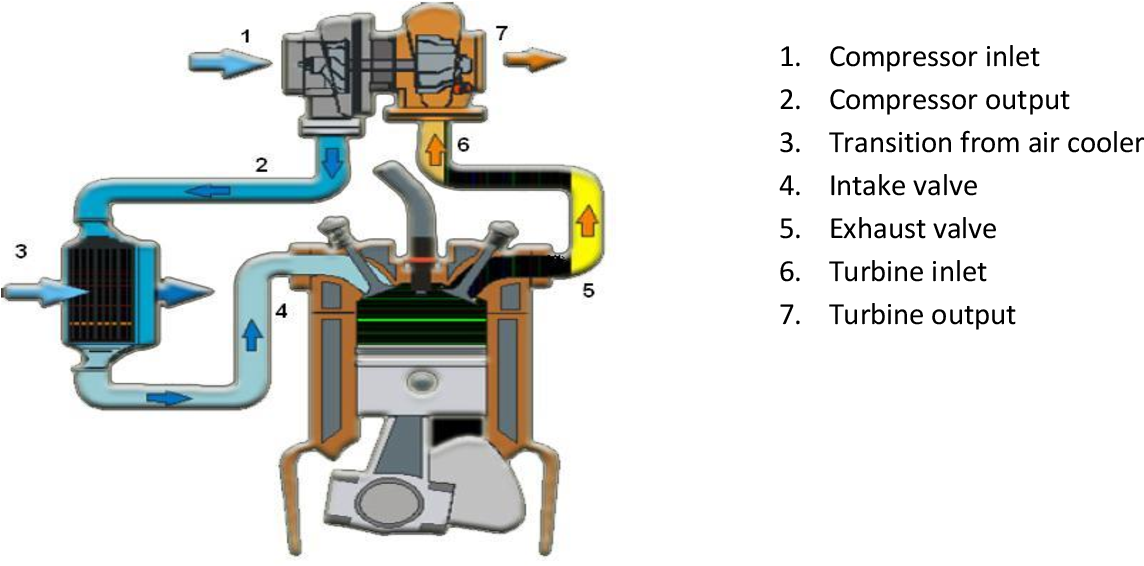
Before we dive into the installation, let's establish a solid understanding of the basics. An intercooler is essentially a heat exchanger. Its primary function is to reduce the temperature of the charge air – the air that has been compressed by your turbocharger or supercharger – before it enters the engine's combustion chamber. Why is this important?
When air is compressed, its temperature increases. Hotter air is less dense, meaning it contains less oxygen per unit volume. Less oxygen translates to reduced combustion efficiency and, consequently, lower power output. Furthermore, elevated CAT can lead to engine knocking or detonation, potentially causing severe engine damage. Detonation is uncontrolled combustion that happens when the air-fuel mixture ignites prematurely, stressing engine components. By cooling the charge air, we increase its density, allowing more oxygen to enter the cylinders. This results in improved combustion, increased power, and a reduced risk of engine-damaging detonation.
The efficiency of an intercooler is measured by its ability to lower the charge air temperature. The ideal CAT varies depending on the engine and application, but generally, lower is better, within reasonable limits. Factors influencing intercooler efficiency include:
- Core size and design: Larger cores with more surface area allow for greater heat transfer. Tube-and-fin cores and bar-and-plate cores are the most common types, each with its own advantages and disadvantages in terms of flow and cooling efficiency.
- Airflow: The amount of ambient air passing through the intercooler core directly impacts its cooling capacity. A poorly positioned intercooler or blocked airflow will significantly reduce its effectiveness.
- Ambient temperature: On hot days, the intercooler's ability to cool the charge air is naturally diminished.
- Charge air velocity: Slower-moving charge air allows for more time for heat transfer.
Types of Intercoolers
There are two primary types of intercoolers:
- Air-to-Air: These are the most common type, using ambient air to cool the charge air. They are typically mounted in the front of the vehicle (FMIC - Front Mount Intercooler) to maximize airflow or as a top mount (TMIC - Top Mount Intercooler).
- Air-to-Water: These intercoolers use a liquid (usually water or a water/coolant mixture) to absorb heat from the charge air. The heated liquid is then circulated to a separate radiator, where it is cooled by ambient air. Air-to-water intercoolers are generally more compact and can be more efficient in certain applications, but they are also more complex and require additional components.
Intercooler Installation: Step-by-Step
Let's walk through the installation process for a typical front-mount air-to-air intercooler (FMIC). Keep in mind that specific steps may vary depending on your vehicle and the intercooler kit you purchased. Always consult the manufacturer's instructions for your specific kit.
1. Preparation
Before you even think about touching a wrench, take these crucial steps:
- Gather your tools: Wrenches, sockets, screwdrivers, pliers, a cutting tool (like a Dremel or angle grinder with a cutting disc), measuring tape, a marker, and potentially a drill and drill bits. Having the right tools will make the job much smoother.
- Read the instructions thoroughly: Understand each step before you start. Identify all the components in the kit and familiarize yourself with their placement.
- Disconnect the battery: Safety first! Disconnecting the negative terminal prevents accidental electrical shorts.
- Jack up the car and secure it on jack stands: Never work under a vehicle supported only by a jack.
- Remove the front bumper: This is usually required to access the mounting location for the intercooler. Consult your vehicle's service manual for specific instructions.
2. Intercooler Mounting
This is where things get a bit more involved.
- Locate mounting points: The intercooler kit should provide brackets or mounting hardware. Identify where these brackets will attach to the vehicle's frame or bumper support.
- Modifications (if necessary): In some cases, you may need to trim or modify the bumper support or other components to create clearance for the intercooler. Use your measuring tape and marker to carefully plan your cuts. Use a cutting tool to make clean cuts, and be sure to deburr any sharp edges.
- Install mounting brackets: Attach the brackets securely to the vehicle.
- Mount the intercooler: Position the intercooler in the brackets and secure it with the provided hardware. Ensure the intercooler is properly aligned and doesn't interfere with any other components.
3. Piping Installation
Connecting the intercooler to the turbocharger and throttle body is crucial for proper operation.
- Install silicone couplers and clamps: Use silicone couplers to connect the intercooler to the turbocharger outlet and the throttle body inlet. Silicone couplers provide flexibility and help absorb vibrations. Secure the couplers with high-quality clamps. Double-check that the clamps are properly tightened to prevent leaks.
- Cut and route piping: The intercooler kit should include piping. You may need to cut the piping to the correct length for your specific application. Use a pipe cutter or a saw to make clean, straight cuts. Carefully route the piping to avoid sharp bends or contact with hot engine components.
- Test fit and adjust: Before fully tightening all the clamps, test fit all the piping to ensure proper fitment and clearance. Make any necessary adjustments.
- Tighten clamps securely: Once you're satisfied with the fitment, tighten all the clamps securely. Avoid overtightening, as this can damage the couplers.
4. Reassembly and Final Checks
Almost there!
- Reinstall the front bumper: Carefully reinstall the front bumper. Make sure it doesn't rub against the intercooler or piping.
- Reconnect the battery: Reconnect the negative terminal of the battery.
- Check for leaks: Start the engine and listen for any air leaks. You can also use a soapy water solution to check for leaks around the couplers and clamps.
- Inspect for obstructions: Make sure there are no obstructions blocking airflow to the intercooler.
Charge Air Temperature Analysis
Once the intercooler is installed, it's essential to monitor its performance and ensure it's effectively reducing charge air temperature. There are several ways to do this:
- OBD-II Monitoring: Many vehicles have a charge air temperature sensor (sometimes called intake air temperature - IAT - sensor). You can use an OBD-II scanner or a tuning device to monitor the CAT in real-time. This is the easiest and most convenient method.
- Aftermarket Gauges: Install an aftermarket CAT gauge for a dedicated and easily visible display of charge air temperature. This option often requires installing an additional temperature sensor.
- Data Logging: Use a data logging device to record charge air temperature along with other engine parameters during driving conditions. This allows you to analyze the intercooler's performance under various loads and driving scenarios. This is the most comprehensive method.
Interpreting the Data
When analyzing CAT data, consider the following:
- Baseline Readings: Take baseline CAT readings before installing the intercooler. This will give you a reference point to compare against after the installation.
- Ambient Temperature: Account for ambient temperature variations. On hotter days, you'll naturally see higher CAT readings.
- Driving Conditions: Monitor CAT under different driving conditions, such as cruising, acceleration, and sustained boost.
- Intercooler Efficiency: Compare the difference between the pre-intercooler air temperature (turbo outlet temperature) and the post-intercooler air temperature (intake manifold temperature). A significant temperature drop indicates good intercooler efficiency.
Troubleshooting
If your CAT readings are higher than expected after installing the intercooler, consider these potential issues:
- Air Leaks: Check for air leaks in the intercooler piping. Even a small leak can significantly reduce intercooler efficiency.
- Poor Airflow: Ensure that the intercooler is receiving adequate airflow. Remove any obstructions blocking the airflow.
- Intercooler Size: If you're running high boost levels or have a heavily modified engine, you may need a larger intercooler.
- Hot Soak: TMICs can suffer from heat soak when the car is stationary. Consider heat shielding or relocating the intercooler.
Final Thoughts
Installing an intercooler is a rewarding upgrade that can significantly improve your engine's performance and reliability. By understanding the principles behind charge air temperature and following the installation steps carefully, you can ensure a successful and effective upgrade. Remember to monitor your CAT and address any potential issues to maximize the benefits of your new intercooler. Happy boosting!