Kouki Front Bumper Conversion Mounting Requirements
So, you're thinking about swapping that zenki (pre-facelift) or chuki (mid-facelift) front bumper on your S14 240SX for the coveted Kouki (late-facelift) version? Excellent choice! The Kouki bumper is arguably the most aesthetically pleasing, and with a little know-how, this conversion is well within the reach of a moderately skilled DIYer. However, it's not a simple bolt-on affair. This article will break down the necessary mounting requirements and address common challenges, ensuring a successful and aesthetically pleasing transformation.
Understanding the Differences: A Kouki Bumper Deep Dive
Before diving into the specifics, it's crucial to understand the key differences between the earlier S14 bumpers and the Kouki. The main points of divergence are:
- Shape and Design: The Kouki bumper features a more aggressive, angular design with integrated fog light housings and a distinct lower lip. This difference is obvious, but its implications extend beyond mere aesthetics.
- Mounting Points: While some mounting points are shared, the Kouki bumper utilizes additional and slightly different locations, particularly around the fender liners and headlight supports.
- Headlight Design: The Kouki headlights are a completely different shape than the zenki or chuki versions. While you don't *need* Kouki headlights for the bumper conversion (more on that later), they are highly recommended for the proper aesthetic.
- Bumper Support: The bumper support, that metal bar behind the bumper, is slightly different between models, and you'll need the Kouki bumper support for the best fitment and to ensure proper crash protection.
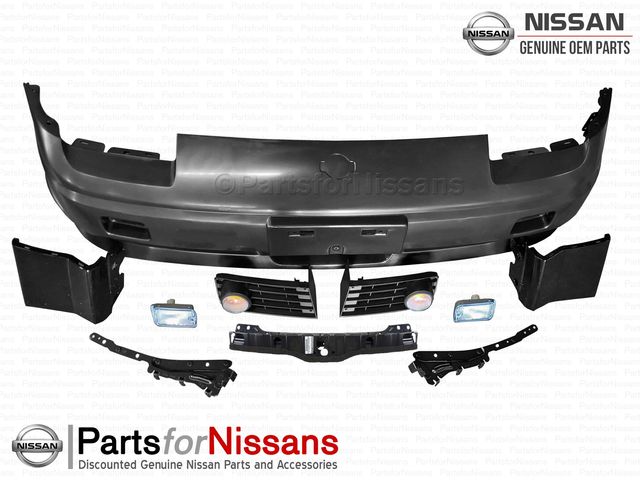
Essential Components for a Smooth Kouki Bumper Conversion
To ensure a successful conversion, gather the following:
- Kouki Front Bumper: Obviously. Ensure it's in good condition, free from major cracks or damage. Consider the material – fiberglass (FRP) requires more prep work and may be more prone to damage, while polyurethane (PU) is more flexible and durable.
- Kouki Bumper Support: As mentioned earlier, this is crucial for proper mounting and crash protection. Trying to modify the zenki/chuki support can be done, but it is very time consuming and is usually not the best option.
- Kouki Headlights (Highly Recommended): While you can technically mount the Kouki bumper with zenki/chuki headlights using custom brackets and modifications, the aesthetic will be compromised. The Kouki headlights complete the look.
- Kouki Fog Lights (Optional): If you want the complete Kouki look, you'll need the fog lights and associated wiring.
- Kouki Turn Signals: The zenki and chuki turn signals will not fit the Kouki bumper.
- Fender Liners: While not *strictly* necessary, Kouki fender liners will ensure a cleaner, more secure fit. The zenki/chuki liners can be made to work, but it will require some modifications.
- Mounting Hardware: You'll likely need a collection of bolts, nuts, washers, and possibly self-tapping screws. Having a kit on hand is always a good idea.
- Basic Tools: Wrenches, sockets, screwdrivers, a drill (for minor modifications), a cutting tool (for trimming fender liners), and potentially a heat gun (for bending plastic).
Step-by-Step Mounting Guide: Tackling the Conversion
Here's a breakdown of the mounting process, highlighting potential problem areas and offering solutions:
- Preparation: Remove the existing front bumper, headlights, turn signals, and bumper support. Thoroughly clean the area and inspect for any rust or damage. Address any issues before proceeding.
- Bumper Support Installation: Bolt on the Kouki bumper support. Ensure it's securely fastened and aligned properly. This is a critical step for safety.
- Headlight Installation (If Applicable): Install the Kouki headlights. This might involve swapping wiring harnesses or making minor adjustments. Refer to a separate headlight conversion guide for detailed instructions.
- Bumper Placement and Initial Alignment: Carefully position the Kouki bumper over the bumper support and headlights. This is where you'll start to assess the fitment and identify any areas that need attention.
- Fender Mounting: This is often the trickiest part. The Kouki bumper attaches to the fenders at several points, and these points might not align perfectly with the existing holes on your car. You may need to:
- Enlarge Existing Holes: If the holes are close, you can carefully enlarge them with a drill.
- Drill New Holes: If the holes are significantly off, you'll need to drill new ones. Use a self-tapping screw to secure the bumper to the fender.
- Use Brackets: For more complex misalignment, consider fabricating custom brackets. This requires more advanced skills and tools.
Pay close attention to the gap between the bumper and the fenders. You want a consistent and even gap for a professional look.
- Fender Liner Attachment: Secure the fender liners to the bumper. As mentioned earlier, Kouki fender liners will provide the best fit. If using zenki/chuki liners, you'll likely need to trim them to fit the Kouki bumper's contours.
- Fog Light Installation (If Applicable): Install the fog lights and connect the wiring. This may involve splicing wires or using a relay.
- Turn Signal Installation: Install the Kouki turn signals. Usually, they are a direct fit.
- Final Adjustments: Once everything is mounted, step back and assess the overall look. Make any necessary adjustments to ensure a clean and even fit.
Troubleshooting Common Kouki Bumper Conversion Issues
Here are some common problems and solutions:
- Poor Fitment: This is the most common issue. Causes can range from a damaged bumper to incorrect mounting. Double-check all mounting points and ensure the bumper support is properly installed. Minor fitment issues can sometimes be addressed with careful bending or shimming. A high-quality bumper will significantly reduce fitment issues.
- Large Gaps Between Bumper and Fenders: This usually indicates misalignment or incorrect mounting. Try adjusting the bumper's position or using shims to fill the gaps.
- Inability to Securely Attach Fender Liners: This is common when using zenki/chuki fender liners. Trim the liners as needed and use self-tapping screws to secure them to the bumper.
- Wiring Issues with Fog Lights: Ensure you have the correct wiring harness and relay (if required). Consult a wiring diagram for your car model.
Materials Matter: FRP vs. Polyurethane (PU)
The material your bumper is made from will greatly impact the installation process. Here's a quick rundown:
- Fiberglass (FRP): FRP is lightweight and relatively inexpensive, but it's also brittle and prone to cracking. FRP bumpers often require significant prep work, including sanding, filling, and priming. They are also less forgiving during installation. Expect to potentially need to modify mounting points more extensively with FRP. Professional installation is recommended for FRP bumpers.
- Polyurethane (PU): PU is more flexible and durable than FRP. It's more resistant to cracking and can withstand minor impacts. PU bumpers typically require less prep work and are easier to install. The added flexibility makes them more forgiving when aligning.
Finishing Touches and Considerations
Once the bumper is installed, consider these final touches:
- Paint Matching: If your bumper is unpainted, you'll need to have it painted to match your car's color. Consult a professional paint shop for best results.
- Bumper Lip: Adding a lip to the bottom of the Kouki bumper can further enhance its aggressive look.
- Professional Installation: If you're not comfortable with any of the steps outlined above, consider hiring a professional body shop to handle the installation. While it will cost more, it will ensure a high-quality and lasting result.
In conclusion, converting to a Kouki front bumper on your S14 240SX is a rewarding upgrade that can dramatically improve the car's appearance. By understanding the mounting requirements, gathering the necessary components, and following the step-by-step guide, you can achieve a successful and aesthetically pleasing transformation. Remember to take your time, be patient, and don't be afraid to seek professional help if needed. Good luck!