Nissan 240sx Battery Relocation
So, you're thinking about relocating the battery in your Nissan 240SX? Or maybe you're already experiencing the common issues that crop up when doing so incorrectly. You're not alone! Battery relocation is a popular modification for the 240SX, often done to improve weight distribution, clear space in the engine bay for turbo kits, or simply to clean up the overall look. However, it's not a project to take lightly. A poorly executed relocation can lead to frustrating electrical problems, performance issues, and even safety hazards. Let’s walk through some of the common pitfalls and, more importantly, how to avoid them.
The Why and The How of 240SX Battery Relocation
Before we dive into the problems, let's quickly recap why people relocate their batteries in the first place and the most common methods.
Reasons for Battery Relocation:
- Weight Distribution: Moving the battery to the trunk shifts weight towards the rear, which can improve handling and traction, especially for drifting or racing.
- Engine Bay Clearance: This is crucial for those installing turbochargers or other modifications that require extra space around the engine.
- Aesthetics: A cleaner engine bay simply looks better. Relocating the battery can free up valuable space and hide unsightly wiring.
Common Relocation Methods:
The most common method involves moving the battery to the trunk or rear seat area. This requires extending the battery cables and securing the battery in a safe and stable manner. Some people will also relocate the battery to behind the passenger seat or in a custom enclosure in the trunk.
Common Problems and Solutions:
Now, let's get to the heart of the matter – the issues you might be facing or want to prevent.
1. Voltage Drop and Performance Issues
This is arguably the most common problem. When you extend the battery cables, especially using inadequate wire gauge, you increase resistance. This increased resistance leads to a voltage drop, meaning the components in your car aren't receiving the voltage they need to operate efficiently. This can manifest as:
- Slow Cranking: The starter motor struggles to turn the engine over.
- Dim Headlights: Your headlights appear noticeably dimmer than before.
- Fuel Pump Issues: The fuel pump might not be delivering enough fuel, leading to poor performance or even stalling.
- ECU Malfunctions: The engine control unit (ECU) relies on a stable voltage supply. A significant drop can cause errors or even damage the ECU.
Solution: The key here is using the correct wire gauge. Don't cheap out! For a 240SX, you should be using at least 0-gauge (0 AWG) welding cable for both the positive and negative cables. Some people even go with 00-gauge (2/0 AWG) for added insurance, especially on high-performance builds. Welding cable is highly flexible and designed to handle high current loads. Make sure the cables are long enough to reach the new battery location without being stretched or strained.
Also, ensure proper grounding. Run a dedicated ground cable from the battery to a clean, unpainted metal surface on the chassis. Adding multiple grounding points can further improve electrical conductivity. Use star washers to bite into the metal and ensure a solid connection.
Tip: When calculating cable length, it’s better to overestimate slightly than to underestimate. You can always neatly coil up excess cable, but a cable that's too short is useless.
2. Poor Connections and Corrosion
A loose or corroded connection is a recipe for disaster. It introduces resistance, leading to voltage drop and potentially sparking or even fires.
Solution: Invest in high-quality battery terminals and connectors. Avoid cheap, generic options. Look for terminals made from copper or brass, which are excellent conductors. Crimp the terminals securely onto the cables using a proper crimping tool – don’t use pliers! After crimping, you can solder the connection for added strength and conductivity. Use heat shrink tubing to insulate the connections and protect them from moisture and corrosion.
Regularly inspect your connections for signs of corrosion. If you see any, clean them thoroughly with a wire brush and apply a dielectric grease to prevent future corrosion. Consider using battery terminal protectors to further shield the connections from the elements.
3. Battery Not Secure
A loose battery bouncing around in the trunk is a serious safety hazard. In an accident, it can become a projectile or, worse, short out and cause a fire.
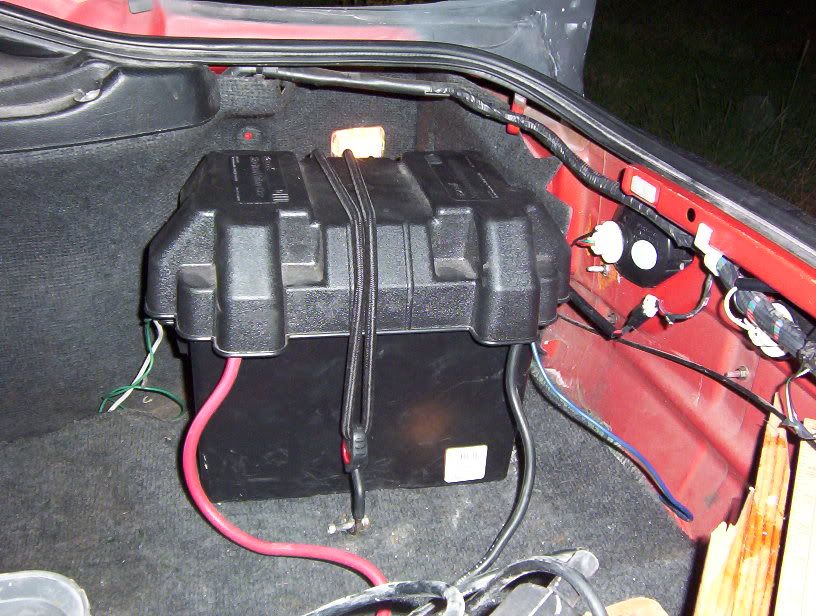
Solution: Use a proper battery box or mounting bracket. Don't just strap the battery down with bungee cords! There are aftermarket battery boxes specifically designed for automotive use. These boxes typically have a secure lid and mounting points for bolting them to the chassis. Alternatively, you can fabricate a custom mounting bracket from steel or aluminum.
Ensure the battery box or bracket is securely bolted to the chassis using strong bolts and nuts. Reinforce the mounting area if necessary. You want the battery to be able to withstand significant force without coming loose.
4. Improper Fusing
Forgetting to add a fuse or using an undersized fuse can leave your electrical system vulnerable to damage in the event of a short circuit.
Solution: Install a high-amp fuse as close as possible to the battery. This fuse will protect the entire wiring run from the battery to the engine bay. The fuse rating should be appropriate for the current draw of your car's electrical system. A 150-200 amp fuse is generally recommended for a 240SX. Use an ANL fuse or a similar high-current fuse.
Make sure the fuse holder is weatherproof to protect the fuse from moisture and corrosion.
5. Running Cables Incorrectly
Improperly routed cables can be chafed, pinched, or damaged by heat, leading to short circuits and potential fires.
Solution: Route the cables carefully and securely. Avoid sharp edges, moving parts, and sources of heat. Use zip ties or cable clamps to secure the cables along their route. Run the cables through grommets when passing through metal panels to protect them from chafing. Consider using heat shielding on cables that are close to exhaust components.
Keep the cables away from fuel lines to prevent a potentially catastrophic fire hazard.
6. Using the Chassis as Ground
While using the chassis for ground seems easy, it can lead to inconsistent grounding and voltage fluctuations. The chassis relies on multiple bolted connections to complete the circuit, and these connections can corrode over time, increasing resistance.
Solution: As mentioned earlier, run a dedicated ground cable from the battery to a clean, unpainted metal surface on the chassis. This ensures a consistent and reliable ground connection.
7. Not Venting the Battery
Some batteries, especially traditional lead-acid batteries, release hydrogen gas during charging. In a confined space like a trunk, this gas can accumulate and become explosive.
Solution: Use a sealed AGM (Absorbent Glass Mat) battery or a vented battery box. AGM batteries are sealed and don't release hydrogen gas. If you use a traditional lead-acid battery, make sure your battery box has a vent that leads to the outside of the car. This will allow any released gas to escape safely.
Tools and Materials You'll Need:
- 0-gauge or 00-gauge welding cable
- High-quality battery terminals and connectors
- Crimping tool
- Soldering iron and solder (optional, but recommended)
- Heat shrink tubing
- Battery box or mounting bracket
- Bolts, nuts, and washers
- High-amp fuse and fuse holder
- Wire stripper and cutter
- Drill and drill bits
- Zip ties or cable clamps
- Multimeter (for checking voltage drop)
- Basic hand tools (wrenches, screwdrivers, etc.)
Approximate Repair Costs:
The cost of a battery relocation project can vary depending on the quality of the components you use and whether you do the work yourself or hire a professional. Here's a rough estimate:
- DIY (Parts Only): $150 - $400. This includes the cost of the battery cable, terminals, fuse, battery box, and other necessary hardware.
- Professional Installation: $400 - $800+. This includes the cost of parts plus labor. Labor rates can vary depending on your location and the complexity of the installation.
Final Thoughts:
Relocating the battery in your 240SX can be a worthwhile modification, but it's crucial to do it right. By following these tips and avoiding common pitfalls, you can ensure a safe and reliable installation that improves your car's performance and aesthetics. If you're not comfortable working with electrical systems, it's best to leave the job to a professional. Remember, safety should always be your top priority.
Always disconnect the negative battery terminal before working on any electrical components. Good luck, and happy driving!