Nissan 240sx Egr Valve Function And Diagnostic Procedures
Let's dive into the sometimes-misunderstood EGR (Exhaust Gas Recirculation) system on your Nissan 240SX. Specifically, we'll focus on the EGR valve, its function, and how to diagnose common problems. This article assumes you're already familiar with basic automotive tools and safety procedures. Remember, always consult your factory service manual (FSM) for the most accurate information for your specific 240SX model year (S13 or S14) and engine (KA24E or KA24DE).
What is an EGR Valve and Why Does My 240SX Need One?
The EGR valve's primary job is to reduce Nitrogen Oxides (NOx) emissions. NOx are harmful pollutants formed at high combustion temperatures. The EGR valve accomplishes this by recirculating a small amount of exhaust gas back into the intake manifold. This exhaust gas is inert (mostly non-combustible) and effectively lowers the peak combustion temperature.
Think of it like this: the EGR valve is like a tiny doorway that lets a bit of used-up air (exhaust) back into the engine to cool things down. Less heat means fewer NOx emissions. This is especially important during cruising conditions when the engine is under relatively light load.
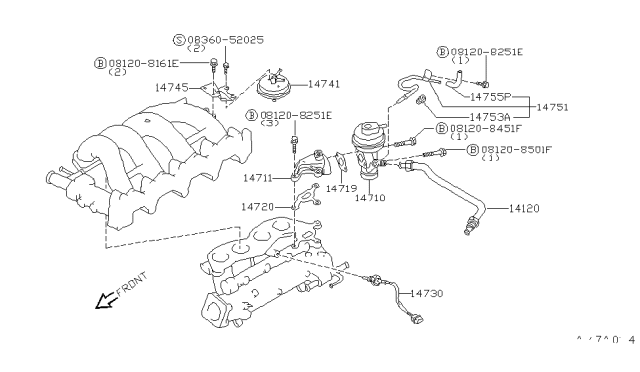
On your 240SX, the EGR system is typically vacuum-operated. This means the amount of exhaust gas recirculated is controlled by engine vacuum. Let's break down the main components:
- EGR Valve: The actual valve that opens and closes, allowing exhaust gas to flow.
- EGR Control Solenoid Valve: An electrically controlled valve that regulates the vacuum signal to the EGR valve. The ECU (Engine Control Unit) controls this solenoid.
- Vacuum Hoses: Connect all the components and carry the vacuum signal.
- EGR Temperature Sensor (some models): Monitors the temperature of the exhaust gas flowing through the EGR system.
- Exhaust Manifold Port: Where the exhaust gas is drawn from.
- Intake Manifold Port: Where the exhaust gas is introduced into the intake stream.
Common 240SX EGR Valve Problems
Over time, the EGR system can become problematic. Here are some typical issues:
- Clogged EGR Valve: Carbon deposits from the exhaust can build up inside the valve, preventing it from opening or closing properly. This is probably the most common issue.
- Faulty EGR Control Solenoid Valve: The solenoid can fail electrically or mechanically, preventing it from properly controlling the vacuum signal to the EGR valve.
- Vacuum Leaks: Cracked or disconnected vacuum hoses can disrupt the vacuum signal, causing the EGR valve to malfunction.
- Faulty EGR Temperature Sensor: If equipped, a failing sensor can send incorrect information to the ECU, leading to incorrect EGR operation.
- Carbon Buildup in EGR Passages: The passages leading to and from the EGR valve can become clogged with carbon, restricting exhaust gas flow.
Diagnosing EGR Valve Problems: Step-by-Step
Now, let's get into the troubleshooting process. Always start with the basics!
1. Visual Inspection
A thorough visual inspection is crucial. Look for:
- Disconnected or cracked vacuum hoses. Replace any damaged hoses.
- Corrosion or damage to the EGR valve and solenoid valve.
- Carbon buildup around the EGR valve and its connections.
- Check the EGR temperature sensor (if equipped) for damage.
2. Vacuum Testing
You'll need a vacuum gauge for this step. Locate the vacuum hose that connects the EGR control solenoid valve to the EGR valve itself.
- Disconnect the vacuum hose from the EGR valve.
- Connect your vacuum gauge to the disconnected hose.
- Start the engine and let it idle.
- Observe the vacuum reading on the gauge. You should see little or no vacuum at idle.
- Now, have someone increase the engine RPMs to around 2000-2500 RPM. You should see a significant increase in vacuum if the EGR control solenoid valve is working correctly.
- If you don't see a change in vacuum, the EGR control solenoid valve might be faulty. Proceed to electrical testing.
3. Electrical Testing of the EGR Control Solenoid Valve
You'll need a multimeter for this. Consult your FSM for the specific test procedure for your 240SX model. Generally, you'll be checking the following:
- Resistance Test: Disconnect the electrical connector from the solenoid valve. Use your multimeter to measure the resistance between the terminals of the solenoid. Compare the reading to the specification in your FSM. An open circuit (infinite resistance) or a short circuit (zero resistance) indicates a faulty solenoid.
- Voltage Test: With the electrical connector connected to the solenoid valve, use your multimeter to check for voltage at the connector when the engine is running. You should see battery voltage. If there's no voltage, there might be a problem with the wiring or the ECU.
- Continuity Test: Check the continuity of the wiring between the solenoid valve and the ECU. This will help you identify any breaks or shorts in the wiring.
4. EGR Valve Functionality Test
This test checks if the EGR valve itself is opening and closing properly.
- With the engine idling, locate the EGR valve diaphragm (the part that moves when vacuum is applied).
- Carefully apply vacuum directly to the EGR valve using a hand-held vacuum pump. Be careful not to over-apply vacuum, as this could damage the valve.
- As you apply vacuum, the engine idle should become rough or even stall. This indicates that the EGR valve is opening and allowing exhaust gas to enter the intake manifold, disrupting the air-fuel mixture.
- If the engine idle doesn't change when you apply vacuum, the EGR valve is likely stuck closed or has a leak.
5. Checking for Clogged EGR Passages
If you suspect clogged EGR passages, you'll need to remove the EGR valve and inspect the passages in the intake manifold and exhaust manifold.
- Carefully remove the EGR valve. Take note of the gasket orientation for reassembly.
- Use a small wire or pipe cleaner to probe the passages and dislodge any carbon buildup. You can also use carburetor cleaner or intake cleaner to help dissolve the deposits. Be careful not to damage the passages.
- Clean the EGR valve thoroughly with carburetor cleaner.
- Reinstall the EGR valve with a new gasket.
Diagnostic Trouble Codes (DTCs)
Many 240SX models have OBD-I diagnostic systems. Check engine light codes related to the EGR system can include:
- Code 32: EGR System Fault
- Code 33: EGR Temperature Sensor Circuit Malfunction (if equipped)
Consult your FSM for the specific troubleshooting procedures for these codes.
EGR Valve Cleaning vs. Replacement
If your EGR valve is simply clogged with carbon, cleaning it might restore its function. However, if the valve is severely corroded, damaged, or has a faulty diaphragm, replacement is the better option.
Important Considerations
- Factory Service Manual (FSM): Always refer to your FSM for the most accurate and detailed information for your specific 240SX model.
- Safety First: Wear safety glasses and gloves when working on your car.
- Vacuum Hose Routing: Pay close attention to the routing of the vacuum hoses. Incorrect routing can cause the EGR system to malfunction.
- Torque Specifications: Use a torque wrench and follow the torque specifications in your FSM when tightening bolts and nuts.
Troubleshooting the EGR system can seem daunting, but by following these steps and using your FSM, you can diagnose and repair many common EGR valve problems on your Nissan 240SX.