Nissan 240sx Rocket Bunny V2: The Next Evolution Of Widebody
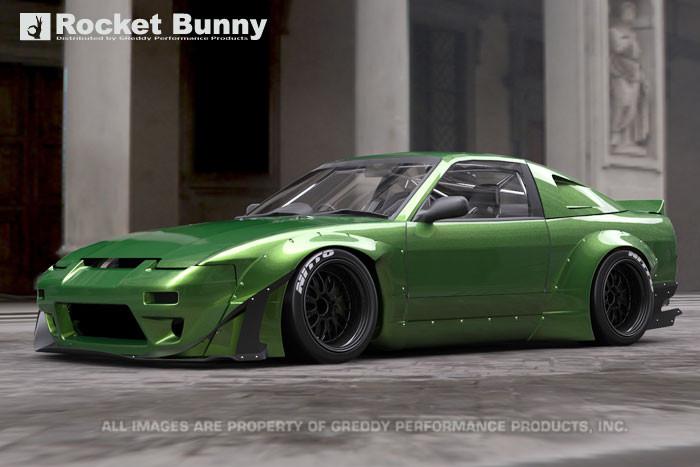
So, you've taken the plunge and joined the ranks of 240SX owners rocking the iconic Rocket Bunny V2 kit. Congratulations! It's a stunning transformation that takes the S13 or S14 to a whole new level of aggressive style. However, as with any aftermarket body kit, especially one as involved as the V2, there are bound to be a few bumps along the road. This isn't your average bolt-on; it requires modifications, finesse, and a bit of patience. Let's troubleshoot some common issues and offer practical solutions to keep your ride looking its best.
Problem: Fitment Issues After Installation
One of the most frequently encountered problems is imperfect fitment. The Rocket Bunny V2 isn't a factory-stamped panel; it's handcrafted fiberglass, and slight variations are expected. Don't panic! This is perfectly normal, and with the right approach, you can achieve a seamless look.
Solution: Careful Preparation and Modification
Preparation is key. Before you even think about paint, spend significant time test-fitting each piece. This includes the front and rear over-fenders, the side skirts, and the ducktail spoiler (if applicable). Look for areas where the kit sits proud of the original bodywork or has noticeable gaps. Here’s what you can do:
- Panel Alignment: Use clamps and shims to hold the panels in place. Check for consistent gaps along the edges where the kit meets the original body panels.
- Sanding and Shaping: Fiberglass can be shaped. Use a sanding block and varying grits of sandpaper (starting with a coarser grit like 80 and moving to finer grits like 220 or 320) to carefully smooth out any high spots or uneven edges. Be patient and work slowly to avoid damaging the fiberglass.
- Filling Gaps: For small gaps, body filler is your friend. Apply it in thin layers, allowing each layer to dry completely before sanding. Remember, multiple thin layers are better than one thick layer.
- Brace for Cutting: The rear fenders *will* need to be cut to accommodate the widebody. A rotary tool with a cutting wheel is the best tool for this. Take your time, measure twice, and cut once. Consider reinforcing the cut edge to prevent future cracking or flexing.
Tools Needed:
- Clamps
- Shims (washers or small pieces of metal work well)
- Sanding block
- Various grits of sandpaper (80, 120, 220, 320)
- Body filler
- Body filler spreader
- Rotary tool with cutting wheel
- Safety glasses and dust mask (crucial when working with fiberglass)
Estimated Cost: The cost depends heavily on whether you tackle this yourself or hire a professional. DIY materials might run you $50-$150. Professional bodywork can range from $500 to $2000+, depending on the complexity and the shop's hourly rate.
Problem: Cracking and Damage to the Fiberglass
Fiberglass, while strong, is susceptible to cracking, especially in areas that experience stress or impact. This is common with a widebody kit, considering the car's likely lower ride height and increased exposure to road debris.
Solution: Reinforcement and Careful Driving
Preventive measures and prompt repairs are key. Here's how to address cracking and minimize future damage:
- Reinforce Stress Points: Before painting, consider reinforcing areas prone to stress, such as the fender arches and mounting points. You can use fiberglass mat and resin to add extra layers of strength.
- Careful Driving: Avoid potholes and speed bumps whenever possible. The lower your car is, the more vulnerable your kit becomes.
- Regular Inspections: Regularly inspect your kit for early signs of cracking. The sooner you catch it, the easier it is to repair.
- Professional Repair: For major cracks or structural damage, it's best to consult a professional fiberglass repair shop. They have the expertise and tools to restore the integrity of the kit.
- Consider Polyurethane Additions: While not strictly Rocket Bunny, adding polyurethane lips to the front and sides of the kit can dramatically improve impact resistance.
Repairing Minor Cracks:
- Clean the Area: Thoroughly clean the cracked area with soap and water, then degrease it with acetone or isopropyl alcohol.
- Sand the Crack: Use sandpaper to create a V-shaped groove along the crack. This will provide a larger surface area for the repair material to bond to.
- Apply Fiberglass Resin and Mat: Cut small pieces of fiberglass mat and saturate them with fiberglass resin. Apply the resin and mat to the crack, overlapping the edges.
- Allow to Cure: Let the resin cure completely according to the manufacturer's instructions.
- Sand and Finish: Sand down the repaired area to blend it with the surrounding surface. Apply body filler if necessary, and then prime and paint.
Tools Needed:
- Fiberglass resin
- Fiberglass mat
- Acetone or isopropyl alcohol
- Sandpaper (various grits)
- Mixing cups and stir sticks
- Paintbrush or roller
- Safety glasses and gloves
Estimated Cost: Minor crack repairs can be done DIY for around $30-$75 in materials. Professional repairs can range from $100 to $500+, depending on the extent of the damage.
Problem: Matching Paint and Blending
Getting the paint to match perfectly between the new kit and the existing body is crucial for a professional look. Even with the correct paint code, slight variations in age and exposure can lead to discrepancies.
Solution: Professional Painting and Blending Techniques
This is where investing in a reputable body shop pays dividends. Here's what they'll typically do:
- Paint Code Verification: Ensure the paint code is accurate and cross-referenced with the vehicle's VIN.
- Tinting and Matching: A skilled painter will tint the paint to match the existing color as closely as possible. They might even take a sample from your car to ensure an exact match.
- Blending: Blending the new paint into the surrounding panels is crucial to avoid a noticeable color difference. This involves gradually feathering the new paint into the old paint.
- Clear Coat Application: A high-quality clear coat will protect the paint and provide a glossy finish.
DIY Considerations: If you're determined to paint the kit yourself, research proper techniques for blending and color matching. Practice on a test panel before tackling the actual kit. Consider using a paint mixing service that can custom-blend your paint based on a sample. Renting professional-grade spray equipment is also highly recommended.
Estimated Cost: Painting a Rocket Bunny V2 kit professionally can cost anywhere from $1000 to $3000+, depending on the complexity of the color, the shop's reputation, and the level of blending required. DIY painting can save you money, but it requires significant skill and preparation, with material costs ranging from $200 to $500.
Problem: Maintaining the Widebody Look
Beyond the initial installation, keeping your Rocket Bunny V2 looking fresh requires ongoing maintenance and attention to detail.
Solution: Regular Cleaning and Protection
Here are some tips to keep your widebody looking its best:
- Regular Washing: Wash your car regularly to remove dirt, grime, and road salt. Use a pH-neutral car soap and a soft wash mitt.
- Waxing or Sealing: Apply a coat of wax or sealant every few months to protect the paint from UV damage and environmental contaminants.
- Touch-Up Paint: Keep a bottle of touch-up paint handy for addressing small chips and scratches.
- PPF (Paint Protection Film): Consider applying PPF to high-impact areas, such as the front fenders and side skirts. This will provide an extra layer of protection against rock chips and scratches.
- Proper Storage: If you store your car outdoors, consider using a car cover to protect it from the elements.
Estimated Cost: Regular maintenance is relatively inexpensive. Car washing supplies and wax/sealant will cost around $50-$100 per year. PPF application can range from $500 to $1500+, depending on the coverage area.
The Rocket Bunny V2 kit is a statement piece, and like any high-end modification, it requires attention and care. By addressing these common issues proactively and following these solutions, you can keep your 240SX looking its absolute best for years to come. Don't be afraid to seek professional help when needed, and remember that patience and attention to detail are your best allies in achieving a flawless widebody transformation. Good luck and enjoy the ride!
Disclaimer: The information provided in this article is intended for general guidance only. Always consult with a qualified professional before undertaking any automotive repairs or modifications. Costs are estimates and may vary depending on location and specific circumstances.