Nissan 240sx S13 5 Lug Conversion
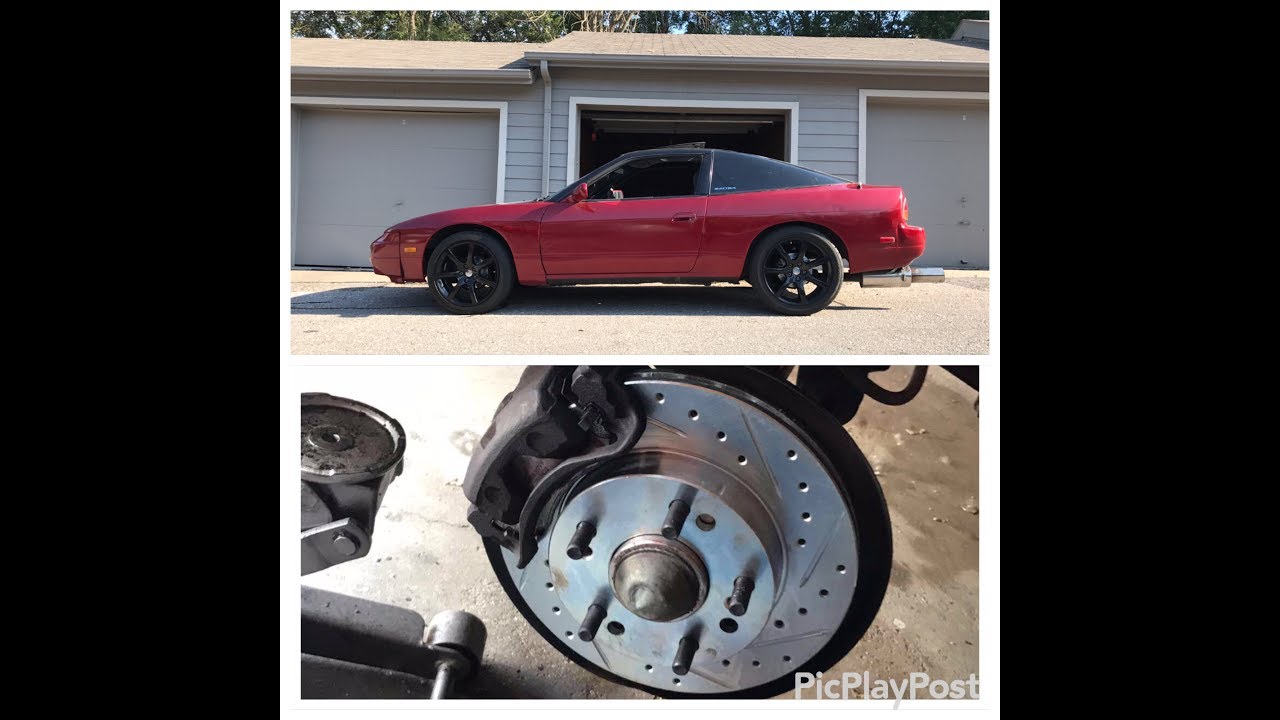
The Nissan 240SX S13, a darling of the drift and tuner communities, originally came equipped with a 4x114.3 bolt pattern. While perfectly adequate for stock power levels and casual driving, enthusiasts often find themselves wanting to upgrade their wheels and tires for improved performance and aesthetics. This frequently leads to the desire for a 5-lug conversion, which allows for a wider selection of readily available and often stronger wheels. This guide provides a detailed, step-by-step explanation of how to perform a 5-lug conversion on your S13.
Why Perform a 5-Lug Conversion?
Before diving into the "how," let's briefly touch upon the "why." A 5-lug conversion offers several advantages:
- Increased Wheel Selection: This is the primary reason. The 5x114.3 bolt pattern is far more common, opening up a vast array of wheel choices, both new and used.
- Potentially Stronger Hubs and Bearings: Depending on the kit you choose, the conversion can replace the original hubs with more robust alternatives. This is especially beneficial for those pushing higher horsepower or engaging in demanding driving activities.
- Improved Aesthetics: Let's be honest, many desirable wheel designs simply aren't available in 4x114.3. A 5-lug conversion unlocks a whole new level of visual customization.
- Brake Upgrade Compatibility: Some larger brake kits are designed specifically for 5-lug setups. If you plan on upgrading your brakes in the future, a 5-lug conversion may be a necessary prerequisite.
Choosing the Right Conversion Kit
Several options exist for performing a 5-lug conversion on an S13. The most common methods involve utilizing parts from other Nissan models. Here's a breakdown:
- S14 Hubs and Spindles: This is a popular and relatively straightforward option. It involves swapping the entire front and rear hubs and spindles from an S14 (1995-1998 240SX) onto your S13. The S14 natively uses a 5x114.3 bolt pattern.
- Z32 (300ZX) Hubs and Spindles: Another option is to use Z32 hubs and spindles. While this option works, it may require some modification and careful consideration of offsets, as the Z32 has a different track width.
- Aftermarket Conversion Kits: Several aftermarket companies offer dedicated 5-lug conversion kits. These kits may include hubs, spindles, bearings, and sometimes even brake rotors. They can be more expensive, but they often offer superior performance and durability.
Important Considerations:
- ABS Compatibility: If your S13 is equipped with ABS, ensure the conversion method you choose retains ABS functionality. This usually involves ensuring the new hubs have ABS rings and that the ABS sensors are compatible.
- Hub Offset: Be mindful of the hub offset. Different hubs can alter your track width, which can affect wheel fitment. Research and plan accordingly.
- Brake Compatibility: Consider your existing brake setup. If you have aftermarket brakes, ensure they are compatible with the new hubs and spindles. You may need to upgrade your brakes alongside the 5-lug conversion.
- Quality of Parts: When sourcing used parts, prioritize quality. Inspect the hubs and spindles for any signs of damage, wear, or corrosion. Replace bearings and seals as necessary.
For the purpose of this guide, we'll focus on the S14 hub and spindle swap, as it's the most common and generally the easiest to execute.
Tools and Materials Required
Before starting the conversion, gather the following tools and materials:
- S14 Front Hubs and Spindles (Left and Right)
- S14 Rear Hubs and Spindles (Left and Right)
- New Wheel Bearings and Seals (Highly Recommended)
- New Ball Joints (Recommended)
- New Tie Rod Ends (Recommended)
- Brake Cleaner
- Penetrating Oil (PB Blaster or similar)
- Jack and Jack Stands
- Wheel Chocks
- Socket Set (Metric)
- Wrench Set (Metric)
- Torque Wrench
- Hammer
- Ball Joint Separator (Pickle Fork or Ball Joint Press)
- Hub Puller (Optional but Highly Recommended)
- Bearing Press (For Installing New Bearings)
- Grease Gun
- Brake Line Wrench (Flare Nut Wrench)
- New Brake Fluid
- Gloves
- Eye Protection
- Shop Towels
- Anti-Seize Compound
- Threadlocker (Loctite)
Step-by-Step Guide: S14 Hub and Spindle Swap
Safety First! Ensure the vehicle is parked on a level surface, the parking brake is engaged, and the wheels are chocked before lifting the vehicle. Always use jack stands to support the vehicle – never work under a vehicle supported only by a jack.
Front Hub and Spindle Swap
- Loosen Lug Nuts: Before lifting the vehicle, loosen the lug nuts on the front wheels.
- Lift and Support the Vehicle: Jack up the front of the vehicle and securely place it on jack stands.
- Remove Wheels: Remove the front wheels completely.
- Disconnect Brake Caliper: Carefully disconnect the brake caliper from the spindle. Use a brake line wrench to disconnect the brake line. Be prepared for brake fluid to leak. Plug the brake line to prevent excessive fluid loss. Secure the caliper out of the way to prevent damage to the brake line.
- Disconnect ABS Sensor (If Applicable): Disconnect the ABS sensor from the spindle.
- Disconnect Tie Rod End: Use a ball joint separator to disconnect the tie rod end from the spindle.
- Disconnect Ball Joint: Use a ball joint separator to disconnect the lower ball joint from the spindle.
- Remove the Spindle: Carefully remove the spindle from the vehicle. It may be necessary to use penetrating oil and a hammer to loosen any stubborn bolts or joints.
- Prepare the S14 Spindle: If you're replacing the wheel bearings, now is the time to do so. Use a bearing press to remove the old bearings and install the new ones. Also, inspect and replace the ball joint and tie rod end if necessary.
- Install the S14 Spindle: Install the S14 spindle onto the vehicle, connecting the ball joint and tie rod end. Torque the bolts to the manufacturer's specifications. Use threadlocker (Loctite) on these bolts.
- Connect ABS Sensor (If Applicable): Connect the ABS sensor to the S14 spindle.
- Connect Brake Caliper: Connect the brake caliper to the S14 spindle. Reconnect the brake line and torque to the manufacturer's specifications.
- Bleed the Brakes: Bleed the brake system to remove any air bubbles.
- Install Wheels: Install the front wheels and torque the lug nuts to the manufacturer's specifications.
Rear Hub and Spindle Swap
The rear hub and spindle swap is slightly more involved due to the presence of the rear suspension components.
- Loosen Lug Nuts: Before lifting the vehicle, loosen the lug nuts on the rear wheels.
- Lift and Support the Vehicle: Jack up the rear of the vehicle and securely place it on jack stands.
- Remove Wheels: Remove the rear wheels completely.
- Disconnect Brake Caliper: Carefully disconnect the brake caliper from the spindle. Use a brake line wrench to disconnect the brake line. Be prepared for brake fluid to leak. Plug the brake line to prevent excessive fluid loss. Secure the caliper out of the way to prevent damage to the brake line.
- Disconnect ABS Sensor (If Applicable): Disconnect the ABS sensor from the spindle.
- Disconnect E-Brake Cable: Disconnect the e-brake cable from the caliper.
- Disconnect Lower Control Arm: Disconnect the lower control arm from the spindle.
- Disconnect Upper Control Arm: Disconnect the upper control arm from the spindle.
- Disconnect Trailing Arm: Disconnect the trailing arm from the spindle.
- Remove the Spindle: Carefully remove the spindle from the vehicle. It may be necessary to use penetrating oil and a hammer to loosen any stubborn bolts or joints.
- Prepare the S14 Spindle: If you're replacing the wheel bearings, now is the time to do so. Use a bearing press to remove the old bearings and install the new ones.
- Install the S14 Spindle: Install the S14 spindle onto the vehicle, connecting the trailing arm, upper control arm, and lower control arm. Torque the bolts to the manufacturer's specifications. Use threadlocker (Loctite) on these bolts.
- Connect ABS Sensor (If Applicable): Connect the ABS sensor to the S14 spindle.
- Connect E-Brake Cable: Connect the e-brake cable to the caliper.
- Connect Brake Caliper: Connect the brake caliper to the S14 spindle. Reconnect the brake line and torque to the manufacturer's specifications.
- Bleed the Brakes: Bleed the brake system to remove any air bubbles.
- Install Wheels: Install the rear wheels and torque the lug nuts to the manufacturer's specifications.
Final Steps and Considerations
- Double-Check All Connections: Before driving the vehicle, carefully double-check all connections, including brake lines, suspension components, and ABS sensors.
- Torque Specifications: Ensure all bolts are torqued to the manufacturer's specifications. Refer to a service manual for the correct torque values.
- Wheel Alignment: After completing the conversion, it's essential to get a professional wheel alignment. The new hubs and spindles can alter your vehicle's alignment settings.
- Brake Bleeding: Bleeding the brakes is crucial to ensure proper brake function. A spongy brake pedal indicates the presence of air in the system.
- Test Drive: Perform a test drive in a safe area to ensure everything is working correctly. Listen for any unusual noises or vibrations.
Conclusion
A 5-lug conversion is a significant upgrade for any S13 owner looking to improve their vehicle's performance and aesthetics. While the process can be time-consuming and requires a certain level of mechanical skill, the results are well worth the effort. By following these steps and taking the necessary precautions, you can successfully perform a 5-lug conversion on your S13 and enjoy the benefits of a wider wheel selection and potentially improved performance. Remember to always prioritize safety and consult a professional mechanic if you are unsure about any aspect of the conversion.