Nissan 240sx S14 Kouki Front End Conversion Technical Guide
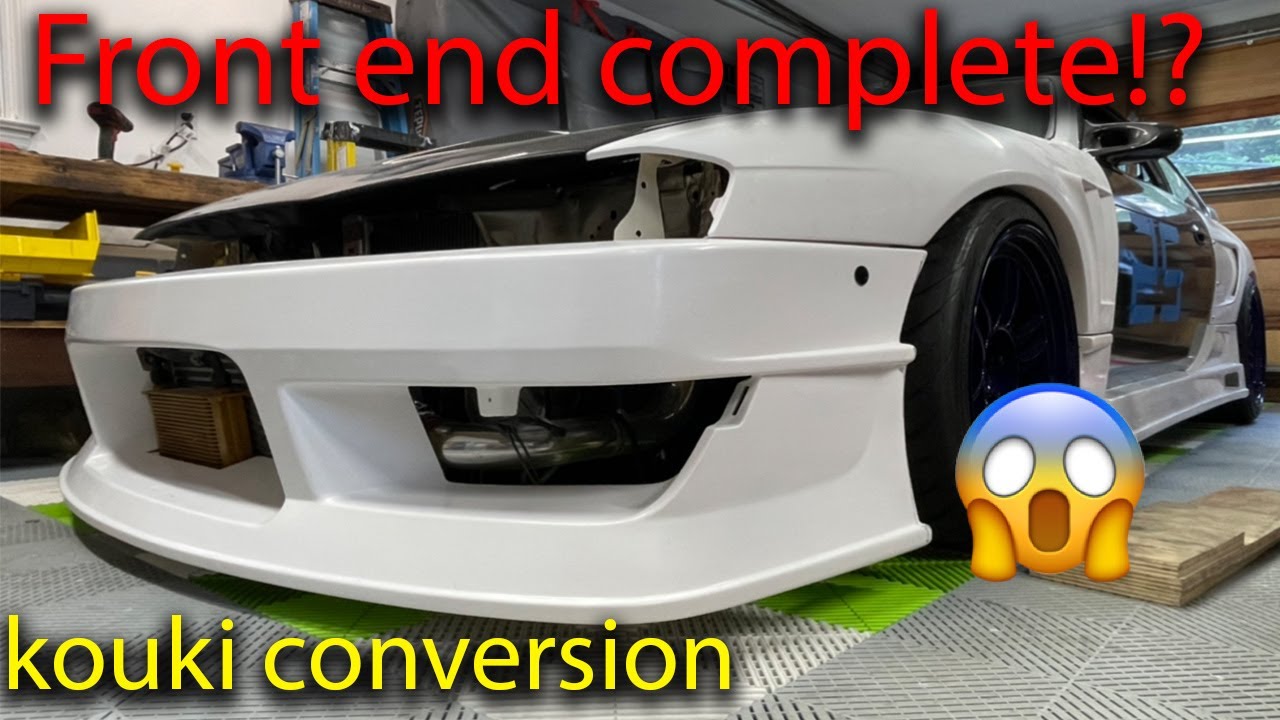
The Nissan 240SX, particularly the S14 chassis, enjoys legendary status among import car enthusiasts. Its rear-wheel-drive layout, independent suspension, and robust SR20DET engine (in JDM configurations) have made it a popular platform for drifting, track racing, and spirited street driving. One of the most sought-after modifications for the S14 is the "Kouki" front end conversion. This refers to swapping the earlier Zenki (1995-1996) front fascia for the later Kouki (1997-1998) design. While seemingly cosmetic, the conversion involves more than just bolting on new parts. This technical guide will delve into the intricacies of this conversion, examining the parts involved, the challenges encountered, and the engineering considerations to ensure a successful and aesthetically pleasing result.
Understanding the Kouki vs. Zenki Difference
Before diving into the conversion process, it's crucial to understand the key differences between the Zenki and Kouki front ends. These differences extend beyond mere aesthetics:
- Headlights: This is the most obvious difference. The Zenki features a single-piece headlight design with a more rounded appearance. The Kouki boasts projector-style headlights separated into two distinct sections, offering a more aggressive and modern look.
- Grille: The Zenki grille is a single, horizontal piece. The Kouki grille is divided into two smaller sections, positioned above and below the bumper opening.
- Bumper: The Kouki bumper is generally considered more aggressive, with sharper lines and larger air intakes. The mounting points are also slightly different.
- Hood: While the overall shape is similar, the Kouki hood has subtle differences in its contours to match the updated headlights and grille.
- Fender Liners: The fender liners for the Zenki and Kouki models are designed to accommodate the specific bumper and headlight configurations.
While swapping individual parts might seem possible at first glance, the subtle differences in mounting points and contours mean that a complete conversion is generally required for a proper fit and finish.
Parts List for the Kouki Front End Conversion
A comprehensive list of parts is essential for a smooth and successful conversion. Missing or incorrect components can lead to delays, frustration, and potentially, a poorly executed final product. Here’s a breakdown of the necessary parts:
- Kouki Headlights (Left & Right): Source genuine Nissan headlights or high-quality aftermarket replicas. Ensure they are properly aimed and wired.
- Kouki Grille (Upper & Lower): Again, genuine or high-quality replicas are recommended for optimal fitment.
- Kouki Bumper Cover: Consider purchasing a new or used bumper in good condition. Inspect for any damage or repairs.
- Kouki Hood: A Kouki-specific hood is required for the headlights to sit correctly.
- Kouki Corner Lights (Left & Right): These lights fit flush with the Kouki bumper and provide additional visibility.
- Kouki Fender Liners (Left & Right): These are designed to fit the Kouki bumper and provide protection for the engine bay.
- Bumper Reinforcement Bar: While technically, the Zenki bar will work, the Kouki bar is slightly different, potentially leading to minor fitment issues with the bumper cover. Replacing it is highly recommended.
- Headlight Brackets and Hardware: These are essential for properly mounting the Kouki headlights. Ensure you have all the necessary screws, bolts, and clips.
- Wiring Harness Adapters (Optional): Depending on the headlights you purchase, you may need adapters to connect the Kouki headlights to the Zenki wiring harness.
Important Note: Sourcing a complete front end "clip" (the entire front end of a donor car cut off at the firewall) can be a cost-effective way to acquire all the necessary parts at once. However, ensure the clip is in good condition and that all parts are present and undamaged.
The Conversion Process: A Step-by-Step Guide
The Kouki front end conversion is a moderately complex project requiring basic mechanical skills and tools. Allow ample time for the project, as unexpected challenges can arise.
Step 1: Removal of the Zenki Front End
This involves carefully removing all the existing Zenki components:
- Disconnect the battery.
- Remove the Zenki headlights, grille, bumper, corner lights, and hood. Refer to the service manual for specific instructions and bolt locations.
- Carefully disconnect all wiring harnesses connected to the headlights, corner lights, and fog lights (if equipped). Label each connector to avoid confusion during reassembly.
- Remove the Zenki fender liners.
- Remove the Zenki bumper reinforcement bar.
Step 2: Test Fitting the Kouki Components
Before committing to permanent installation, it’s crucial to test fit all the Kouki components. This allows you to identify any potential fitment issues and make necessary adjustments before painting or final assembly.
- Install the Kouki bumper reinforcement bar.
- Install the Kouki headlights, ensuring they sit correctly in the headlight brackets.
- Install the Kouki hood and check for proper alignment with the headlights and fenders. Adjust the hood latch and hinges as needed.
- Install the Kouki bumper cover and check for gaps or misalignments. Pay close attention to the fitment around the headlights, fenders, and grille.
- Install the Kouki grille and corner lights.
- Install the Kouki fender liners.
Addressing Fitment Issues: If you encounter fitment problems, several factors could be at play:
- Damage: Check for any damage to the bumper, hood, or fenders. Even minor damage can affect fitment.
- Aftermarket Parts: Aftermarket replicas may not always have the same precision as genuine Nissan parts. Be prepared to make minor adjustments or modifications.
- Accident History: If the car has been involved in an accident, the chassis may be slightly bent, affecting the fitment of the front end components.
Minor adjustments can often be made by loosening the mounting bolts and shifting the components slightly. In some cases, you may need to use shims or spacers to achieve a perfect fit. For more significant fitment issues, consulting a professional body shop is recommended.
Step 3: Wiring and Electrical Connections
Connecting the Kouki headlights to the Zenki wiring harness can be one of the more challenging aspects of the conversion. The wiring configurations are different, and you may need to use wiring harness adapters or perform some custom wiring.
- Identify the wiring diagrams for both the Zenki and Kouki headlights. These diagrams are essential for understanding the wiring configurations.
- If using wiring harness adapters, simply plug them into the Zenki wiring harness and the Kouki headlights.
- If performing custom wiring, carefully splice the wires according to the wiring diagrams. Use high-quality connectors and ensure all connections are properly insulated.
Important Considerations:
- Ensure the headlights are properly grounded. A poor ground connection can cause dim headlights or electrical problems.
- Use a multimeter to test all wiring connections before connecting the battery. This will help prevent short circuits and damage to the electrical system.
- Consider upgrading the headlight wiring harness for improved performance and reliability. The factory wiring harness can be marginal, especially with aftermarket headlights.
Step 4: Painting and Finishing
Once you are satisfied with the fitment and wiring, it's time to paint the Kouki components. If using used parts, ensure they are properly prepped and primed before painting.
- Clean and sand all the Kouki components to remove any dirt, grease, or imperfections.
- Apply a primer coat to the components.
- Paint the components with the desired color. Use a high-quality automotive paint and follow the manufacturer's instructions.
- Apply a clear coat to protect the paint and enhance the gloss.
- Allow the paint to dry completely before handling the components.
Step 5: Final Assembly
With the Kouki components painted and the wiring completed, you can now proceed with the final assembly.
- Install the Kouki headlights, grille, bumper, corner lights, hood, and fender liners.
- Connect all wiring harnesses.
- Adjust the headlight alignment to ensure proper visibility.
- Double-check all bolts and connections to ensure they are secure.
Conclusion
The Kouki front end conversion is a popular and rewarding modification for the Nissan 240SX S14. While it requires some mechanical skills and attention to detail, the transformation in appearance is significant. By following this technical guide, you can ensure a successful and aesthetically pleasing conversion, enhancing the look and value of your 240SX. Remember to prioritize safety, take your time, and don't hesitate to seek professional help if needed. The result will be a timeless and iconic Japanese sports car that commands attention and admiration.