Nissan 240sx Silvia Conversion Kit
So, you're thinking about a Nissan 240SX Silvia conversion. It's a popular modification, and for good reason – you get the iconic, JDM-inspired look of the Silvia S13 while keeping the relatively affordable and readily available 240SX chassis. This isn't a weekend afternoon job, mind you. It requires patience, some fabrication skills, and a good understanding of automotive mechanics. But with careful planning and execution, you can achieve a truly unique and head-turning result.
Understanding the Conversion: What's Involved?
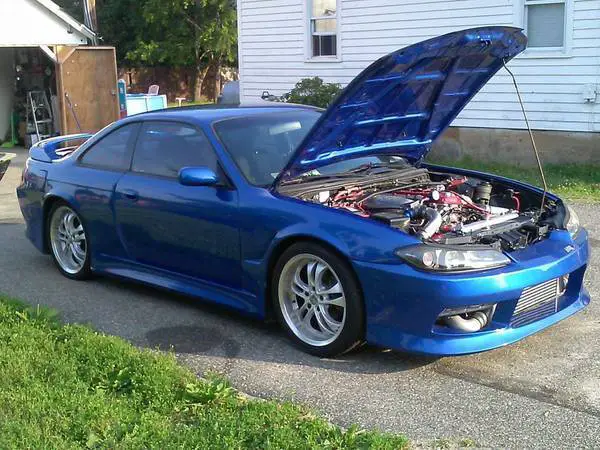
At its core, a Silvia conversion involves swapping the front-end body panels of a 240SX with those from a Japanese-market Silvia S13. This primarily includes the hood, fenders, headlights, turn signals, and front bumper. However, it's rarely a simple bolt-on affair. There are variations in the chassis and subtle differences that necessitate modifications.
The Key Components:
- Hood: A direct replacement, generally. However, ensure you source a genuine Silvia hood or a high-quality replica. Poorly made replicas can suffer from fitment issues and potential damage.
- Fenders: These are the most noticeable difference. Silvia fenders are wider and have a distinct shape compared to the 240SX.
- Headlights: The iconic Silvia headlights are a critical part of the conversion. You'll need the headlights themselves, as well as the corresponding brackets and wiring. There are several types of Silvia headlights, including projector and brick headlights. Choose the style you prefer.
- Turn Signals/Corner Lights: These mount in the front bumper. Make sure they match the headlight style you choose.
- Front Bumper: The bumper completes the front-end transformation. Similar to the hood, prioritize genuine or high-quality replicas. Aftermarket bumpers made from FRP (Fiber Reinforced Plastic) require proper preparation before painting, including sanding, filling, and priming.
- Headlight Brackets and Mounting Hardware: Often overlooked, these are crucial for proper headlight alignment and fitment. Don't skimp on quality here.
- Wiring Harness Adapters: Converting from the 240SX's pop-up headlights to the Silvia's fixed headlights requires adapting the wiring harness. Pre-made adapter harnesses are available and highly recommended to avoid cutting and splicing wires unnecessarily.
- Radiator Support Modification (Possibly): Depending on the specific 240SX year and the Silvia front end being used, minor modifications to the radiator support may be necessary to provide proper clearance for the headlights.
Preparation and Planning: Due Diligence is Key
Before you even order parts, do your homework. Research different Silvia front-end styles and choose the one you like best. Consider your budget and the overall condition of your 240SX. A rusty or damaged chassis will require additional work and expense.
Inventory and Inspection: Once you've received your parts, thoroughly inspect them for any damage incurred during shipping. Ensure you have all the necessary components before starting the installation process.
Trial Fitment: Perform a trial fitment of all the parts before committing to any permanent modifications. This will help you identify any potential fitment issues or areas that require adjustment. This step is absolutely crucial!
The Installation Process: A Step-by-Step Guide (General Outline)
This is a general outline, and the specific steps may vary depending on the parts you use and the condition of your car. Always consult a detailed repair manual for your 240SX and the Silvia S13 for specific torque specifications and safety procedures.
- Disassembly: Remove the 240SX front bumper, headlights, turn signals, hood, and fenders. Carefully disconnect any wiring and hoses attached to these components.
- Radiator Support Modification (If Necessary): If required, carefully modify the radiator support to provide clearance for the Silvia headlights. This typically involves cutting and welding. Measure twice, cut once! Ensure you protect surrounding components from welding sparks.
- Headlight Bracket Installation: Install the Silvia headlight brackets onto the chassis. This may involve drilling new holes or modifying existing ones. Accuracy is important here to ensure proper headlight alignment.
- Fender Installation: Mount the Silvia fenders. Pay close attention to the alignment with the doors and hood. You may need to adjust the fender mounting points to achieve a proper fit.
- Hood Installation: Install the Silvia hood and adjust the hinges for proper alignment with the fenders.
- Headlight and Turn Signal Installation: Connect the wiring harness adapters and install the headlights and turn signals. Test the lights to ensure they function correctly.
- Bumper Installation: Install the Silvia front bumper. You may need to modify the bumper mounting brackets to achieve a proper fit.
- Final Adjustments and Alignment: Make any necessary adjustments to ensure proper panel gaps and alignment. This may involve shimming or grinding certain areas.
Wiring Considerations: Harness Adapters are Your Friend
The 240SX's pop-up headlight wiring is significantly different from the Silvia's fixed headlight setup. Using a pre-made wiring harness adapter is highly recommended. These adapters plug directly into the existing 240SX wiring harness and provide the correct connectors for the Silvia headlights. This eliminates the need for cutting and splicing wires, which can be prone to errors and electrical problems.
If you choose to wire the headlights manually, be sure to consult a wiring diagram for both the 240SX and the Silvia. Identify the correct wires for power, ground, high beams, and low beams, and connect them accordingly. Use proper crimping tools and connectors to ensure secure and reliable connections. Don't forget to use heat shrink tubing to protect the connections from moisture and corrosion. Always disconnect the battery before working on the electrical system.
Challenges and Considerations: Be Prepared
This conversion isn't always straightforward. Here are some potential challenges:
- Fitment Issues: Replica parts may not fit perfectly, requiring additional modification. Genuine parts are preferred but can be more expensive and harder to find.
- Wiring Complications: Even with adapter harnesses, wiring issues can arise. Double-check your connections and consult wiring diagrams if necessary.
- Paint Matching: Matching the paint color of the Silvia front end to your 240SX's existing paint can be challenging. Consider blending the paint for a seamless look.
- Rust and Corrosion: If your 240SX has rust or corrosion, address it before starting the conversion. Otherwise, the new front end may not fit properly, and the rust will continue to spread.
- Bumper Support: Depending on the aftermarket bumper, you may need to fabricate or modify the bumper support to properly secure the bumper.
Tools and Materials: Essential Items for the Job
Having the right tools and materials will make the conversion process much smoother. Here's a list of essentials:
- Socket set
- Wrench set
- Screwdrivers (Phillips and flathead)
- Pliers
- Wire cutters and strippers
- Crimping tool
- Multimeter
- Drill with various drill bits
- Grinder (for minor modifications)
- Welder (if radiator support modification is needed)
- Sandpaper
- Body filler
- Primer
- Paint (matching the color of your 240SX)
- Clear coat
- Masking tape
- Safety glasses
- Gloves
- Jack and jack stands
- Torque wrench
Finishing Touches: Making it Your Own
Once the conversion is complete, take the time to refine the details. This may include adjusting the panel gaps, polishing the paint, and adding custom touches such as a front lip spoiler or aftermarket grille. A professional alignment is highly recommended after completing the conversion. This will ensure proper handling and tire wear.
A Silvia conversion is a significant undertaking, but the end result can be a truly rewarding and unique car. By carefully planning, preparing, and executing the conversion, you can transform your 240SX into a head-turning Silvia tribute. Remember to prioritize safety, take your time, and don't be afraid to ask for help from experienced mechanics or fellow car enthusiasts. Good luck, and happy modding!