Nissan Altima Brake Caliper Torque Specs
Alright folks, let's talk brake calipers on your Nissan Altima. Specifically, we're going to drill down into the all-important topic of torque specifications. Getting these numbers right isn't just about avoiding a loose bolt – it's about your safety, the longevity of your brake system, and ensuring proper braking performance. Ignoring these specs can lead to warped rotors, damaged calipers, and, in a worst-case scenario, brake failure. This guide assumes you're an experienced DIYer comfortable working on brakes, but we'll cover the details thoroughly to ensure accuracy.
Why Torque Specs Matter for Brake Calipers
Before we dive into the specific numbers, let's quickly review why torque is so critical in this application. Torque, in the context of fasteners, is the rotational force applied when tightening a bolt or nut. It's measured in pound-feet (lb-ft) or Newton-meters (Nm). Applying the correct torque provides the clamping force needed to hold the caliper securely against the brake rotor.
Here's what happens if you don't:
- Undertightening: A bolt that's too loose can vibrate free, leading to caliper movement, uneven brake pad wear, potential rotor damage, and ultimately, a loss of braking power. It can also cause rattling and noise from your brakes.
- Overtightening: This is just as bad, if not worse. Overtightening can stretch or even snap the bolt. It can also damage the threads in the caliper bracket or caliper itself. You risk distorting the caliper body, which could lead to piston binding and uneven pad wear. Worst case, you could cause catastrophic failure of the brake components.
So, you can see that precision is key. We're not just guessing here; we're following engineering specifications designed to ensure a safe and reliable brake system.
Locating the Correct Torque Specs
This is the crucial part. You can't just guess at these numbers. Here's where to find the correct information for your specific Altima:
- Factory Service Manual (FSM): The gold standard. If you're serious about DIY car repair, investing in a FSM for your specific year and model Altima is highly recommended. It contains detailed diagrams, procedures, and, most importantly, precise torque specifications for every fastener on the vehicle. You can often find these online as PDFs (sometimes for a fee).
- Haynes or Chilton Manuals: These are good alternatives to the FSM. They offer a good balance of detail and affordability. Make sure to get the manual that covers your specific Altima's year range.
- Online Databases (Proceed with Caution): There are various online databases that claim to provide torque specs. While some are reliable, others are not. Always cross-reference any online information with another reliable source, such as your FSM or a Haynes/Chilton manual. Be especially wary of generic torque charts that don't account for specific applications.
Important: Never rely solely on your memory or advice from a friend. Always verify the torque specs using a trusted source. Brake safety depends on it.
Common Altima Brake Caliper Torque Specs (General Guide - Verify for Your Year/Model)
While I can't provide *exact* torque specs for every Altima year and model without knowing your specific vehicle details, here's a general overview of the typical fasteners you'll encounter and the approximate torque ranges you can expect. Remember, these are for informational purposes only and must be verified for your specific vehicle!
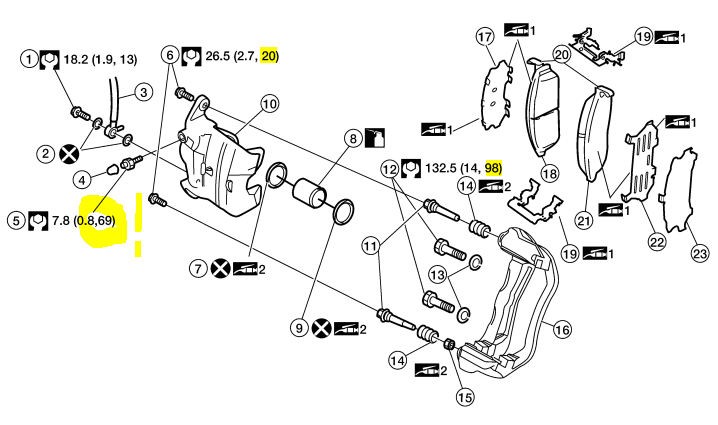
- Caliper Mounting Bolts (attaching the caliper bracket to the spindle/knuckle): This is usually the highest torque value. Expect something in the range of 60-85 lb-ft (81-115 Nm). This is a critical connection, so accuracy is paramount. These bolts are usually larger in diameter (e.g., 14mm or 17mm).
- Caliper Guide Pins/Slider Bolts (attaching the caliper body to the caliper bracket): These are usually smaller bolts that allow the caliper to slide freely. The torque values are much lower, typically in the range of 20-35 lb-ft (27-47 Nm). These bolts often have a rubber bushing or sleeve around them, so be careful not to overtighten and crush the bushing.
- Brake Hose Banjo Bolt (attaching the brake hose to the caliper): This bolt requires a copper crush washer on either side of the banjo fitting to create a seal. The torque is typically in the range of 15-25 lb-ft (20-34 Nm). Overtightening can damage the caliper threads or crush the banjo fitting. Always use new copper crush washers when replacing the brake hose.
- Bleeder Screw (for bleeding the brakes): While not technically a mounting fastener, it's important not to overtighten the bleeder screw, as it can easily strip the threads in the caliper. Snug it down firmly, but don't crank on it. A torque value of around 7-10 lb-ft (9-14 Nm) is usually sufficient.
Again, these are general ranges. Find the exact values for your vehicle before proceeding!
Tools and Materials You'll Need
To properly torque your brake calipers, you'll need the following tools and materials:
- Torque Wrench: A high-quality torque wrench is essential. Invest in a good one that is properly calibrated. There are two main types: click-type and beam-type. Click-type wrenches are more common and easier to use, but beam-type wrenches are generally considered more accurate (though they require more skill to use). Make sure your torque wrench covers the torque ranges you need for your Altima's brake calipers.
- Socket Set: You'll need a socket set with the correct sizes for the caliper bolts. A set that includes both standard (SAE) and metric sizes is recommended.
- Wrench Set: For the banjo bolt and bleeder screw, you'll likely need a wrench set.
- Brake Cleaner: Use brake cleaner to clean the caliper mounting surfaces and bolts before installation. This helps to ensure accurate torque readings.
- Anti-Seize Lubricant (Optional): Applying a small amount of anti-seize lubricant to the bolt threads can help prevent corrosion and make it easier to remove the bolts in the future. However, be extremely careful when using anti-seize. It can affect the torque reading, so if you choose to use it, reduce the specified torque value slightly (around 10-15%). Consult a reliable source for specific torque reduction recommendations. Some manufacturers explicitly recommend against using anti-seize on brake fasteners.
- New Copper Crush Washers (for the Banjo Bolt): Always replace these when working with the brake hose.
- Gloves and Eye Protection: Brake fluid is corrosive, so wear gloves and eye protection.
- Jack and Jack Stands: Essential for safely lifting and supporting the vehicle.
- Wheel Chocks: For added safety, use wheel chocks to prevent the vehicle from rolling.
Step-by-Step Torqueing Procedure
Here's the general procedure for torqueing your Altima's brake caliper bolts. Always refer to your FSM or Haynes/Chilton manual for specific instructions and diagrams.
- Prepare the Vehicle: Safely lift and support the vehicle using jack stands. Remove the wheel.
- Clean the Mounting Surfaces and Bolts: Use brake cleaner to thoroughly clean the caliper mounting surfaces on the spindle/knuckle and the threads of the bolts.
- Install the Caliper Bracket: Position the caliper bracket onto the spindle/knuckle. Install the mounting bolts finger-tight.
- Torque the Caliper Bracket Bolts: Using your torque wrench, tighten the caliper bracket bolts to the specified torque value in your FSM or Haynes/Chilton manual. Tighten the bolts in a star pattern (criss-cross) to ensure even clamping force. This helps prevent distortion of the bracket.
- Install the Caliper Body: Slide the caliper body onto the caliper bracket, aligning the guide pins with the corresponding holes.
- Torque the Caliper Guide Pins/Slider Bolts: Install the guide pins/slider bolts and tighten them to the specified torque value. Be careful not to overtighten, especially if the bolts have rubber bushings.
- Install the Brake Hose (if removed): Attach the brake hose to the caliper using the banjo bolt and new copper crush washers. Tighten the banjo bolt to the specified torque value.
- Bleed the Brakes: After reconnecting the brake hose, you'll need to bleed the brakes to remove any air from the system.
- Reinstall the Wheel: Reinstall the wheel and tighten the lug nuts to the specified torque value.
- Lower the Vehicle: Carefully lower the vehicle to the ground.
- Test the Brakes: Pump the brake pedal several times to ensure the brakes are working properly. Take the vehicle for a short test drive in a safe area to verify brake function.
Final Thoughts
Working on your brakes can be a rewarding experience, but it's crucial to prioritize safety and accuracy. Double-check all torque specifications, use the right tools, and follow the proper procedures. If you're ever unsure about something, consult a qualified mechanic. Your safety, and the safety of others, depends on it.