Nissan Frontier Fuel Pump Replacement
So, your Nissan Frontier's been acting up, huh? Stuttering, struggling to start, maybe even cutting out entirely? Sounds like a fuel pump issue. Don't panic. Replacing the fuel pump on a Frontier (especially the 2nd generation, 2005-present) is a manageable job for the experienced DIYer. This guide will walk you through the process, covering the important details and potential pitfalls. Remember, safety first! Disconnect the battery and work in a well-ventilated area.
Understanding the Frontier Fuel System
Before we dive in, let's briefly review how the Frontier's fuel system works. The fuel pump, located inside the fuel tank, is responsible for drawing fuel from the tank and delivering it to the engine at the correct pressure. This fuel flows through the fuel filter, which removes contaminants, and then to the fuel injectors. The injectors spray a precisely measured amount of fuel into the cylinders, where it mixes with air and ignites to power the engine. A failing fuel pump disrupts this entire process.
Common symptoms of a failing fuel pump include:
- Difficulty starting, especially when the engine is cold.
- Stalling, particularly under load (e.g., accelerating uphill).
- Hesitation or stumbling during acceleration.
- Reduced fuel economy.
- A noticeable whining sound from the fuel tank (often heard when the pump is struggling).
- Inability to maintain engine speed.
- Complete engine shut-down.
While these symptoms *can* point to other issues (like a clogged fuel filter or faulty fuel injectors), a failing fuel pump is a prime suspect, especially if the symptoms are worsening.
Tools and Materials You'll Need
Gathering your tools and parts beforehand will make the job much smoother. Here's a list of what you'll need:
- New Fuel Pump Module: Get the correct part number for your specific year and engine (2.5L I4 or 4.0L V6). A complete module is usually recommended, as it includes the pump, fuel level sender, and often a new fuel filter/sock.
- Fuel Tank Strap Wrench (optional but highly recommended): These wrenches make removing the fuel tank straps much easier and safer.
- Floor Jack and Jack Stands: To safely lift and support the vehicle.
- Wheel Chocks: To prevent the vehicle from rolling.
- Safety Glasses and Gloves: Always protect your eyes and hands.
- Screwdrivers (Phillips and Flathead): For removing various components.
- Socket Set and Wrenches: Metric sizes.
- Pliers: For hose clamps and connectors.
- Hammer (and maybe a soft mallet): Sometimes needed to loosen stubborn parts.
- Penetrating Oil (e.g., PB Blaster): To help loosen rusted bolts.
- Fuel Line Disconnect Tool: Often a set of plastic tools for releasing fuel line connections. Some Frontiers have quick-disconnect fittings.
- Drain Pan: To catch any spilled fuel.
- Shop Rags: For cleaning up spills and wiping down components.
- Flashlight or Work Light: To illuminate the work area.
- Multimeter (optional): To test the fuel pump relay and power supply.
Step-by-Step Fuel Pump Replacement Guide
Now, let's get to the meat of the job. Follow these steps carefully:
- Safety Precautions: Disconnect the negative battery cable. Block the rear wheels with wheel chocks. Ensure you are working in a well-ventilated area, away from any open flames or sources of ignition. Fuel vapors are highly flammable.
- Accessing the Fuel Tank:
- The fuel tank is located underneath the truck, near the rear axle. You'll need to raise the vehicle to gain access.
- Use a floor jack to lift the rear of the vehicle and securely support it with jack stands placed under the frame rails. Never work under a vehicle supported only by a jack.
- Draining the Fuel Tank (Important!):
Never attempt to remove the fuel pump with a full tank! It's dangerous and messy. You'll need to siphon or drain the fuel.
- Method 1 (Siphoning): Insert a siphon hose into the fuel filler neck and carefully siphon the fuel into approved fuel containers. Be extremely cautious and avoid inhaling fuel vapors.
- Method 2 (Fuel Pump Connector): Disconnect the fuel pump electrical connector located near the fuel tank. Locate the fuel pump relay (consult your owner's manual or a wiring diagram). Disconnect the relay. Connect jumper wires to the fuel pump side of the relay connector to energize the pump and pump the fuel into a container through the fuel line. This can be slow. Monitor the pump and don't run it dry.
Regardless of the method, drain as much fuel as possible. A small amount will inevitably remain in the tank.
- Disconnecting Fuel Lines and Electrical Connectors:
- Locate the fuel lines and electrical connectors connected to the fuel pump module on top of the fuel tank.
- Use the fuel line disconnect tool to carefully disconnect the fuel lines. There may be a small amount of residual pressure in the lines, so be prepared for a small fuel spill. Place a rag underneath to catch any drips.
- Disconnect the electrical connector to the fuel pump module.
- Removing the Fuel Tank Straps:
- Support the fuel tank with a floor jack. This will prevent the tank from dropping suddenly when you release the straps.
- Use the fuel tank strap wrench (or a socket and wrench) to loosen and remove the fuel tank straps. Be extremely careful as the tank is heavy, even when mostly empty.
- Slowly lower the jack to carefully lower the fuel tank to the ground.
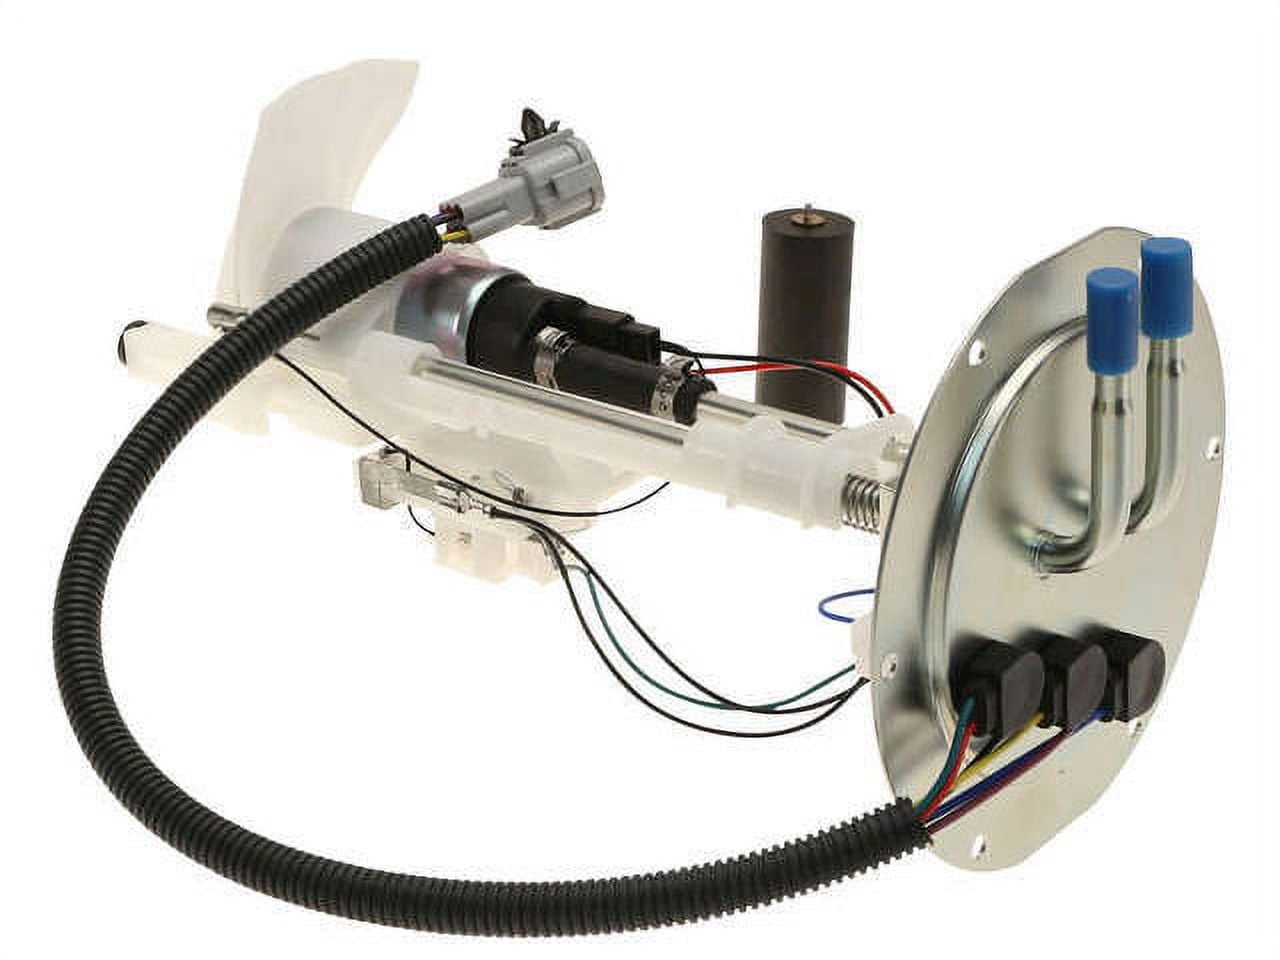
- Accessing and Removing the Fuel Pump Module:
- Once the tank is on the ground, you'll see the fuel pump module on top. It's usually held in place by a retaining ring.
- Clean any dirt and debris from around the retaining ring.
- Using a hammer and a brass punch (or a specialized fuel pump retaining ring tool), carefully tap the retaining ring counterclockwise to loosen it. You may need to apply some penetrating oil to loosen stubborn rings.
- Once the retaining ring is loose, carefully remove it.
- Slowly and carefully lift the fuel pump module out of the tank. Be very careful not to bend the float arm for the fuel level sensor.
- Installing the New Fuel Pump Module:
- Compare the new fuel pump module to the old one to ensure they are identical.
- Inspect the fuel tank for any debris or sediment. Clean the inside of the tank with a clean rag if necessary.
- Carefully install the new fuel pump module into the tank, ensuring the float arm moves freely and doesn't get caught on anything.
- Install the retaining ring and tighten it securely.
- Reinstalling the Fuel Tank:
- Carefully lift the fuel tank back into position using the floor jack.
- Reinstall the fuel tank straps and tighten them securely.
- Reconnect the fuel lines and electrical connectors to the fuel pump module. Ensure the connections are secure.
- Lowering the Vehicle and Testing:
- Carefully lower the vehicle to the ground.
- Reconnect the negative battery cable.
- Turn the ignition key to the "ON" position (without starting the engine) to allow the fuel pump to prime the fuel system. You should hear a buzzing sound from the fuel tank for a few seconds.
- Check for any fuel leaks around the fuel lines and fuel pump module.
- Start the engine and let it idle for a few minutes. Listen for any unusual noises and ensure the engine runs smoothly.
- Take the vehicle for a short test drive to ensure the fuel pump is functioning correctly.
Important Considerations and Troubleshooting
- Fuel Filter: If your new fuel pump module doesn't include a new fuel filter/sock, consider replacing it separately. A clogged fuel filter can put extra strain on the fuel pump and shorten its lifespan.
- Fuel Pump Relay: A faulty fuel pump relay can prevent the fuel pump from working correctly. If you're still having problems after replacing the fuel pump, test the fuel pump relay with a multimeter.
- Wiring Issues: Inspect the fuel pump wiring for any damage or corrosion. Corroded or damaged wiring can cause voltage drops and prevent the fuel pump from receiving enough power.
- Fuel Pressure Regulator: The fuel pressure regulator maintains constant fuel pressure to the fuel injectors. If the regulator is faulty, it can cause fuel pressure problems that mimic a failing fuel pump.
- Aftermarket Fuel Pumps: While aftermarket fuel pumps can be cheaper, they may not be as reliable as OEM (Original Equipment Manufacturer) parts. Stick with a reputable brand.
- Proper Torque: When tightening the fuel tank straps, refer to the vehicle's service manual for the correct torque specifications. Overtightening can damage the straps or the fuel tank.
Replacing the fuel pump on your Nissan Frontier is a challenging but rewarding DIY project. By following these steps and taking your time, you can save money and gain valuable experience. Remember to prioritize safety and consult a professional mechanic if you're unsure about any part of the process. Good luck!