Nissan Frontier Trailer Lights Not Working
So, you're ready to tow with your Nissan Frontier, hook up the trailer, and… nothing. No brake lights, no turn signals, no running lights. A non-functional trailer lighting system isn't just an inconvenience; it's a serious safety hazard and, in many places, illegal. This guide delves into the potential causes of trailer light failure on your Frontier, providing a structured approach to diagnosing and resolving the problem. We’ll go beyond simply checking fuses and explore the electrical pathways, components, and troubleshooting techniques that will get your trailer lights shining bright again.
Understanding the Nissan Frontier Trailer Wiring System
Before diving into troubleshooting, it's crucial to understand the basics of your Frontier's trailer wiring system. Modern Frontiers typically use a 7-pin connector, also known as an RV blade connector. Each pin corresponds to a specific function, typically adhering to the Society of Automotive Engineers (SAE) standard J560. Here’s a breakdown:
- Pin 1 (White): Ground – Provides the return path for all circuits. A good, clean ground is paramount.
- Pin 2 (Blue): Electric Brakes – Supplies power to the trailer's electric brakes, controlled by the brake controller in the truck. *If you don’t have electric brakes, this wire may not be connected.*
- Pin 3 (Yellow): Left Turn/Brake – Activates the left turn signal and brake light on the trailer.
- Pin 4 (Green): Right Turn/Brake – Activates the right turn signal and brake light on the trailer.
- Pin 5 (Brown): Tail Lights – Activates the trailer's running or tail lights, illuminating the trailer at night.
- Pin 6 (Red): Auxiliary – This pin can be used for various purposes, such as powering interior lights or a backup camera on the trailer. *May be unused*.
- Pin 7 (Black): 12V Power – Provides a constant 12V power supply to the trailer, used for charging a trailer battery or powering other accessories.
Understanding this pinout is the first step in understanding where the fault could lie. It allows us to isolate potential problems based on which lights are failing.
Common Causes and Troubleshooting Steps
The reasons for trailer light failure can be numerous, ranging from simple issues like a blown fuse to more complex problems such as a faulty trailer wiring harness or a damaged vehicle wiring module. Here's a systematic approach to diagnosing the problem:
1. Start with the Obvious: Fuses
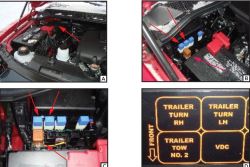
The first and easiest check is the fuses. Nissan typically provides dedicated fuses for the trailer lights. Refer to your Frontier's owner's manual or the fuse box diagram (usually located on the fuse box cover) to identify the fuses related to trailer lights, typically labeled "Trailer Tow" or similar.
How to check: Visually inspect each fuse. A blown fuse will have a broken filament inside. Even better, use a multimeter to test the fuses for continuity. Set the multimeter to the continuity setting (often indicated by a diode symbol or a buzzer). Touch the probes to both ends of the fuse. A good fuse will show continuity (a beep or a reading of 0 ohms), while a blown fuse will show no continuity (OL or 1). Replace any blown fuses with fuses of the exact same amperage. Using a higher amperage fuse can cause serious damage.
Important: If a fuse blows repeatedly, it indicates a short circuit somewhere in the system. Replacing the fuse without addressing the underlying short will only lead to further fuse failures.
2. Inspect the Trailer Connector
The trailer connector on both the truck and the trailer is a common point of failure. Corrosion, damaged pins, and loose wiring can all cause problems.
How to inspect: Visually examine the connector for any signs of corrosion, dirt, or damage. Use a wire brush or electrical contact cleaner to clean the pins. Check for any bent or broken pins. On the truck side, inspect the wiring going into the back of the connector to ensure the wires are securely attached. Give each wire a gentle tug. Do the same on the trailer side.
3. Test the Trailer Wiring Harness
The trailer wiring harness itself can be a source of problems. Wires can become damaged, frayed, or disconnected, leading to intermittent or complete light failure.
How to test: Use a trailer light tester. These testers plug into the truck's trailer connector and allow you to individually test each circuit (left turn, right turn, brake, tail lights, etc.). If the tester shows that some circuits are working while others are not, the problem likely lies in the truck's wiring or the trailer connector itself.
If you don't have a trailer light tester, you can use a multimeter to test the voltage at each pin on the truck's trailer connector. With the truck running and the appropriate lights activated (turn signal, brake pedal pressed, headlights on), you should see 12V at the corresponding pin.
Example: To test the left turn signal circuit, turn on the left turn signal and check for 12V at pin 3 (yellow wire). Repeat this process for each circuit.
4. Check the Trailer Ground
A poor ground connection is a frequent culprit behind trailer light problems. The ground wire provides the return path for all electrical circuits, and if it's loose, corroded, or disconnected, the lights won't work properly.
How to check: Locate the ground wire on both the truck and the trailer. On the truck, the ground wire is usually attached to the frame. On the trailer, it's often connected to the trailer tongue. Ensure the connections are clean, tight, and free of corrosion. Use a wire brush to clean the metal surfaces before reattaching the ground wire.
Testing for Ground Issues: Use a multimeter to check the continuity between the trailer's frame and the truck's frame. Set the multimeter to the continuity setting and connect one probe to the trailer's frame and the other probe to the truck's frame. You should see continuity (a beep or a reading of 0 ohms). If you don't see continuity, there's a problem with the ground connection.
5. Examine the Trailer Lights Themselves
Sometimes, the problem is simply a faulty bulb in one of the trailer lights. While less common with LED trailer lights (which have a much longer lifespan), it's still worth checking. Corrosion inside the light housing can also cause issues.
How to check: Inspect each bulb to ensure it's not burned out. Check the bulb socket for corrosion. Clean the socket with electrical contact cleaner if necessary. For LED lights, check the wiring connections to the LED module itself. You may need to replace the entire light assembly if the LED module is faulty.
6. Investigate the Truck's Wiring Harness
The wiring harness that connects the trailer connector to the truck's electrical system can be damaged by corrosion, abrasion, or rodent damage. This is a more involved process, as it requires tracing the wiring harness from the trailer connector back to the source (usually a wiring module or fuse box).
How to check: Visually inspect the wiring harness for any signs of damage. Look for frayed wires, cracked insulation, or corroded connectors. Use a multimeter to test the continuity of each wire in the harness. If you find any damaged wires, repair them by splicing in new wire sections and properly insulating the connections. Consider using heat shrink tubing for a more durable and weather-resistant repair.
7. Advanced Troubleshooting: The Vehicle Wiring Module
Many modern vehicles, including the Nissan Frontier, use a vehicle wiring module (also known as a trailer light control module) to manage the trailer lights. This module protects the truck's electrical system from overloads and short circuits and provides a clean, stable power supply to the trailer lights. If the vehicle wiring module is faulty, it can cause a variety of trailer light problems.
Identifying a Faulty Module: A faulty vehicle wiring module can exhibit several symptoms, including: No trailer lights working, Intermittent trailer light operation, Blown trailer light fuses, and Error codes related to trailer lights.
Testing the Module: Testing the vehicle wiring module typically requires a scan tool that can communicate with the module and read diagnostic trouble codes (DTCs). The scan tool can also be used to activate the trailer light circuits and verify that the module is functioning correctly. This step often requires professional assistance.
Replacing the Module: Replacing the vehicle wiring module usually involves disconnecting the battery, removing the old module, and installing the new module. The new module may need to be programmed to the vehicle using a scan tool. This also often requires professional assistance.
Tools You'll Need
Successfully troubleshooting trailer light problems requires a few basic tools:
- Multimeter: For testing voltage, continuity, and resistance.
- Trailer light tester: A convenient tool for quickly testing each circuit.
- Wire stripper/crimper: For repairing or replacing wiring.
- Electrical tape or heat shrink tubing: For insulating wire connections.
- Wire brush or electrical contact cleaner: For cleaning corroded connectors.
- Fuse puller: For safely removing fuses.
- Screwdrivers and pliers: For general disassembly and reassembly.
- Owner's manual: Crucial for locating fuses and understanding the wiring diagram.
Preventive Maintenance
The best way to avoid trailer light problems is to perform regular preventive maintenance. Here are a few tips:
- Clean the trailer connector regularly with electrical contact cleaner.
- Inspect the trailer wiring harness for damage and repair any frayed wires.
- Check the trailer lights regularly to ensure they're working properly.
- Apply dielectric grease to the trailer connector pins to prevent corrosion.
- Store your trailer in a dry place to minimize corrosion.
Troubleshooting trailer light issues on your Nissan Frontier can seem daunting, but by following a systematic approach and understanding the basics of the wiring system, you can often diagnose and resolve the problem yourself. Remember to prioritize safety and always disconnect the battery before working on electrical components. If you're uncomfortable working with electrical systems, it's always best to consult a qualified mechanic.