Nissan Pathfinder Front Window Replacement
The replacement of a front windshield, while seemingly straightforward, is a complex process that requires precision and an understanding of automotive engineering principles. This guide dissects the intricacies of replacing the front windshield on a Nissan Pathfinder, offering insights into the tools, techniques, and considerations involved.
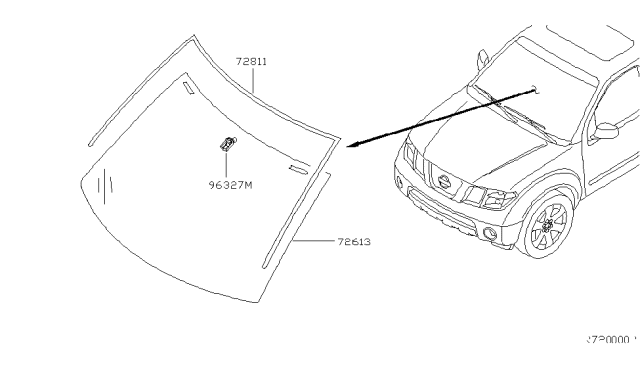
Understanding the Structural Role of the Windshield
The windshield isn't merely a transparent barrier against the elements; it's a critical structural component of the vehicle. Modern vehicles, including the Nissan Pathfinder, are designed with a unibody construction. In this design, the windshield contributes significantly to the vehicle's torsional rigidity, especially in rollover accidents. This is why a proper installation, adhering to manufacturer specifications, is paramount for safety.
Essential Tools and Materials
Before commencing the replacement, gather the necessary tools and materials. Using the correct tools minimizes the risk of damaging the vehicle's body or compromising the new windshield.
- Windshield Removal Tool (Cold Knife or Wire Cut-Out Tool): A cold knife is used to carefully cut through the adhesive bead that secures the old windshield. A wire cut-out tool utilizes a specialized wire pulled through the adhesive. Choosing the right tool depends on preference and experience.
- Urethane Adhesive Removal Tool: This tool is designed to shave down the old urethane bead on the pinch weld after windshield removal, creating a clean surface for the new adhesive.
- Suction Cups (Windshield Handling): Heavy-duty suction cups are essential for safely lifting and maneuvering the old and new windshields.
- Urethane Adhesive Gun: A specialized caulking gun designed for applying the urethane adhesive.
- Urethane Primer: This is applied to the pinch weld and the frit band (black ceramic band around the edge) of the new windshield to promote adhesion and prevent corrosion.
- Glass Cleaner: For cleaning the new windshield and the pinch weld area.
- Razor Blades/Scrapers: For cleaning and removing any remaining debris.
- Gloves and Safety Glasses: Essential for personal protection.
- Heat Gun (Optional): Can be used to soften the old urethane adhesive, making removal easier. Use with caution to avoid damaging the paint.
- New Windshield: Ensure the replacement windshield is the correct part number and specifications for your specific Nissan Pathfinder model and year.
- Urethane Adhesive: Use a high-quality urethane adhesive specifically formulated for automotive windshield installation. Pay attention to the expiration date.
- Pinch Weld Primer: This is applied to any bare metal on the pinch weld to prevent rust.
- Setting Blocks/Spacers: These small blocks are placed around the perimeter of the windshield opening to ensure proper alignment and spacing during installation.
Detailed Removal Procedure
The removal process requires patience and precision. Rushing can lead to damage to the vehicle's paint or the windshield opening.
- Preparation: Protect the vehicle's hood, fenders, and dashboard with protective covers. Disconnect the negative battery terminal to prevent accidental short circuits. Remove the windshield wipers and any exterior trim pieces that overlap the windshield.
- Cutting the Adhesive: Using the chosen windshield removal tool (cold knife or wire cut-out tool), carefully cut through the urethane adhesive bead around the entire perimeter of the windshield. Start from a corner and maintain a consistent angle to avoid damaging the pinch weld. If using a wire cut-out tool, ensure the wire doesn't overheat, which can cause it to break. A slight sawing motion is most effective.
- Windshield Removal: Once the adhesive is completely cut, use suction cups to carefully lift the windshield out of the opening. Work with a partner for easier and safer removal. Be prepared for the windshield to suddenly release.
- Pinch Weld Preparation: This is perhaps the most critical step. Use the urethane adhesive removal tool to carefully shave down the old urethane bead on the pinch weld. The goal is to create a clean, smooth, and uniform surface for the new adhesive. Remove all loose debris and old primer. Any imperfections can lead to leaks. If there are any rust spots, treat them with a rust converter and primer.
- Cleaning and Priming: Thoroughly clean the pinch weld with glass cleaner to remove any remaining residue. Apply pinch weld primer to any exposed metal on the pinch weld to prevent rust. Then, apply urethane primer to the remaining urethane and the area where the new urethane will adhere. Follow the manufacturer's instructions for drying time. This primer is crucial for proper adhesion.
- Windshield Preparation: Clean the inner surface of the new windshield, particularly the frit band, with glass cleaner. Apply urethane primer to the frit band, following the manufacturer's instructions.
Installation Procedure: The Key to a Secure Fit
The installation process directly impacts the structural integrity of the windshield and the safety of the vehicle.
- Urethane Application: Using the urethane adhesive gun, apply a consistent and uniform bead of urethane adhesive around the perimeter of the pinch weld. The bead should be of the correct height and width as specified by the adhesive manufacturer. Maintaining a consistent bead is crucial for a proper seal. Consider using a notched nozzle to ensure a consistent bead size.
- Windshield Placement: Carefully lift the new windshield using suction cups and align it with the windshield opening. Lower the windshield into place, ensuring it sits flush against the pinch weld. Setting blocks or spacers can be used to maintain proper alignment and spacing. Press the windshield firmly against the urethane adhesive bead.
- Setting and Curing: Allow the urethane adhesive to cure completely according to the manufacturer's instructions. This typically takes several hours, often 24 hours or more, depending on the ambient temperature and humidity. During this time, avoid driving the vehicle or applying any pressure to the windshield.
- Final Inspection and Trim Installation: Once the urethane adhesive is fully cured, inspect the windshield for any gaps or leaks. Reinstall any exterior trim pieces that were removed and reattach the windshield wipers.
Troubleshooting Common Issues
Even with meticulous preparation, issues can arise. Understanding these potential problems and their solutions is essential.
- Leaks: Leaks are often caused by an inconsistent urethane bead or improper pinch weld preparation. If a leak is detected, the windshield may need to be removed and the installation process repeated.
- Poor Adhesion: Poor adhesion can result from using expired urethane adhesive, improper primer application, or a contaminated pinch weld. Always use fresh, high-quality materials and follow the manufacturer's instructions carefully.
- Wind Noise: Wind noise can indicate a gap between the windshield and the pinch weld. Inspect the installation carefully and address any gaps with additional urethane adhesive if necessary.
- Damaged Pinch Weld: Careless removal of the old windshield can damage the pinch weld. Repair any damage to the pinch weld before installing the new windshield.
Safety Considerations
Safety is paramount when replacing a windshield. Always wear safety glasses and gloves to protect your eyes and skin. Work in a well-ventilated area to avoid inhaling fumes from the urethane adhesive and primer. Dispose of the old windshield properly to prevent injury.
Professional Installation vs. DIY
While this guide provides a comprehensive overview of the windshield replacement process, it's important to acknowledge the complexities involved. Professional installers have the experience, specialized tools, and knowledge to ensure a safe and proper installation. If you are not comfortable performing this task yourself, it's always best to consult with a qualified automotive glass technician. A DIY installation gone wrong can compromise the safety and structural integrity of your vehicle, potentially leading to serious consequences in an accident.
In conclusion, replacing a Nissan Pathfinder's front windshield is a task that blends careful mechanical work with an understanding of structural engineering. By following these guidelines, you'll gain a deeper appreciation for the critical role this seemingly simple piece of glass plays in your vehicle's overall safety and performance.