Nissan Titan Emergency Brake Replacement
Alright, let's talk about replacing the emergency brake, or parking brake, on your Nissan Titan. This isn't the most glamorous job, but it's a crucial safety system. A properly functioning emergency brake can be a lifesaver, especially in hilly areas or if your regular brakes fail. This guide assumes you're comfortable with basic automotive repair and have a decent understanding of vehicle mechanics. If you're unsure about any of the steps, please consult a professional. We'll cover the procedure, special tools you might need, and some common pitfalls to avoid.
Understanding the Nissan Titan Parking Brake System
Before we dive into the replacement, let's quickly review how the Titan's parking brake system works. Most Titans utilize a drum-in-hat system for the parking brake. This means the parking brake shoes operate inside a small drum located within the rear brake rotor (the "hat"). When you engage the parking brake lever or pedal, a cable pulls on a lever within the drum, forcing the shoes outward against the drum's inner surface, creating friction and preventing the wheels from turning.
It's important to note that some older Titan models might use a different parking brake setup, so always refer to your vehicle's repair manual for specific details. Also, the electronic parking brake system found in some newer Titans has a significantly different procedure and often requires specialized diagnostic equipment, which we won't cover in this article.
Tools and Materials Needed
Gather your tools and materials before starting. This will save you time and frustration later. Here's what you'll likely need:
- New Parking Brake Shoes: Make sure you get the correct part number for your Titan's year and model.
- Parking Brake Hardware Kit: This typically includes new springs, retainers, and adjusters. Replacing these is highly recommended, as they often corrode and weaken over time.
- Brake Cleaner: For cleaning brake components.
- Penetrating Oil: For loosening rusted bolts and components.
- High-Temperature Brake Grease: Specifically formulated for brake systems.
- Wheel Chocks: Essential for safety.
- Jack and Jack Stands: To safely lift and support the vehicle.
- Lug Wrench: For removing the wheels.
- Socket Set and Wrenches: Various sizes will be needed.
- Screwdrivers: Both flathead and Phillips head.
- Pliers: Regular and needle-nose pliers.
- Brake Spring Tool: This tool is specifically designed for installing and removing brake springs. It makes the job much easier.
- Brake Adjusting Tool (Spoon): This tool is used to adjust the parking brake shoes.
- Torque Wrench: For tightening bolts to the correct specification.
- Safety Glasses and Gloves: Always protect yourself.
- Repair Manual (Recommended): Provides detailed instructions and torque specifications specific to your vehicle.
Step-by-Step Emergency Brake Shoe Replacement
Now, let's get to the actual replacement. Remember to work on one side at a time so you can use the other side as a reference if needed.
Step 1: Preparation and Safety
Chock the front wheels to prevent the vehicle from rolling. Loosen the lug nuts on the rear wheel you'll be working on. Jack up the rear of the vehicle and securely support it with jack stands. Never work under a vehicle supported only by a jack. Remove the wheel.
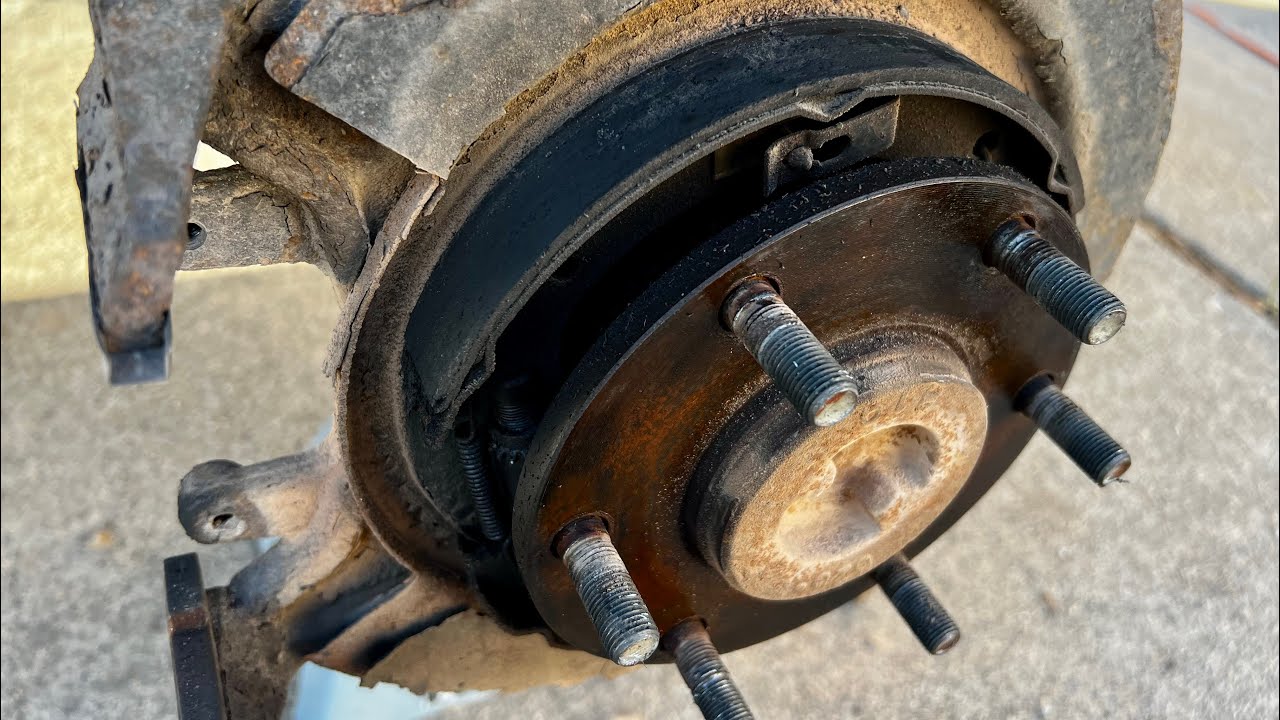
Step 2: Rotor Removal
Before removing the rotor, release the parking brake completely. This is crucial; otherwise, you won't be able to remove the rotor. If the rotor is stuck, try tapping it gently with a rubber mallet. You can also use penetrating oil around the hub to help loosen it. Some rotors have threaded holes that allow you to use bolts to push the rotor off the hub. If yours does, insert bolts into these holes and tighten them gradually to push the rotor off. Be patient and avoid excessive force, as you don't want to damage the hub or rotor. If the rotor is severely corroded to the hub, you may need to use a wheel puller.
Step 3: Inspect and Clean
With the rotor removed, you'll have access to the parking brake shoes and hardware. Take a good look at the components. Note how the springs, retainers, and adjusters are positioned. This will be helpful when reassembling everything. Use brake cleaner to thoroughly clean all the brake components. This will remove brake dust and debris.
Step 4: Parking Brake Shoe Removal
Using your brake spring tool, carefully remove the brake shoe retaining springs. These springs are under tension, so be cautious. Next, remove the shoe hold-down pins and retainers. Disconnect the parking brake cable from the lever on the leading shoe. You may need to use pliers to compress the cable spring. Now, you can remove the old parking brake shoes and the adjuster mechanism.
Step 5: Adjuster Disassembly and Cleaning
The adjuster mechanism is responsible for maintaining the correct shoe-to-drum clearance. Disassemble the adjuster and clean all the parts thoroughly. Apply a small amount of high-temperature brake grease to the threads of the adjuster screw to prevent corrosion and ensure smooth operation. If the adjuster is heavily corroded or damaged, replace it.
Step 6: Installation of New Parking Brake Shoes and Hardware
Install the new parking brake shoes and hardware in the reverse order of removal. Start by attaching the parking brake cable to the lever on the leading shoe. Then, install the adjuster mechanism. Make sure the adjuster is properly oriented. Install the shoe hold-down pins and retainers. Finally, use your brake spring tool to install the brake shoe retaining springs. Double-check that all the components are correctly positioned and securely fastened.
Step 7: Parking Brake Adjustment
This is a crucial step. The parking brake must be properly adjusted for it to function correctly. Using your brake adjusting tool (spoon), turn the adjuster screw until the brake shoes make contact with the inside of the rotor drum. You should feel a slight drag when rotating the adjuster. Back off the adjuster a few clicks until the rotor can be installed without significant drag. The goal is to have minimal clearance between the shoes and the drum, but not so much that the shoes are constantly rubbing. The specific adjustment procedure can be found in your vehicle's repair manual.
Step 8: Rotor Installation
Carefully install the rotor back onto the hub. Make sure the rotor is properly seated. Reinstall the wheel and tighten the lug nuts to the manufacturer's specified torque. Lower the vehicle and remove the jack stands.
Step 9: Final Adjustment and Testing
With the vehicle on the ground, pump the brake pedal several times to seat the parking brake shoes. Engage and disengage the parking brake several times. The parking brake should engage firmly and release completely. If the parking brake travel is excessive or the brakes are dragging, you may need to readjust the parking brake shoes. The final adjustment is typically done at the parking brake lever or pedal. Refer to your vehicle's repair manual for the specific adjustment procedure.
Common Pitfalls and Tips
- Rusted Components: Be prepared for rusted bolts and components. Penetrating oil is your friend. If a bolt is severely rusted, consider using a torch to heat it up before attempting to remove it.
- Incorrect Shoe Installation: Pay close attention to the orientation of the parking brake shoes and hardware. Installing them incorrectly can prevent the parking brake from functioning properly.
- Over-Tightening the Adjuster: Over-tightening the adjuster can cause the parking brake shoes to drag, leading to premature wear and overheating.
- Ignoring the Hardware Kit: Don't reuse old springs and retainers. They are inexpensive and can significantly impact the performance of the parking brake.
- Brake Dust: Brake dust contains hazardous materials. Avoid breathing it in. Wear a dust mask or respirator when working on brake systems.
- Cleaning: Clean all parts thoroughly. This is crucial.
- Use a reference: Only work on one side at a time. This allows you to look at the other side for reference if you encounter a problem during reassembly. Take pictures.
Replacing the parking brake shoes on your Nissan Titan is a manageable task for the experienced DIYer. By following these steps and taking your time, you can ensure that your parking brake system is functioning correctly and safely. Remember to always prioritize safety and consult a professional if you are unsure about any of the steps.