Nx1600 Digital Cluster In A 240sx: A Unique Interior Mod
The Nissan 240SX, particularly the S13 and S14 chassis, enjoys a legendary status in the drifting, track, and general automotive enthusiast communities. Known for their affordability, readily available parts, and inherent potential for modification, these cars serve as a blank canvas for owners to express their automotive vision. While engine swaps and suspension upgrades are common modifications, interior enhancements often take a backseat. This article delves into a more niche and technically intriguing modification: the installation of a Nissan NX1600 digital cluster into a 240SX.
Why the NX1600 Cluster?
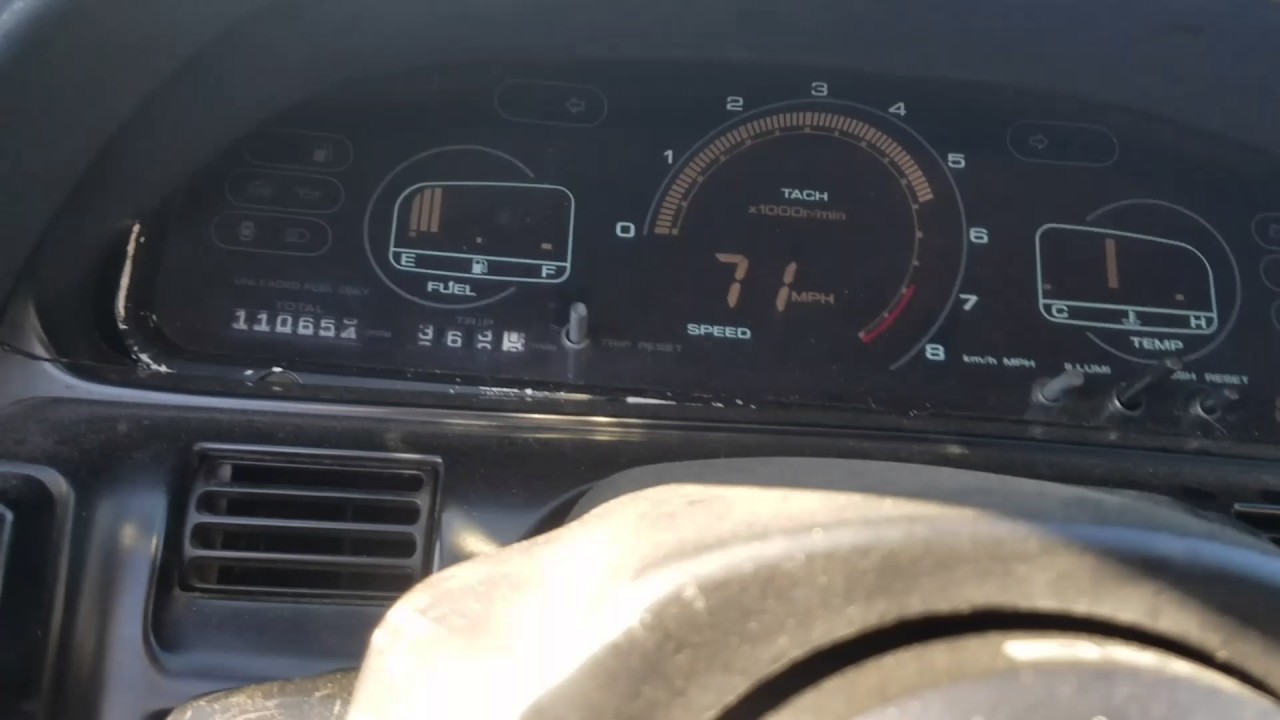
The appeal of the NX1600 digital cluster lies in its rarity and distinct aesthetic. Unlike the analog gauges prevalent in most 240SX models, the NX1600 unit features a futuristic, vacuum fluorescent display (VFD) that presents speed, RPM, fuel level, and temperature in a clear, digital format. This digital display offers a unique departure from the traditional look and adds a touch of 90s technological charm to the 240SX's interior.
Beyond aesthetics, the swap presents a stimulating technical challenge. Integrating a digital cluster into a car originally designed for analog gauges requires careful consideration of wiring, sensor signals, and potentially even adapting physical mounting points.
Understanding the Key Components
1. The NX1600 Digital Cluster
This is the heart of the operation. The cluster itself contains the VFD display, a processing unit that interprets sensor signals, and various connectors for power, ground, and data input. Crucially, sourcing a fully functional cluster is paramount. Test the unit before committing to the swap to avoid troubleshooting a faulty display after installation.
2. 240SX Analog Gauge Cluster
The original 240SX cluster serves as the baseline for comparison. Understanding its wiring diagram is crucial for identifying the correct signals needed to drive the NX1600 cluster. The 240SX cluster sends analog signals for speed, RPM, fuel level, and temperature, whereas the NX1600 cluster requires these to be translated and compatible.
3. Wiring Harnesses and Connectors
This is where the meticulous work begins. Modifying the existing wiring harness or creating a custom adapter harness is essential. High-quality automotive-grade wiring, connectors, and terminals are critical for a reliable and safe installation. Consider using a crimping tool specifically designed for automotive terminals to ensure secure connections.
4. Speed Signal Conversion (Potentially Required)
One of the most common hurdles is the speed signal. The 240SX typically uses a mechanical speed sensor in the transmission that sends pulses to the analog gauge. The NX1600 may require a different pulse count or even a digital signal. A speed signal converter might be necessary to translate the 240SX's signal into a format the NX1600 cluster can understand. Research thoroughly to determine compatibility and the specific conversion required.
5. RPM Signal
The RPM signal is typically a square wave signal generated by the engine's ignition system. Both the 240SX and NX1600 likely use a similar signal type, but the voltage levels might differ. Check the wiring diagrams for both vehicles to ensure the signal strength is compatible.
6. Fuel Level and Temperature Sensors
The fuel level and temperature sensors usually operate based on variable resistance. As the fuel level or engine temperature changes, the resistance of the sensor changes, which is then interpreted by the gauge. The NX1600 cluster needs to be calibrated to the resistance range of the 240SX sensors. This may require adjusting the sensor readings, or in some cases, finding sensors that are compatible with both the 240SX and the NX1600 cluster.
The Installation Process: A Step-by-Step Overview
Disclaimer: This is a simplified overview and should not be considered a complete installation guide. Always consult wiring diagrams and seek professional assistance if you are unsure about any aspect of the installation.
- Preparation: Disconnect the battery to prevent electrical shorts. Gather all necessary tools, including a multimeter, wiring strippers, crimpers, soldering iron (optional), and wiring diagrams.
- Removal of the 240SX Cluster: Carefully remove the existing 240SX gauge cluster. Document the wiring connections before disconnecting them. Take clear photos or draw a diagram to aid in reconnection if needed.
- Wiring Identification: Compare the wiring diagrams of the 240SX and NX1600 clusters. Identify the corresponding wires for power, ground, speed, RPM, fuel level, temperature, and any other relevant signals. This is arguably the most critical step. Incorrect wiring can damage the cluster or the car's electrical system.
- Harness Modification/Creation: Modify the existing 240SX wiring harness or create a custom adapter harness to connect the NX1600 cluster. Use appropriate connectors to ensure secure and reliable connections. Solder and heat shrink connections where possible for added durability.
- Speed Signal Conversion (If Required): Install the speed signal converter according to its manufacturer's instructions. Connect the input signal from the 240SX speed sensor and the output signal to the NX1600 cluster.
- Initial Testing: Before fully installing the NX1600 cluster, perform a preliminary test. Reconnect the battery and turn the ignition key to the "on" position. Check if the cluster powers up and displays basic information. Monitor the voltage and signal levels with a multimeter to ensure they are within the expected range.
- Cluster Mounting: The NX1600 cluster may not directly fit into the 240SX's gauge cluster housing. Fabrication or modification of the housing may be necessary. Ensure the cluster is securely mounted and does not interfere with any other components.
- Final Installation and Testing: Once the cluster is securely mounted and all wiring connections are verified, perform a final test drive. Monitor the speed, RPM, fuel level, and temperature readings to ensure they are accurate. If any discrepancies are observed, troubleshoot the wiring connections or signal conversion as needed.
Potential Challenges and Solutions
- Speedometer Calibration: The speedometer reading may be inaccurate due to differences in the speed sensor or gear ratios. An adjustable speed signal converter can be used to fine-tune the speedometer calibration.
- Fuel Level Sensor Compatibility: The fuel level readings may be inaccurate or inconsistent. Ensure the fuel level sensor resistance range matches the NX1600 cluster's requirements. Replacing the fuel level sensor with a compatible unit may be necessary.
- Dimming Functionality: The NX1600 cluster may have a dimming function that is not compatible with the 240SX's dimmer switch. A separate dimmer control or a resistor can be used to adjust the brightness of the cluster.
- Warning Lights: Integrating the warning lights (e.g., check engine, oil pressure) may require additional wiring and signal adaptation. Consult the wiring diagrams and consider using relays or other electronic components to ensure proper functionality.
Conclusion
Installing an NX1600 digital cluster in a 240SX is a challenging but rewarding modification. It requires a solid understanding of automotive electrical systems, wiring diagrams, and signal conversion techniques. While the process can be complex and time-consuming, the end result is a unique and eye-catching interior upgrade that sets the car apart. Thorough research, meticulous planning, and careful execution are essential for a successful installation. Remember to prioritize safety and seek professional assistance if needed. The blend of classic chassis and futuristic display creates a conversation piece and a testament to the owner's dedication to personalization and automotive craftsmanship. The digital glow of the NX1600 cluster nestled within the 240SX cockpit is a subtle nod to the past, a bold statement in the present, and a thrilling glimpse into the future of automotive customization.