Painting And Detailing A 1/10 Scale Nissan 240sx Rc Drift Body Shell
Painting and detailing a 1/10 scale Nissan 240SX RC drift body shell is a rewarding process that transforms a clear, blank canvas into a miniature representation of a high-performance machine. It's an exercise in precision, patience, and understanding of materials and techniques. This guide will delve into the intricacies of achieving a professional-looking finish, focusing on the "why" behind each step to empower you with the knowledge to adapt and troubleshoot.
I. Preparation: Laying the Groundwork for Success
The quality of the final paint job hinges heavily on the preparation. This stage involves cleaning, masking, and ensuring a pristine surface ready to accept paint.
A. Cleaning the Body Shell: Removing Mold Release Agent
RC body shells are typically molded from polycarbonate (Lexan), and during the molding process, a release agent is applied to facilitate separation from the mold. This agent leaves a residue that will prevent paint from adhering properly, leading to fisheyes and peeling. Therefore, thorough cleaning is paramount.
Procedure:
- Wash the inside of the body shell with warm water and a mild dish soap (like Dawn). Avoid harsh chemicals, as they can damage the polycarbonate.
- Use a soft-bristled brush or sponge to scrub the entire surface, paying particular attention to corners and crevices.
- Rinse thoroughly with clean water, ensuring no soap residue remains.
- Allow the body shell to air dry completely. Avoid using a cloth, as it can introduce lint and static electricity.
Why this works: Dish soap effectively removes the oily mold release agent without damaging the polycarbonate. Complete drying is essential because water droplets trapped under the paint will cause blemishes.
B. Masking: Defining the Design
Masking is the art of selectively covering areas of the body shell to create different colors and designs. The choice of masking material and technique significantly impacts the sharpness and cleanliness of the final result.
Materials:
- Liquid Mask: This is applied as a liquid and dries into a flexible film. Ideal for complex shapes and intricate designs. Requires patience and practice to apply evenly.
- Masking Tape (specifically for RC bodies): Available in various widths. Choose a tape with low tack to avoid lifting the paint when removed. Tamiya masking tape is a popular choice for its flexibility and clean edges.
- Masking Sheets: Large sheets of masking material that can be cut into custom shapes using a hobby knife or plotter cutter.
Procedure:
- Plan your design carefully. Sketch it out on paper or digitally to visualize the layout.
- Apply the masking material to the inside of the body shell. For simple shapes, use masking tape, overlapping edges slightly. For complex shapes, consider using liquid mask or precut vinyl masks.
- Burnish the edges of the masking material with a smooth, hard object (like the back of a spoon or a specialized burnishing tool) to ensure a tight seal. This prevents paint from bleeding under the mask.
- For multi-color schemes, mask the areas that will be the *first* color applied.
Why this works: Masking tape and liquid mask create a barrier that prevents paint from reaching the underlying surface. Burnishing ensures a tight seal, minimizing paint bleed. Applying colors in the correct order (usually from darkest to lightest) allows for easier corrections and cleaner transitions.
C. Cutting and Trimming: Accuracy is Key
Before painting, the body shell must be accurately cut and trimmed to fit the chassis. This step requires careful measurements and precise cuts.
Tools:
- Lexan Scissors: Designed specifically for cutting polycarbonate, these scissors provide clean, curved cuts.
- Hobby Knife: For precise trimming and detail work. Use a sharp blade and replace it frequently.
- Body Reamer: Used to create perfectly round holes for body posts and antennas.
- Ruler and Marker: For accurate measurements and marking cut lines.
Procedure:
- Carefully cut along the marked cut lines using Lexan scissors. Start with rough cuts, leaving a small amount of excess material.
- Use a hobby knife to trim the excess material, creating a smooth and even edge.
- Use a body reamer to create holes for body posts and antennas. Start with a small hole and gradually enlarge it to the desired size.
Why this works: Lexan scissors provide clean cuts without cracking the polycarbonate. A sharp hobby knife allows for precise trimming. A body reamer creates clean, round holes without damaging the surrounding material.
II. Painting: Applying the Color
The painting process requires the right paint, proper technique, and attention to detail. Consistent and even coats are essential for a professional-looking finish.
A. Choosing the Right Paint: Lexan-Specific Formulations
Only use paints specifically designed for polycarbonate RC bodies. These paints are flexible and will not crack or peel when the body shell flexes during use. Tamiya PS paints and Parma Faskolor paints are common choices.
Types of Paint:
- Spray Paint: Convenient and easy to use, especially for larger areas. Requires proper ventilation and technique to avoid runs and uneven coverage.
- Airbrush Paint: Offers greater control and precision, ideal for detailed work and custom designs. Requires an airbrush and compressor.
Why this is important: Regular paints are not flexible and will crack and flake off when the polycarbonate bends. Lexan-specific paints are formulated to adhere to the plastic and maintain their integrity under stress.
B. Painting Technique: Thin, Even Coats
The key to a good paint job is applying thin, even coats. Avoid the temptation to apply thick coats, as this will lead to runs, drips, and uneven drying.
Procedure:
- Shake the paint can thoroughly for at least two minutes.
- Hold the can approximately 10-12 inches from the body shell.
- Apply a light, even coat of paint, moving the can in a smooth, back-and-forth motion.
- Allow the paint to dry completely (usually 15-30 minutes) before applying the next coat.
- Apply multiple thin coats until the desired color depth is achieved.
- For airbrushing, thin the paint according to the manufacturer's instructions. Use low pressure (around 20-25 psi) and apply thin, even coats.
Why this works: Thin coats allow the paint to dry evenly and prevent runs. Multiple coats build up the color gradually, resulting in a smoother and more durable finish.
C. Backing Colors: Enhancing the Depth and Durability
Backing colors are applied to the inside of the body shell to enhance the depth and vibrancy of the main colors, as well as provide added durability. White is a common backing color, but other colors can be used to create unique effects.
Procedure:
- After the main colors have been applied and have dried completely, apply a backing color to the entire inside of the body shell.
- White is a common choice, as it brightens the colors and prevents light from shining through.
- Black can be used to create a darker, more subdued look.
- Metallic colors can add shimmer and depth.
Why this works: Backing colors provide a solid, opaque layer that enhances the vibrancy of the main colors and protects them from scratches and fading. They also prevent light from shining through the body shell, creating a more realistic appearance.
III. Detailing: Adding the Finishing Touches
Detailing is what elevates a good paint job to a great one. It involves adding small details that bring the body shell to life.
A. Window Trim and Lights: Defining the Features
Window trim and lights are essential details that add realism to the body shell. These can be painted, masked, or applied using decals.
Techniques:
- Painting: Mask off the areas around the windows and lights and spray paint them black or silver.
- Decals: Use precut decals to add window trim and lights. These are easy to apply and provide a clean, professional look.
- Markers: Fine-tipped permanent markers can be used to add small details, such as window trim and panel lines.
Why this works: Window trim and lights define the features of the car and add realism. Using a combination of painting, decals, and markers allows for a high level of detail.
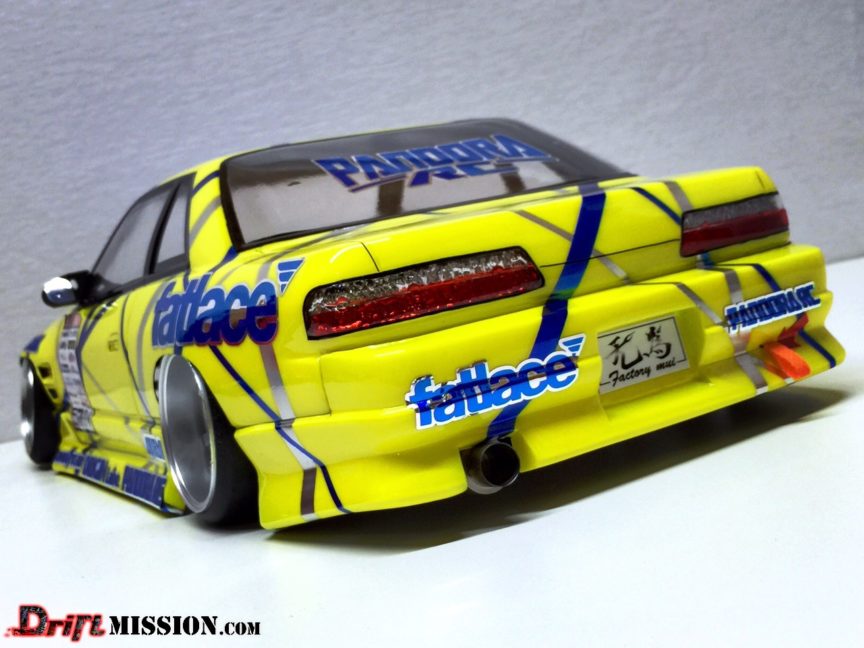
B. Decals and Graphics: Adding Personality
Decals and graphics can be used to add logos, racing stripes, and other details that give the body shell a unique personality. High-quality decals are essential for a professional look.
Types of Decals:
- Vinyl Decals: Durable and easy to apply, vinyl decals are a popular choice for RC body shells.
- Water-Slide Decals: These decals are applied using water and require careful handling. They provide a very thin and realistic look.
Procedure:
- Clean the surface of the body shell where the decal will be applied.
- Carefully peel the decal from the backing paper.
- Position the decal on the body shell and smooth it out, removing any air bubbles.
- For water-slide decals, soak the decal in water for a few seconds, then slide it off the backing paper and onto the body shell.
Why this works: Decals add personality and detail to the body shell. High-quality decals are durable and resistant to fading and peeling.
C. Clear Coat: Protecting the Finish
A clear coat is applied as a final layer to protect the paint and decals from scratches and fading. It also adds a glossy sheen to the body shell.
Types of Clear Coat:
- Lexan-Specific Clear Coat: Designed for polycarbonate, this clear coat is flexible and will not crack or peel.
- Automotive Clear Coat: Can be used, but requires careful application and may not be as durable as Lexan-specific clear coat.
Procedure:
- Apply a thin, even coat of clear coat to the entire outside of the body shell.
- Allow the clear coat to dry completely (usually 24 hours).
- Apply a second coat of clear coat for added protection and gloss.
Why this works: Clear coat protects the paint and decals from scratches and fading, extending the life of the paint job. It also adds a glossy sheen that enhances the appearance of the body shell.
By following these steps and paying attention to detail, you can create a stunning 1/10 scale Nissan 240SX RC drift body shell that reflects your personal style and skills. Remember that practice makes perfect, so don't be afraid to experiment and learn from your mistakes. The journey is just as rewarding as the final product!