Part Numbers And Replacement Procedure For The 240sx Alternator Belt
Okay, so your 240SX is making that dreaded squealing noise, especially when you first start it up, or when you crank the steering wheel hard? Chances are, it's your alternator belt. Don't worry, it's a fairly common issue with these cars, and replacing it is a manageable DIY project for most owners. This guide will walk you through finding the right part and getting the job done.
Identifying the Right Part Number
Before you even think about touching your 240SX, you need to get the correct replacement belt. Using the wrong belt can lead to performance issues, premature wear, or even damage to your accessories. Here's how to ensure you get the right one:
Engine Variation Matters!
The 240SX came with two main engine variants that you should be aware of:
- KA24E (Single Overhead Cam): Found in the earlier models (typically 1989-1990).
- KA24DE (Dual Overhead Cam): Found in the later models (typically 1991-1998).
While the engines are similar, their belt configurations and lengths may differ. Always confirm which engine you have. Look at your valve cover. The KA24E will have a slimmer valve cover with a single cam gear visible. The KA24DE will have a wider valve cover with two cam gears visible.
Common Part Numbers
Here are some common part numbers to get you started. However, always double-check fitment with your specific vehicle year and engine type using your local auto parts store's lookup system!
- For KA24E engines, a common belt number is Dayco 15440 or Gates K040338.
- For KA24DE engines, a common belt number is Dayco 15455 or Gates K040348.
These part numbers are a good starting point, but manufacturers can change them, so always verify compatibility before purchasing. Websites like RockAuto and Amazon, along with your local parts store's computer system, will usually ask for your car's year and engine type to ensure the part fits.
Don't Skimp on Quality
While cheaper belts are available, it's generally a good idea to invest in a reputable brand like Dayco, Gates, or Bando. A higher-quality belt will usually last longer and resist cracking or stretching, saving you time and money in the long run. This is especially true if you drive your 240SX hard or live in a hot climate.
Replacement Procedure: Step-by-Step
Now that you have the right belt, let's get to the replacement. This job is rated as medium difficulty and typically takes about 30-60 minutes, depending on your experience.
Tools You'll Need
- Socket Set: A standard socket set with metric sizes is essential. You'll likely need a 12mm, 14mm, and possibly a 10mm socket.
- Wrench Set: Similar to the socket set, a metric wrench set is necessary.
- Ratchet: A standard ratchet will make loosening and tightening bolts much easier.
- Extension Bars: An extension bar or two can be very helpful for reaching some of the bolts.
- Screwdriver (Flathead): Useful for prying if necessary.
- Belt Tension Gauge (Optional but Recommended): This tool helps you properly tension the new belt, preventing slippage and premature wear. If you don't have one, use the "rule of thumb" which is the deflection of the belt should be around 1/4" in the middle of the longest span with moderate thumb pressure.
- Gloves: Protect your hands from dirt and grime.
- Safety Glasses: Protect your eyes from debris.
Step-by-Step Instructions
- Safety First! Disconnect the negative (-) terminal of your battery. This prevents accidental electrical shorts during the process.
- Locate the Alternator. The alternator is usually located at the front of the engine. Trace the belt you want to replace to identify it.
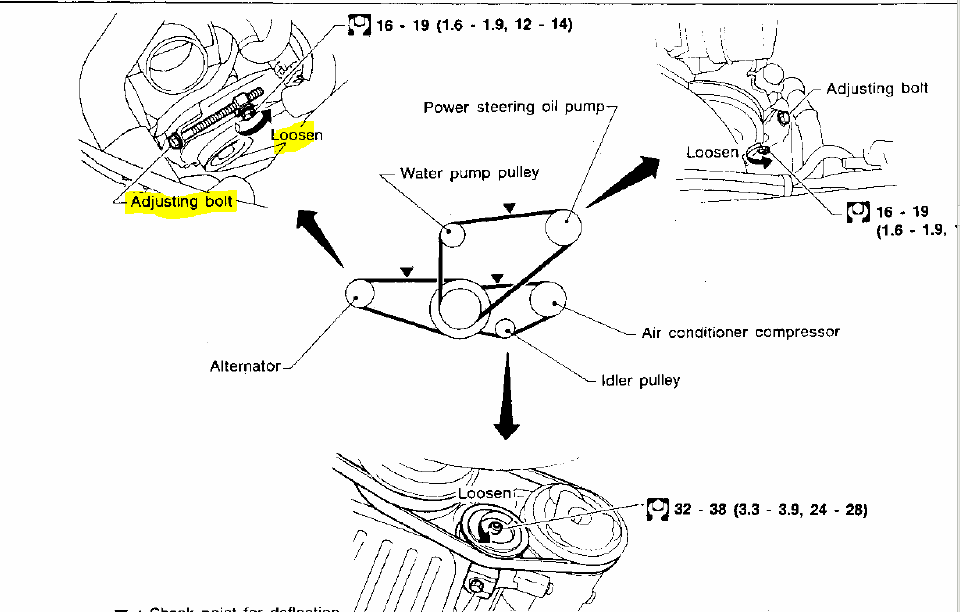
- Loosen the Alternator Adjustment Bolt. The alternator is held in place by a bracket that allows it to pivot, providing tension on the belt. Locate the bolt that secures this bracket. This is usually on the side of the alternator. Loosen this bolt, but don't remove it completely.
- Loosen the Tensioner Bolt(s). There are usually two tensioner bolts. One is used to slide the alternator to loosen the belt. The other is a locking bolt that needs to be loose before you can adjust the tension. Usually, the locking bolt is located close to the adjustment bolt you loosened previously. The adjustment bolt is located at the bottom and is longer. Loosen both bolts, but don't remove them completely.
- Relieve Tension on the Belt. With the adjustment and locking bolts loose, you should be able to push the alternator towards the engine. This will create slack in the belt. You can use a pry bar *gently* to assist, but be careful not to damage anything.
- Remove the Old Belt. Once there's enough slack, carefully slip the old belt off the alternator pulley, then off the other pulleys it runs on (typically the crankshaft pulley and water pump pulley).
- Inspect the Pulleys. Before installing the new belt, inspect the pulleys for any signs of damage, such as cracks, chips, or excessive rust. If you find any problems, address them before proceeding. Clean them with a wire brush if necessary.
- Install the New Belt. Route the new belt around all the pulleys in the correct order, ensuring it sits properly in the grooves. Double-check the routing diagram on the engine bay sticker (if present) or consult a service manual if needed.
- Tension the New Belt. Use the adjustment bolt to pull the alternator away from the engine, applying tension to the belt. Use a belt tension gauge to adjust the tension to the manufacturer's specifications (consult your service manual). If you don't have a gauge, apply moderate thumb pressure to the belt between the longest span. You should be able to deflect the belt about 1/4 inch.
- Tighten the Tensioner and Adjustment Bolts. Once the belt is properly tensioned, tighten the tensioner bolt and the adjustment bolt to secure the alternator in place. Make sure both bolts are nice and tight.
- Double-Check Everything. Before starting the engine, double-check that the belt is properly seated on all pulleys and that all bolts are tightened.
- Reconnect the Battery. Reconnect the negative (-) terminal of your battery.
- Start the Engine. Start the engine and listen for any unusual noises, such as squealing or slippage. If you hear anything, re-check the belt tension and alignment.
Troubleshooting and Common Issues
Sometimes things don't go as planned. Here are some common problems you might encounter and how to deal with them:
- Squealing Noise After Replacement: This usually indicates the belt is not tight enough. Re-tension the belt following the steps above. It's also possible the new belt needs a little time to "break in" and the squealing may diminish after a short drive.
- Belt Slipping Off: This could be caused by a misaligned pulley, a damaged pulley, or a belt that is too loose. Inspect the pulleys for damage and ensure the belt is properly routed. If the pulleys are aligned, and the belt is properly tensioned, you may have the wrong belt.
- Difficulty Loosening Bolts: If the bolts are seized, try using penetrating oil and letting it soak for a while before attempting to loosen them. Be patient and avoid stripping the bolt heads.
Estimated Repair Costs
If you decide to have a professional mechanic replace the alternator belt, the cost will typically range from $80 to $150, including parts and labor. The belt itself usually costs between $15 and $30, and the labor time is typically around 0.5 to 1 hour. Doing it yourself, you'll only pay for the belt.
Preventative Maintenance
To prolong the life of your alternator belt and other accessory belts, consider the following:
- Regular Inspection: Inspect your belts regularly for signs of wear, such as cracks, fraying, or glazing.
- Proper Tension: Maintain proper belt tension to prevent slippage and premature wear.
- Avoid Oil Contamination: Oil leaks can damage the belt material. Repair any oil leaks promptly.
- Replace Belts as a Set: If you're replacing one belt, consider replacing all of them at the same time. This can save you time and money in the long run.
Replacing your 240SX alternator belt is a relatively straightforward task that can save you money and keep your car running smoothly. By following these steps and taking preventative measures, you can ensure a long and reliable lifespan for your belts and your vehicle.